The post A Beginner’s Guide to Scaling a VPS for Traffic Surges appeared first on DreamHost Blog.
]]>Going viral is great. Unless your site faceplants in front of thousands of people because it can’t handle the traffic.
If you’re hosting on a VPS and gearing up for a big traffic event, now’s the time to ask: “Can my server handle this?” The good news is, with the right preparation, the answer can be a confident yes.
In this guide, we’ll walk you through everything you need to know to scale your VPS for traffic surges — without panic, guesswork, or praying to the server gods. Let’s dive in.
What Is a VPS (and Why Does It Matter When Traffic Spikes)?
A Virtual Private Server (VPS) is a type of web hosting that gives you dedicated resources on a server shared with other users. Unlike shared hosting, where websites compete for the same resources, a VPS uses virtualization technology to create isolated environments — giving you more control, better performance, and the flexibility to scale your site as needed.
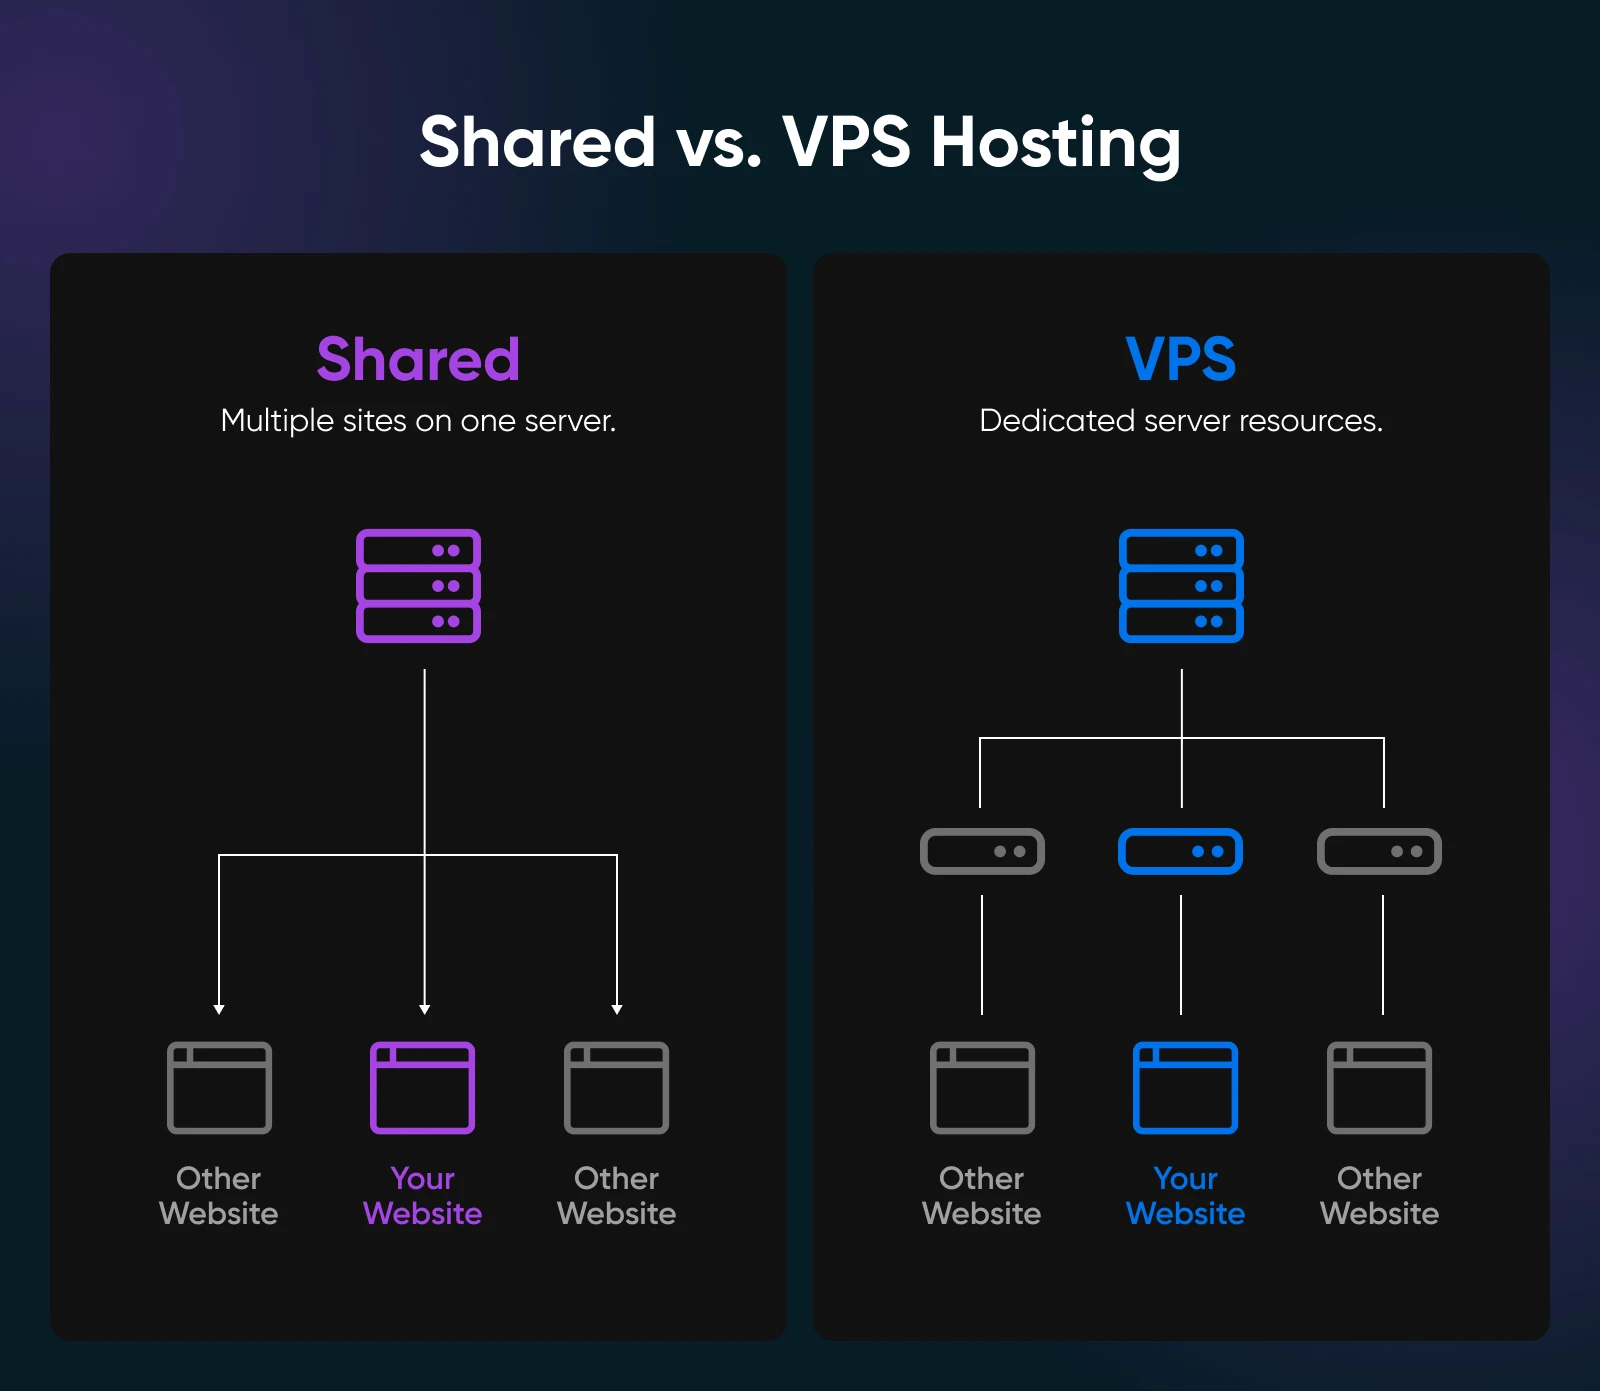
In other words, you get dedicated slices of resources (memory, CPU, storage) that aren’t shared with other sites —as opposed to shared hosting, where your neighbors can hog the server, meaning if one site has a huge spike in traffic, it can slow down everyone else. With a VPS, your site lives in its own isolated “container” with guaranteed resources, so other websites’ traffic surges won’t directly affect you.
Why is this important for scaling? Because while a VPS gives you more control and stability, you still have finite resources allocated to your site.
If your site suddenly needs more CPU or RAM than your plan includes, it can still suffer. But VPS plans are usually very scalable — you can easily add more RAM, CPU, or disk space as your site grows. In other words, a VPS is built to grow with you.

Proactively scaling your VPS before a big traffic event means increasing those resources (and optimizing your setup) ahead of time, so your site stays smooth when the visitors pour in.
It’s kind of like preparing a restaurant for a big dinner rush by adding more tables and staff and prepping ingredients ahead of time. You don’t want to wait until customers are crammed in the lobby to react.
Step-by-Step: How To Scale Your VPS for Traffic Surges
Now, let’s roll up our sleeves and get into why you’re here —this is how you scale your VPS if you anticipate your site will need more of those resources in the near future.
Step 1: Monitor Your Current Traffic and Set a Baseline
You can’t scale what you don’t measure. Start by auditing your current traffic to establish a performance baseline. Use your analytics to review how many visitors you get on a normal day and what your peak traffic looks like. If you use a DreamHost managed hosting plan (including VPS), you can now see built-in traffic analytics on the Traffic Dashboard, seamlessly integrated into the “Manage Websites” section of your customer control panel.
For example, find your average daily visitors and note the times or events when traffic spikes —maybe during past sales or campaigns. Knowing your “normal” versus “busy” traffic levels will help you quantify how big an upcoming surge might be.
Why do this? If you normally have 500 daily users and expect 5,000 during a launch, that’s a 10× jump —a huge strain if you’re unprepared. By identifying patterns (say, traffic doubles every day at 8 p.m., or tends to spike right after you send a newsletter), you can plan server resources for those loads. You want to establish a traffic baseline so you can recognize a true surge and scale accordingly.
Pro tip: Set up real-time analytics or server monitoring now. This will alert you if traffic starts ramping up unexpectedly before the big event.
Step 2: Choose a Flexible VPS Hosting Plan
Next, evaluate your hosting plan. Is your VPS plan flexible enough to handle a spike?
Not all VPS hosts are created equal —you’ll want one that lets you easily dial resources up or down. Check if your provider offers quick upgrades (or even automatic scaling) for CPU, RAM, and bandwidth. The goal is to avoid being stuck on a plan that can’t expand when you need it.
If your current host limits how fast you can scale, consider migrating to one that specializes in scalability (many cloud-based VPS providers allow near-instant resource adjustments). Some VPS hosting plans even have auto-scaling, meaning if traffic increases, the system can allocate more resources on the fly to keep your site stable.
At minimum, make sure you can manually upgrade your VPS plan quickly (within minutes or hours, not days).
Step 3: Allocate Sufficient Resources
Now it’s time to give your VPS those extra lanes of traffic we talked about. Well before the surge hits, allocate more server resources to handle the load. This might mean upgrading your VPS to add RAM, vCPUs (virtual processors), or increasing network bandwidth limits. A smart rule of thumb is to add a healthy buffer on top of your expected needs —roughly 50% extra capacity as a cushion.
For example, if your baseline monitoring from Step 1 suggests you’ll need around 2 GB of RAM to handle normal traffic, consider scaling to ~3 GB RAM for the surge, just to be safe. This margin gives you enough wiggle room to make sure you won’t max out resources if the spike is bigger than predicted.
Pro tip: It’s far better to have a bit too much capacity than to watch your site slow to a crawl or crash because it ran out of RAM.
Step 4: Implement Caching to Reduce Server Strain
Want a quick win for scalability? Enable caching on your site. Caching stores copies of your site’s pages and content so that repeat requests can be served quickly without your VPS doing all the work each time.
In practice, when caching is enabled, the first visitor generates the content (for example, running PHP and database queries for a page) and a static version is saved. Subsequent visitors are then served that pre-built page from the cache, so your server doesn’t have to crank out the same page over and over.
The result: faster load times for users and much less stress on your VPS’s CPU and database.
There are a few types of caching to consider:
- Page caching stores full HTML pages.
- Object or database caching stores frequent query results.
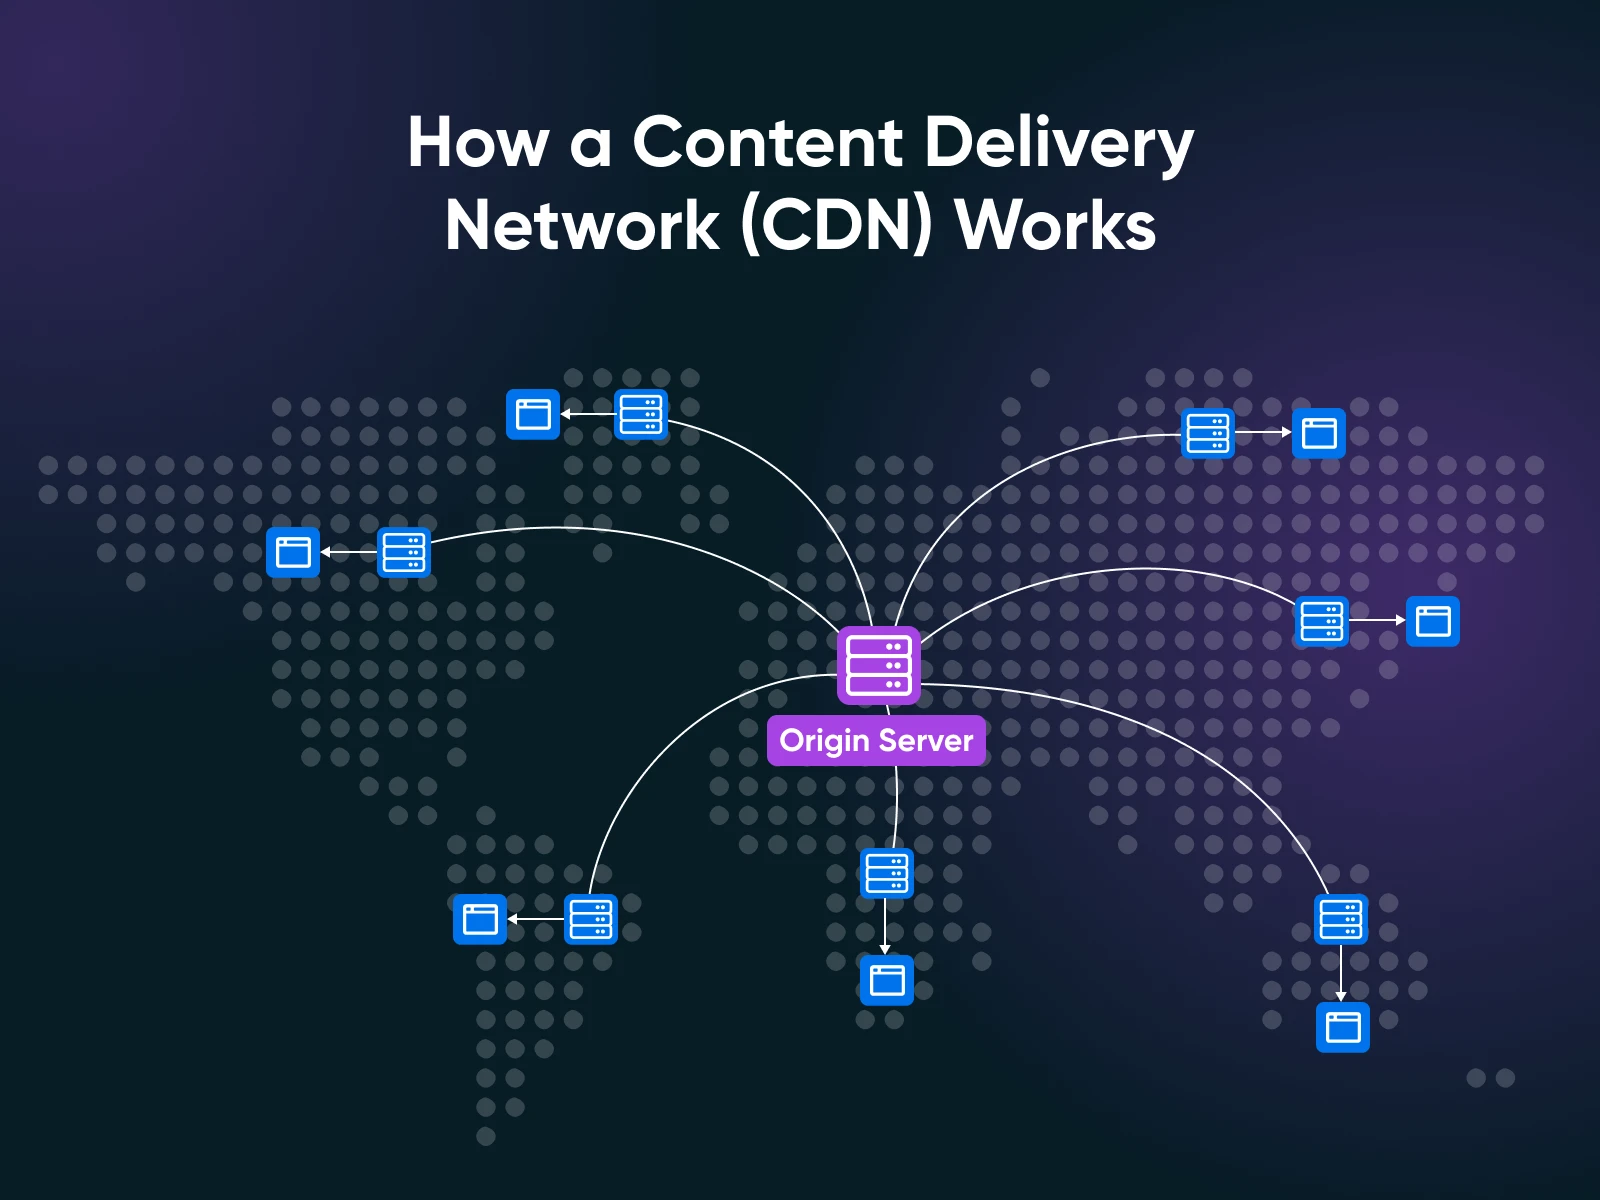
- CDN (Content Delivery Network) caches static files (images, CSS, etc.) on servers around the world.
An easy route to take is installing a caching plugin for WordPress. Your host may also offer built-in caching. By caching content, you avoid overworking your server during high traffic and can handle far more visitors with the same VPS specs.
Pro tip: Using a CDN alongside caching offloads even more traffic from your VPS, since the CDN will serve images and other files to users, leaving your server free to handle the harder tasks.
Step 5: Consider Load Balancing if One Server Isn’t Enough
What if you anticipate a massive surge that one VPS alone can’t handle, even with more resources and caching? It might be time to think beyond a single server. Load balancing is a technique where you use multiple servers to share the traffic load.
Essentially, you put a load balancer in front of your VPS that distributes incoming visitors across two or more servers, preventing any single machine from getting overwhelmed. This setup can drastically increase the amount of traffic you can handle by leveraging multiple VPS instances in tandem.
A load balancer might send half your visitors to “Server A” and half to “Server B” (and even spin up more servers if needed). This not only increases capacity but also adds redundancy — if one server goes down, others can pick up the slack, improving reliability.
Know that you typically won’t need load balancing unless you expect truly high traffic or need high availability. It does introduce more complexity (and cost).
But it’s good to understand the concept: when one VPS isn’t enough, you can always add more servers behind a load balancer to add virtually unlimited capacity. Some hosting providers offer easy load balancing or cloud instances that auto-scale out —if your big event is going to be huge, this is an option to discuss with your host.
Step 6: Test Your Setup
Don’t wait until launch day to find out if your scaling efforts worked. Simulate a traffic surge on your site to see how they hold up.
This is commonly done via load testing or stress testing tools. These tools send a large number of simulated visitors or requests to your website to mimic a flood of real traffic. The goal is to push your VPS to the limit in a controlled way and observe what happens.
During load testing, monitor your server’s response times, CPU/RAM usage, and whether any errors occur.
Do pages start failing at a certain number of concurrent users? Is the database choking on too many queries?
A test might reveal, for example, that your site slows down drastically beyond 1,000 simultaneous users — indicating you may need to further optimize or add resources. It’s much better to discover these bottlenecks now instead of during the actual traffic spike, when real customers are on the line.
There are many tools (both free and paid) to do this: Apache JMeter, BlazeMeter, Loader.io, etc.
Run a few tests approaching the traffic levels you expect. This will identify any weak links in your setup (like a particular plugin or script that crashes under load, for example). You can then fix those issues —whether it’s tweaking database indexes or further boosting your resources —before you get big surges in real traffic.
Step 7: Monitor Your VPS in Real Time During the Surge
The day of your campaign or launch is here!
As visitors start flocking in, make sure you’re watching your VPS metrics in real time. Almost all VPS platforms have monitoring tools or dashboards (and if not, third-party monitoring tools can fill the gap). Keep an eye on your CPU usage, memory consumption, disk I/O, and network traffic in real time.
You may want to set up alerts too. For example, get an email or text alert if CPU usage stays above 90% for more than a few minutes, or if memory is running low. These can act as an early warning system so you can take action (like allocating more resources or optimizing something on the fly) before you run into a potentially catastrophic issue.
By monitoring actively, you avoid flying blind. Real-time analytics also let you validate that your preparations are working, and it’s actually pretty fun to watch the numbers if everything is running smoothly.
And if something starts breaking, you’ll be glad you noticed it immediately. Remember, you can’t manage what you don’t monitor.
After the Surge: Review, Right-Size, and Improve
Congratulations on making it through your viral moment! Once the traffic surge subsides, don’t just pat yourself on the back and forget about it. This is a golden opportunity to review and learn from the experience.
- Start with a post-surge analysis: Dig into your server logs and performance metrics to see how things went.
- Identify any bottlenecks or errors that occurred when traffic was at its peak: For example, did the CPU hit 100%? Did response times spike anywhere? Maybe one of your pages still loaded slowly due to an uncached element. Analyzing this data will pinpoint what worked well and what could still be improved.
- Gather plenty of feedback: if you had team members or users report issues (“Checkout was slow” or “the site timed out for me at 1 p.m.”), take note. All of this information helps you refine your plan for the future. Adjust your infrastructure and configuration based on what you learned.
If you found you over-provisioned (for example, you doubled your RAM but only used 60% of it), you might scale the VPS back down slightly to save on costs until the next big event. On the other hand, if you were near the limits, you might decide to upgrade to a larger VPS plan permanently, so you’re ready for growth.
This is also a great opportunity to update your contingency plans. Did your alerting and monitoring cover everything? Do you need to add a database replica or tweak your caching settings next time?
Use the experience to improve your playbook for future traffic surges: both planned and unexpected.
Scale Confidently With the Right Hosting
By now, you should feel more confident about scaling your VPS to handle traffic surges. We’ve covered everything from understanding your baseline, beefing up resources, clever caching tricks, to testing and real-time monitoring.
The key takeaway? Preparation beats panic.
When you take these proactive steps, you’re not just hoping your site will survive. You know it will. So, the next time your marketing campaign pays off or your post goes viral, you can celebrate the traffic spike instead of dreading it.
If you’re looking for a hosting partner that makes this entire process easier, consider scaling with DreamHost. DreamHost Managed VPS Hosting offers dedicated resources and a scalable, flexible platform designed for growing sites. With four plans to choose from and features like built-in analytics, free WordPress migrations, expandable RAM and storage, and more, you can trust DreamHost to help your site perform under pressure.

Take Charge with Flexible VPS Hosting
Here’s how DreamHost’s VPS offering stands apart: 24/7 customer support, an intuitive panel, scalable RAM, unlimited bandwidth, unlimited hosting domains, and SSD storage.
Choose Your VPS PlanThe post A Beginner’s Guide to Scaling a VPS for Traffic Surges appeared first on DreamHost Blog.
]]>The post Cron Jobs: For When Your Sleep Schedule Matters appeared first on DreamHost Blog.
]]>Well, me neither. Nor do the millions of server admins who manage the 14+ billion servers across the world.
So, stop the madness — I beg you!
Cron jobs are built for that.
Because, genuinely, nothing says “competent sysadmin” like being fast asleep and taking credit for the work your scripts handle for you. It’s called “utilizing your resources.”
With cron jobs:
- Your boss thinks you’re dedicated.
- Your server knows you’re lazy.
- You have this beautiful symbiotic relationship called automation.
Today, you’re going to become a cron jobs pro.
First, What’s a Cron Job? (The Not-Boring Version)
A cron job is essentially a task scheduler built into Unix-like operating systems (Linux, macOS) that lets you run Linux commands automatically at specified times and dates.
Think of it like a to-do list for your server, but…this one actually gets completed.
Cron in Metaphors
If your server infrastructure were a restaurant:
- The cron daemon is the manager checking the daily schedule.
- The crontab is the staff assignment board.
- Each cron job is a task assigned to a specific staff member at a specific time.
- The command is the actual work being done.
When the clock hits the scheduled time, the manager taps the assigned employee on the shoulder and says, “It’s showtime!”
The employee then executes their task without question or complaint.
If only we humans were this reliable, the world would be a different place!
The Anatomy of a Cron Job
Every cron job consists of two main parts:
- When to run (the schedule)
- What to run (the command or script to execute)
The schedule uses a specific syntax that might look like some computer wizardry at first glance:
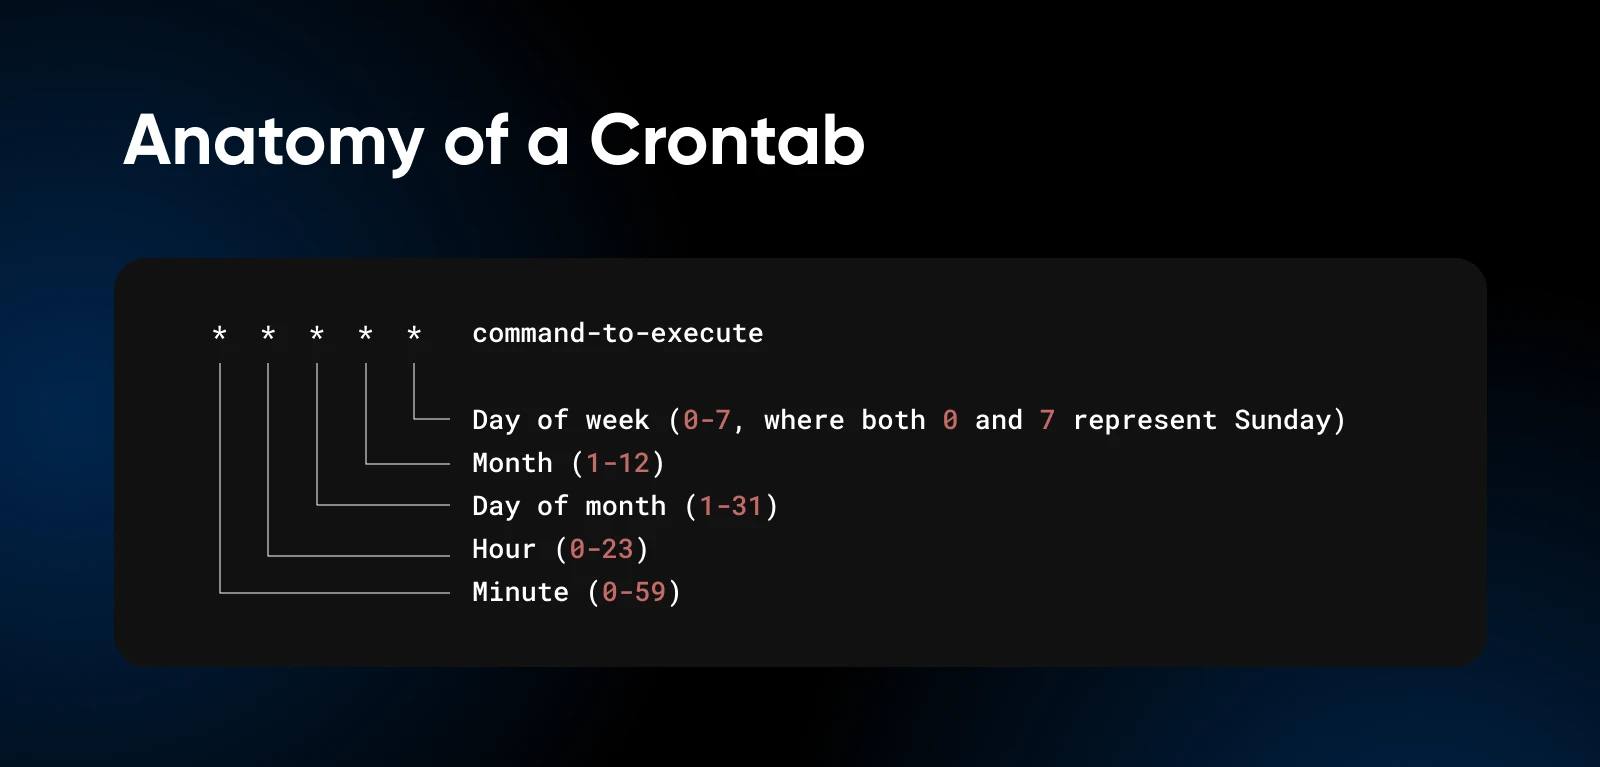
But take a closer look and it’ll start to make sense.
Each asterisk can be replaced with specific values, ranges, or intervals to create precisely the schedule you need.
Why Server Admins Love Cron Jobs
There’s a reason why server admins (even me) get misty-eyed when discussing cron jobs.
They turn server management into something that (at least remotely) resembles work-life balance.
1. They Save You Time
Remember time? That thing you never have enough of? Cron jobs give it back. You set them, you forget them, and you’re pretty much never looking at them.
(Well, until they break or you need to change the schedule.)
2. They Maintain Consistency
Humans are inconsistent. We forget things. We make typos. We get distracted by cat videos. Cron jobs perform the exact task, the exact same way, every single time — no exceptions.
3. Your Server Never Sleeps
With cron jobs, essential maintenance happens 24/7/365, whether you’re awake, asleep, or on a beach sipping margaritas.
4. Error Logs > Human Memory
When you manually perform tasks, can you remember exactly what you did and exactly when you did it? Probably not.
But cron jobs can be configured to log their activity, creating a paper trail of all automated actions for troubleshooting and verification.
5. They’re Built for Scalability
As your infrastructure grows, manually managing everything becomes exponentially more difficult. Cron jobs scale effortlessly.
Meaning, the same job can run across multiple servers without requiring additional time from you.
Setting Up Cron Jobs: A Step-by-Step Guide
Enough theory! You need to get your hands dirty with some practical cron job setup.
Step 1: Confirm Cron Is Installed
Most Unix-like systems have cron pre-installed. To check if it’s available for use, type the below command:
crontab -eDepending on the default editor, the command will open the crontab in your specific editor. If you have never used crontab before, it might ask you to set the default editor.
If the terminal responds with command not found, you’ll need to install cron with the below commands:
- On Ubuntu/Debian:
sudo apt update && sudo apt install cron - On CentOS/RHEL:
sudo yum install cronie
Once done, start and enable the cron service:
sudo systemctl start cron
sudo systemctl enable cron
With the start and enable commands, we’re starting the cron service to execute the cron jobs.
And with enable, we make sure that even if your server restarts, the cron service automatically restarts with it, and no cron jobs are missed.
Nerd Note: CentOS calls the cron service “crond”, so you will need to start and enable the crond service.
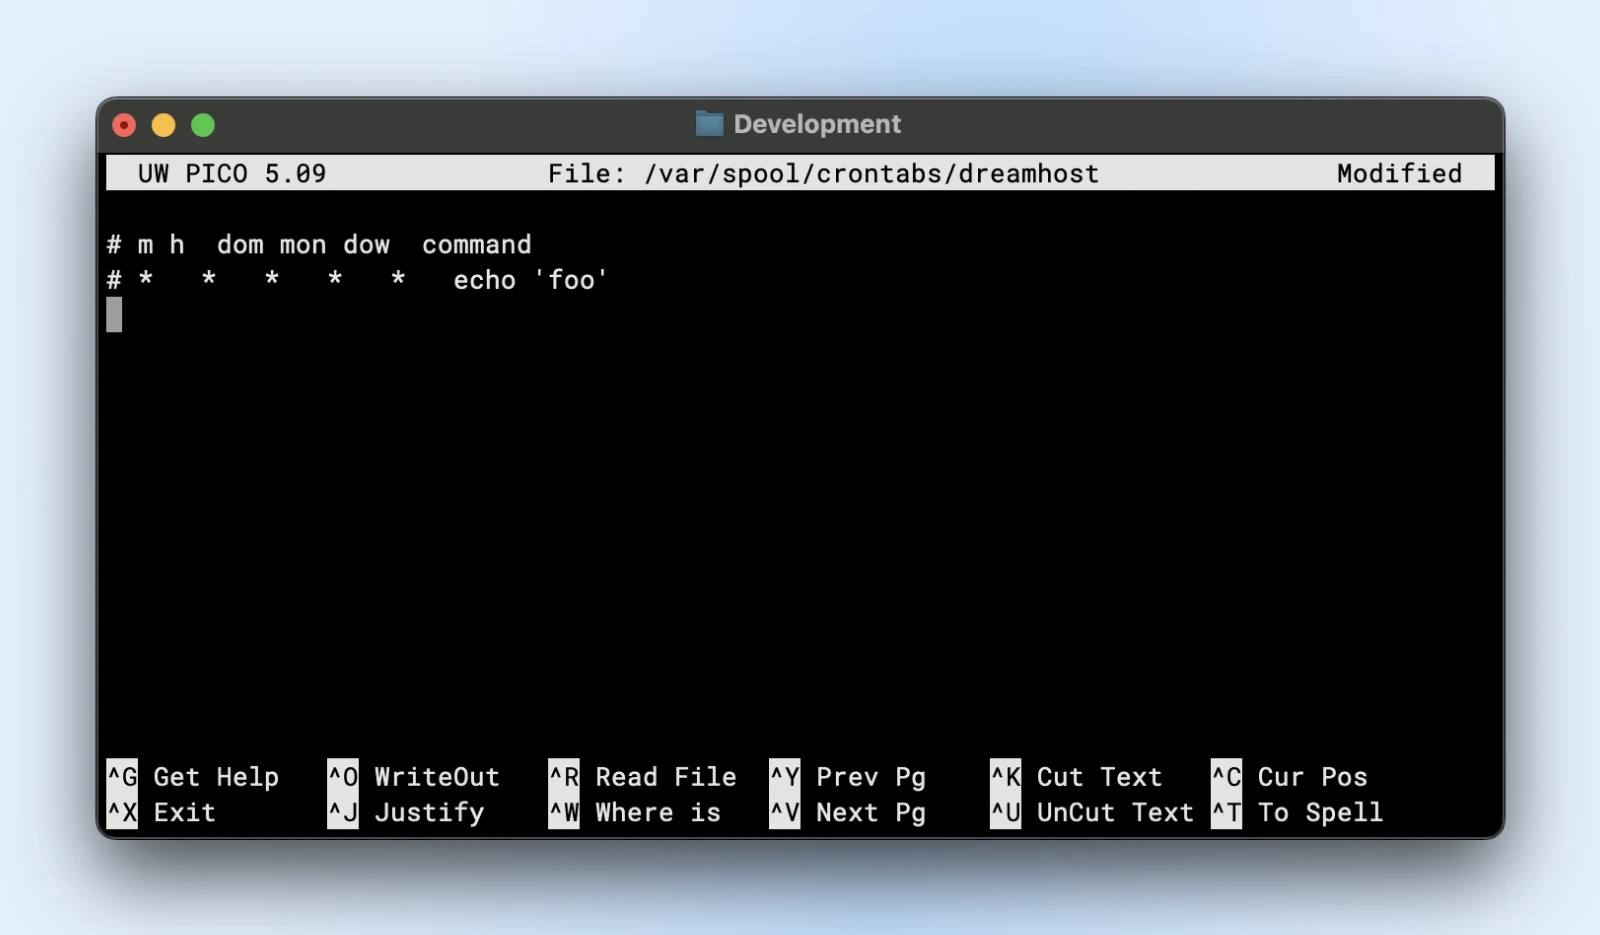
Step 2: Understanding the Crontab
Alright, open the crontab or the crontable to begin adding your scheduled jobs.
Each user on the system can have their own crontab file. Additionally, there is a system-wide crontab.
To edit your personal crontab:
crontab -eThis opens your crontab file in your default text editor. If this is your first time, choose the nano editor (option 1) as it’s the most beginner-friendly.
For system-wide crontabs, run the below command with sudo privileges:
sudo nano /etc/crontab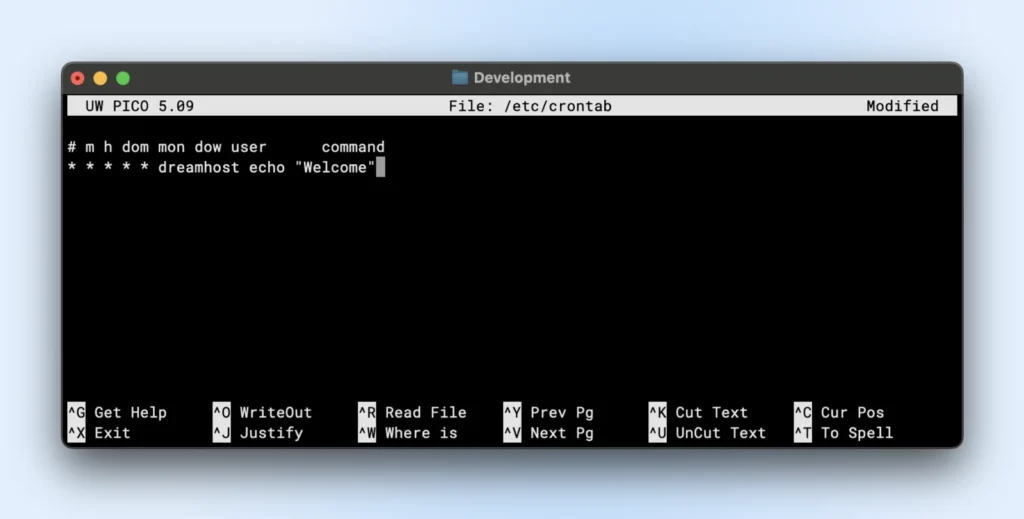
Step 3: Cron Job Syntax
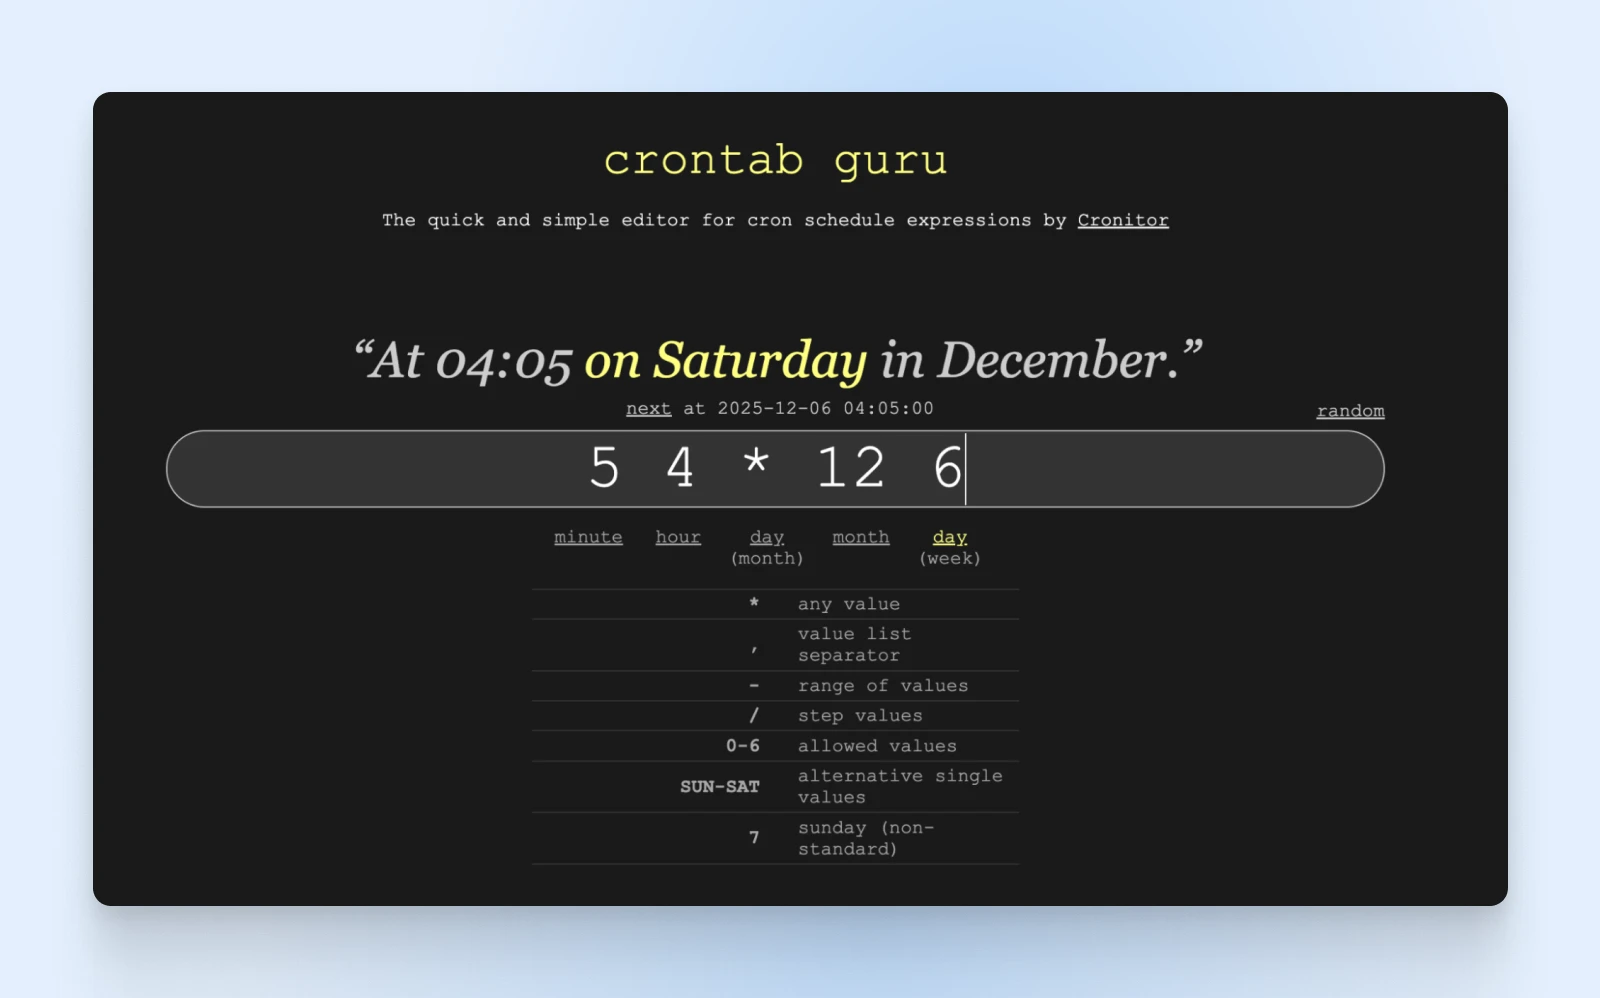
We’ve already talked about the basic structure in the anatomy of cron jobs before.
But creating a cron job can be confusing sometimes. Crontab.guru helps you visualize the job schedules as you type them.
Now for the fun part — writing our first cron job. Let’s take a look at some common cron job schedules:
Every minute:
* * * * /path/to/command
Every hour at minute 0:
0 * * * * /path/to/command
Every day at midnight:
0 0 * * * /path/to/command
Every Monday at 3 a.m.:
0 3 * * 1 /path/to/command
Every 15 minutes:
*/15 * * * * /path/to/command
First day of every month at 6:30 a.m.:
30 6 1 * * /path/to/command
Step 4: Creating Your First Cron Job
Let’s move to creating a simple backup cron job for your server.
The task below creates a backup of your website every day at 2 a.m.
0 2 * * * tar -czf /path/to/backup/website-backup-$(date +%Y%m%d).tar.gz /path/to/your/website
It will output a compressed tar archive of your website directory with the current date as the filename.
Step 5: Save and Verify
Now, exit the editor. In nano, press Ctrl+X and then hit Y.
To view your current crontab and verify your job was added:
crontab -l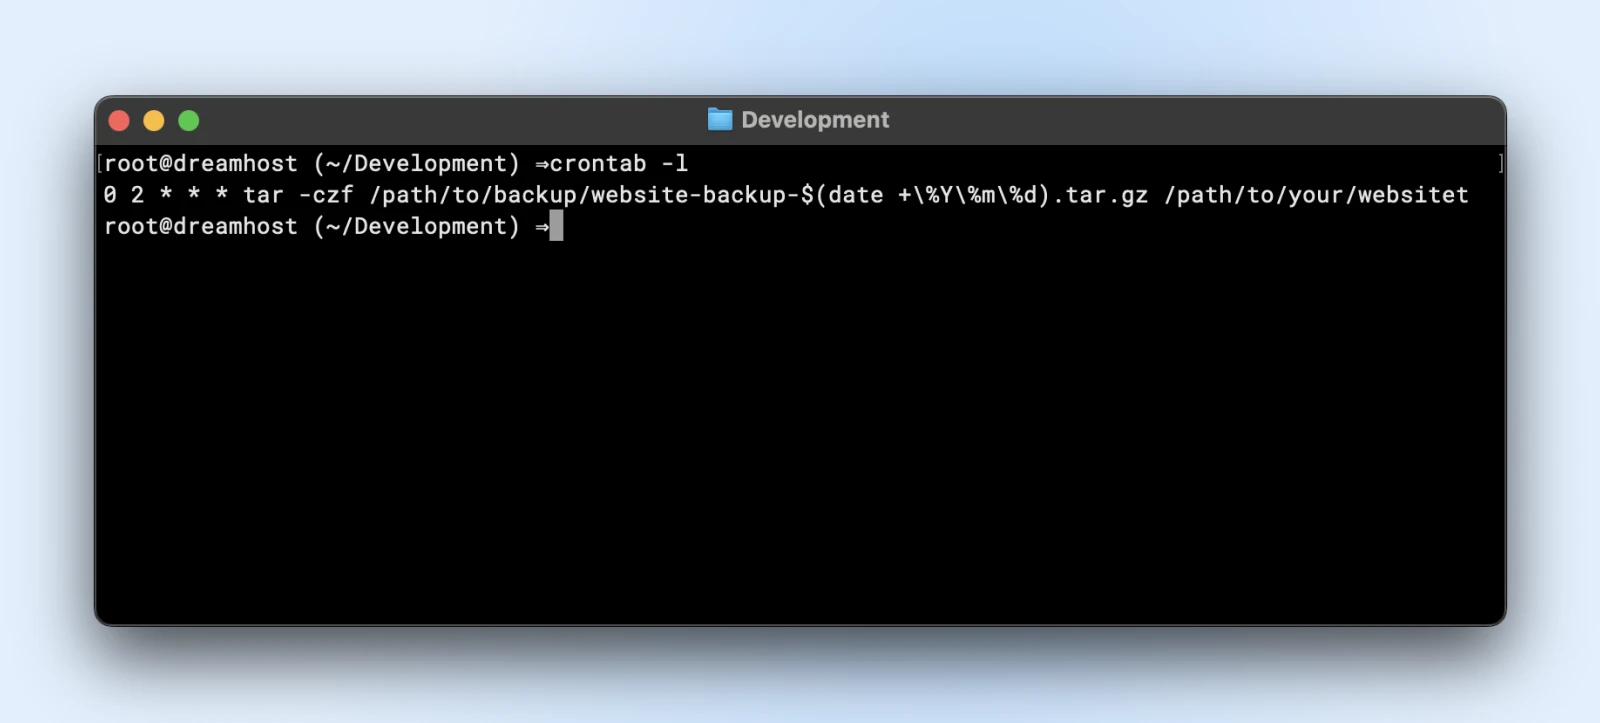
That’s it! Your first cron job is now set up and will run automatically at the scheduled time.
Practical Cron Job Examples for Website Managers
Now that you know the basics, let’s explore some practical cron jobs that can make your life as a website manager significantly easier.
Database Backups
MySQL database backup (daily at 1 a.m.):
0 1 * * * mysqldump -u username -p'password' database_name | gzip > /path/to/backups/db-backup-$(date +%Y%m%d).sql.gzLog Rotation and Cleanup
Clean logs older than 7 days (weekly on Sundays):
0 0 * * 0 find /path/to/logs -type f -name "*.log" -mtime +7 -deleteWebsite Performance Monitoring
Check website response time every 5 minutes:
*/5 * * * * curl -o /dev/null -s -w "%{http_code} %{time_total}sn" example.com >> /path/to/logs/website-performance.logContent Updates
Fetch and update dynamic content (every hour):
0 * * * * /path/to/content-update-script.shEmail Reports
Send a weekly traffic summary every Monday at 9 a.m.:
0 9 * * 1 /path/to/generate-and-email-report.shSecurity Scans
Run a security scan script every night at 3 a.m.:
0 3 * * * /path/to/security-scan.shCron Job Best Practices: Dos and Don’ts
To make sure your cron jobs run smoothly and don’t cause more problems than they solve, here are some important best practices.
The Dos
- Always use full paths to commands and files: Your cron environment doesn’t have the same PATH as your user shell, so
“/usr/bin/python”is better than just python. - Redirect output to prevent email spamming: By default, cron emails any output to the user. Add
>/dev/null 2>&1to suppress output or redirect to a log file instead. - Test your commands before scheduling them: Run your command manually to ensure it works as expected.
Add comments to explain each job — Future you will thank present you for documenting what each cron job does and why.
Daily database backup - Added by Jane on 2023-05-15
0 1 * * * /path/to/backup-script.sh
Consider using lockfiles for long-running jobs to prevent a new instance from starting if the previous one is still running.
0 * * * * flock -n /tmp/script.lock /path/to/your/script.shThe Don’ts
- Don’t schedule resource-intensive jobs during peak hours: Your backup doesn’t need to run at noon when your site is busiest.
- Don’t use relative paths:
“./script.sh”will almost certainly fail in cron. - Don’t forget environment variables: Cron doesn’t load your .bashrc or .profile. Set any required variables in the crontab or script.
- Don’t overlook logging: Without proper logging, debugging cron jobs can be a nightmare.
- Don’t overdo it: Too many frequent cron jobs can overload your server. Be strategic.
What To Do When Cron Jobs Go Wrong
The only time you have to look back at a cron job is when it breaks — and when it breaks, here’s how to diagnose and fix common issues.
Common Problem #1: Job Doesn’t Run
Symptoms: Your scheduled task doesn’t seem to be executing at all.
Potential fixes:
- Check cron daemon is running: The “systemctl” status cron
- Verify your crontab syntax: Use a tool like crontab.guru
- Ensure full paths to executables: Which command to find full paths
- Check file permissions: Scripts must be executable (chmod +x script.sh)
Common Problem #2: Job Runs But Fails
Symptoms: The job executes but doesn’t complete its task successfully.
Potential fixes:
- Redirect output to a log file to see errors:
* * * * /path/to/script.sh > /path/to/script.log 2>&1 - Test the command manually with the same environment
- Check for dependencies that might be missing in the cron environment
Common Problem #3: Email Flooding
Symptoms: Your inbox is flooded with cron output emails.
Potential fixes:
- Redirect output to null:
>/dev/null 2>&1 - Redirect to a log file:
>/path/to/logfile.log 2>&1
Only email on errors:
* * * * /path/to/script.sh >/dev/null || echo "Script failed" | mail -s "Cron failure" [email protected]Common Problem #4: Timing Issues
Symptoms: Jobs run at unexpected times or frequencies.
Potential fixes:
- Double-check your timezone settings — date vs. cron’s expectation
- Be aware of DST changes that might affect timing
- Use explicit time frames instead of relative ones when precision matters
Advanced Cron Job Writing Techniques
We’ve looked at the basics, and you are pretty much a pro with cron jobs by now. But this section will take you a step further.
Using Special Strings
You don’t always need to write cron jobs with those asterisk signs. There are some special strings that let you set up cron jobs quite easily.
- @yearly or @annually: Run once a year (0 0 1 1 *)
- @monthly: Run once a month (0 0 1 * *)
- @weekly: Run once a week (0 0 * * 0)
- @daily or @midnight: Run once a day (0 0 * * *)
- @hourly: Run once an hour (0 * * * *)
- @reboot: Run once at startup
For example, if you want something to run daily, just write the below command:
@daily /path/to/daily-backup.shEnvironment Variables in Crontab
To avoid repeating a string over and over again in your cron jobs (for example, a specific path, or your admin email), set up environment variables at the beginning of your crontab.
You can then reuse the variables as required within your scripts or commands.
SHELL=/bin/bash
PATH=/usr/local/sbin:/usr/local/bin:/usr/sbin:/usr/bin:/sbin:/bin
[email protected]

# This job will send errors to [email protected]
0 2 * * * /path/to/mailing_script.sh
If we use the environment variable MAILTO in our mailing_script.sh, the script will automatically send an email to the correct email address.
With this, changing the admin email will only require changing the value of the MAILTO variable, instead of making changes across all scripts.
Running Jobs As Different Users
If you have superuser access, you can edit another user’s crontab:
sudo crontab -u username -eUsing Anacron for Machines That Aren’t Always On
Unlike cron, anacron ensures jobs run even if the computer was off during the scheduled time:
sudo apt install anacronEdit /etc/anacrontab to add jobs that will run when the system comes back online.
Job Chaining for Complex Workflows
Run jobs in sequence:
0 1 * * * /path/to/first-script.sh && /path/to/second-script.shMonitoring Cron Jobs
For serious server management, consider tools like Cronitor that provide monitoring and alerts for your cron jobs.
0 * * * * cronitor exec check-12345 -- /path/to/your/script.shLet’s Talk Costs
Cron jobs can’t exist in isolation. They need a server and a service running on a server that you need to manage.
Now, if you’re reading this article, it’s highly likely that you have a server for your website or application.
In fact, if you’re hosting with DreamHost VPS or any Linux-based hosting provider, you’ve already got everything you need to get started with automating your server management tasks.
If not, a $10/month VPS is all you’d need, especially when starting out.
For those already running a DreamHost VPS, the process couldn’t be more straightforward:
- SSH into your server
- Run crontab -e to edit your personal cron table
- Add your scheduled tasks
- Save, and let the automation begin!
SSH
Secure Shell Protocol (SSH) is a cryptographic network protocol for running services securely through an unsecured network. It is mostly used for command-line executions and remote logins.
Read MoreThat’s it. The infrastructure you’re already paying for suddenly becomes more valuable, more efficient.
Your Server’s New Autopilot
Congratulations!
You’ve graduated from manual labor to automation wizardry. With cron jobs handling the routine maintenance, backups, and monitoring, you can focus on growing your website and business rather than babysitting the server.
And remember, it’s going to be a process. The automation will become more sophisticated as you add more and more tasks to it.
But for now, start with a few essential cron jobs, monitor how they perform, and gradually expand your automation as you grow more comfortable with the process.
Now go on and take that nap, because you just saved yourself a buttload of time.
The post Cron Jobs: For When Your Sleep Schedule Matters appeared first on DreamHost Blog.
]]>The post How To Translate Your Site in Multiple Languages (Quick & Easy) appeared first on DreamHost Blog.
]]>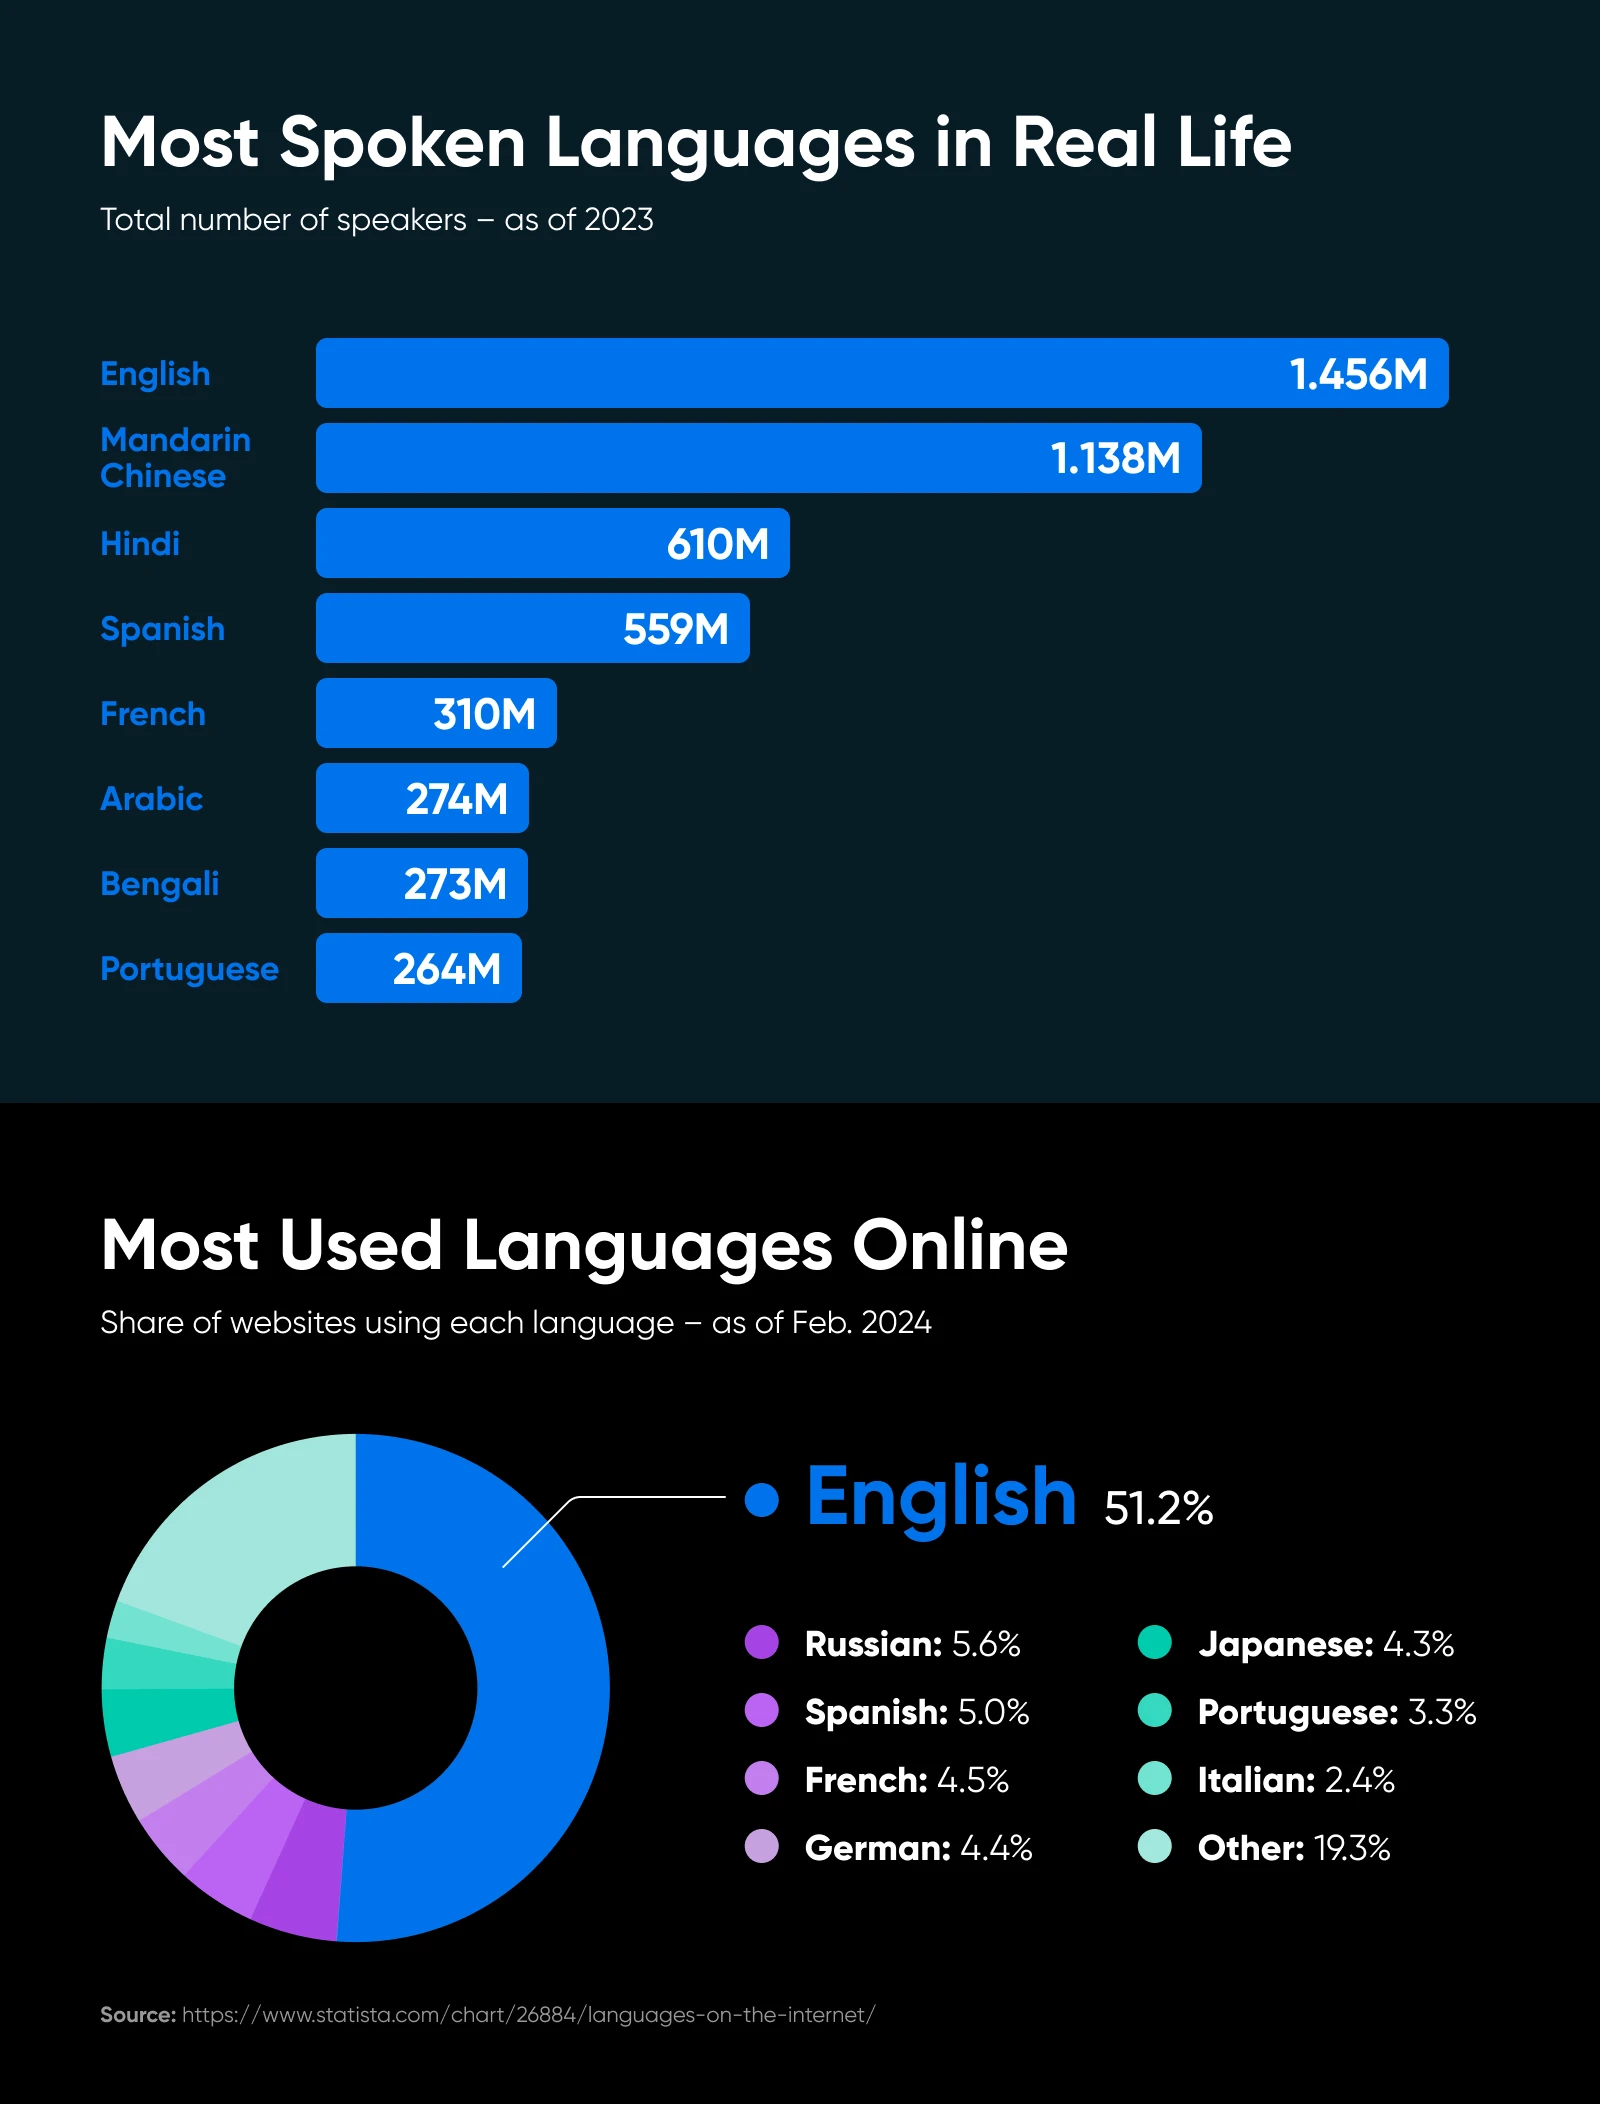
Translating your website can unlock entirely new markets, boost your SEO, and show customers you’re ready to meet them in their language. And the good news is that you don’t need a huge budget or a professional translator on speed dial.
In this guide, we’re covering quick and affordable methods — from AI-powered translation tools to simple WordPress plugins — to help you create a multilingual site so you can offer multilingual content to users worldwide. Let’s get started!
Why You Should Translate Your Website
Before we get into how, let’s briefly tackle why. If you’re on the fence, consider these key benefits.
- Expand your audience reach: Breaking past the English-speaking crowd can bring in customers from around the globe.
- Boost conversions and sales: People tend to buy more readily in their native tongue. Translating your site lowers the barrier to purchase, whether you’re selling digital services or physical products.
- Improve user experience (UX): Showing that you value non-English readers by giving them a tailored language experience builds trust and feels more inclusive.
- Enhance SEO: Offering content in multiple languages helps you capture less-competitive foreign-language keywords. You can also set up localized URLs or subdirectories for different regions, further improving search rankings abroad.
- Build more brand trust: Providing content in a user’s language sends a message: “We care about you.” That resonates deeply with visitors and can boost brand loyalty.
Key Considerations Before You Begin
Translating your site isn’t just a matter of running everything through Google Translate and calling it a day. Here are a few factors to think about before you dive in:
- Identify your target markets: Which countries or languages are most relevant to your business? It might be Spanish for a U.S.-based store, or French for a Canadian audience. Focus on the few that matter most.
- Assess your budget and resources for translation: Decide if you can afford professional translators for critical pages (like product descriptions) or if you need to rely on AI and other technology tools. Consider a hybrid approach if brand voice is crucial but your funds are limited (more on this below).
- Know your platform and tech constraints: Are you on WordPress, Wix, Shopify, or a custom-coded site? Different platforms have different translation solutions (and complexities).
- Consider the SEO challenges: Translating text alone might not be enough. For real international SEO, you’ll want hreflang tags, localized keywords, and possibly subdirectories or subdomains for each language.
- Don’t forget about brand voice and quality control: Machine translation can produce awkward results. If your site’s tone and clarity are key, consider human proofreading for your top-traffic pages, at the very least.
Translation Approaches: AI vs. Human vs. Hybrid
There are a few approaches you can take to translate your site. Before we dive into the tools and methods, let’s briefly compare the pros and cons of AI versus human versus hybrid, or a combination of the two.
| AI translators | Human translators | Hybrid approach | |
| Ideal for | Solopreneurs or small teams that want broad coverage fast, and can’t hire a professional for every page. | E-commerce product pages, marketing copy, or anywhere brand voice is critical. | Most small businesses aiming for high quality but without a huge budget. |
| Pros | Fast Covers many languages Often affordable (or even free) | Highest accuracy Nuanced language skills Preserves brand personality | Balances cost AI handles bulk, humans fix top-priority pages |
| Cons | Potentially awkward phrasing Lacks nuance | Slower More expensive | Requires some manual oversight |
How To Translate Your Site Quickly and Easily
In this section, we’ll explore different methods in detail, from simple browser tools to advanced plugins. Whether you’re on WordPress or using another site builder, there’s an approach that fits your needs, and we’ll explore some of the most popular choices below.
1. Browser-Based Translation (Good for Quick Previews)
If you just want a quick sense of how your site looks in another language — or if you’d like to offer a one-click translation option for users — most major browsers have you covered.
Best for: Quick internal checks or adding a small convenience for visitors (though it won’t look super professional)
Pros:
- Instant
- No installation required
- Free
Cons:
- Usually for personal or user-side translation, not an official website version
- You can’t effectively track or optimize SEO with this method
Here’s what to do:
- Enable translation in your browser settings
- In Chrome, go to Settings > Languages > Google Translate > and turn Use Google Translate on or off.
- In Safari, launch the Settings app and go to General > Language & Region. Translation is on by default, but here, you can choose your preferred languages for translation.
- In Firefox, go to Settings > General > Language and Appearance > Translations. Translation is on by default, but here, you can choose your preferred languages for translation.
- Translate your site
- In Chrome, select Translate on the right of the address bar, or right-click anywhere on the page and select Translate to [Language].
- In Safari, click the Translate button in the Smart Search field and choose a language.
- In Firefox, click the translation icon in the toolbar and select your desired translation language from the bottom dropdown menu.
2. AI-Powered Translation Tools
If you want a straightforward, do-it-yourself solution, AI can be the powerful tool you’re looking for.
Best for: Lean teams that need a broad brush approach, with the option to fine-tune important pages manually
Pros:
- Generally free or low-cost
- Easy to use
- Fast
Cons:
- Machine translations can be clumsy
- You might need to manually polish important copy
Below, explore some popular AI translation tools and how to use them.
1. Google Translate
Google Translate is one of the longest-running and most popular online translator tools. You can use it to translate individual pages or your entire site into different languages.
Here’s what to do:
- Go to Google Translate.
- Choose Websites.
- Enter your site URL.
- Select your target language.
2. DeepL
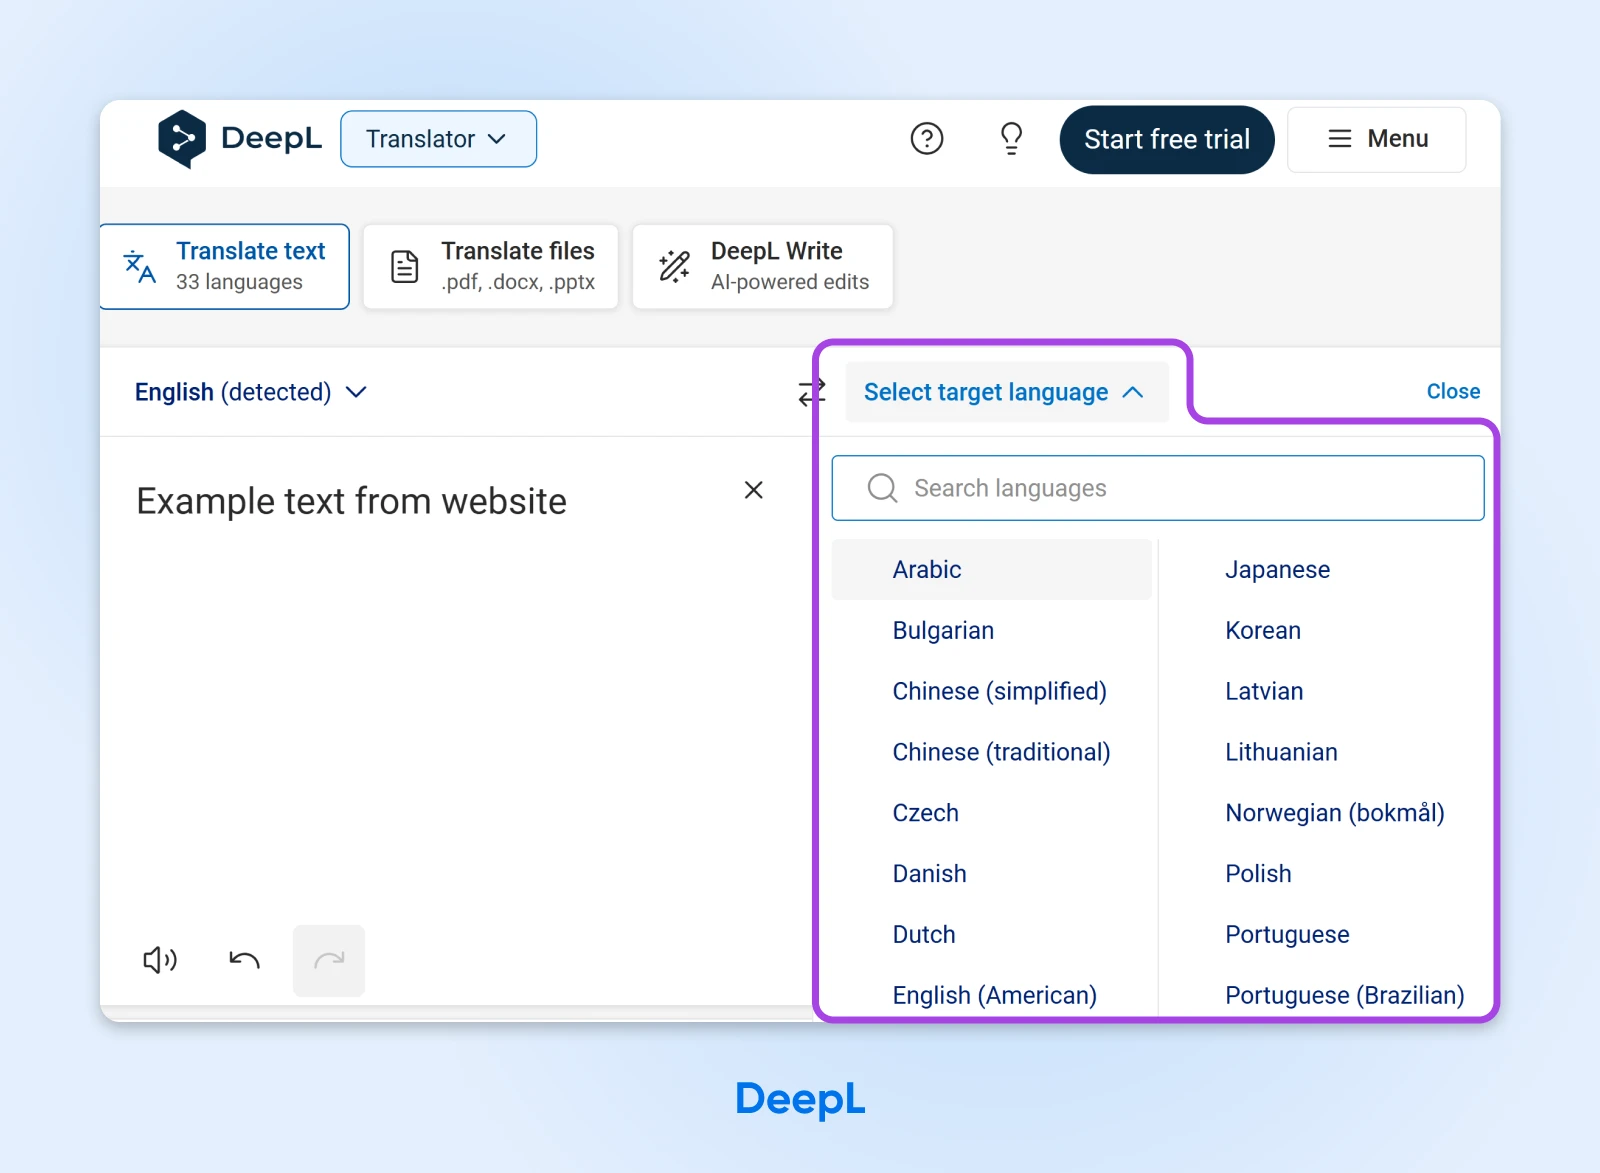
DeepL is widely praised for producing more natural-sounding translations than Google in certain languages, especially European languages like German or French.. It offers a free version for limited text, plus paid tiers for larger volumes.
Here’s what to do:
- Go to DeepL.
- Select your target language.
- Enter the text from your website that you want to translate.
3. Lokalise
Lokalise is more of a localization platform with a free trial, offering translation and project management.
Here’s what to do:
- Go to Lokalise.
- Sign up for a free trial.
- Upload files to translate.
- Choose human or machine translators, depending on your site and needs.

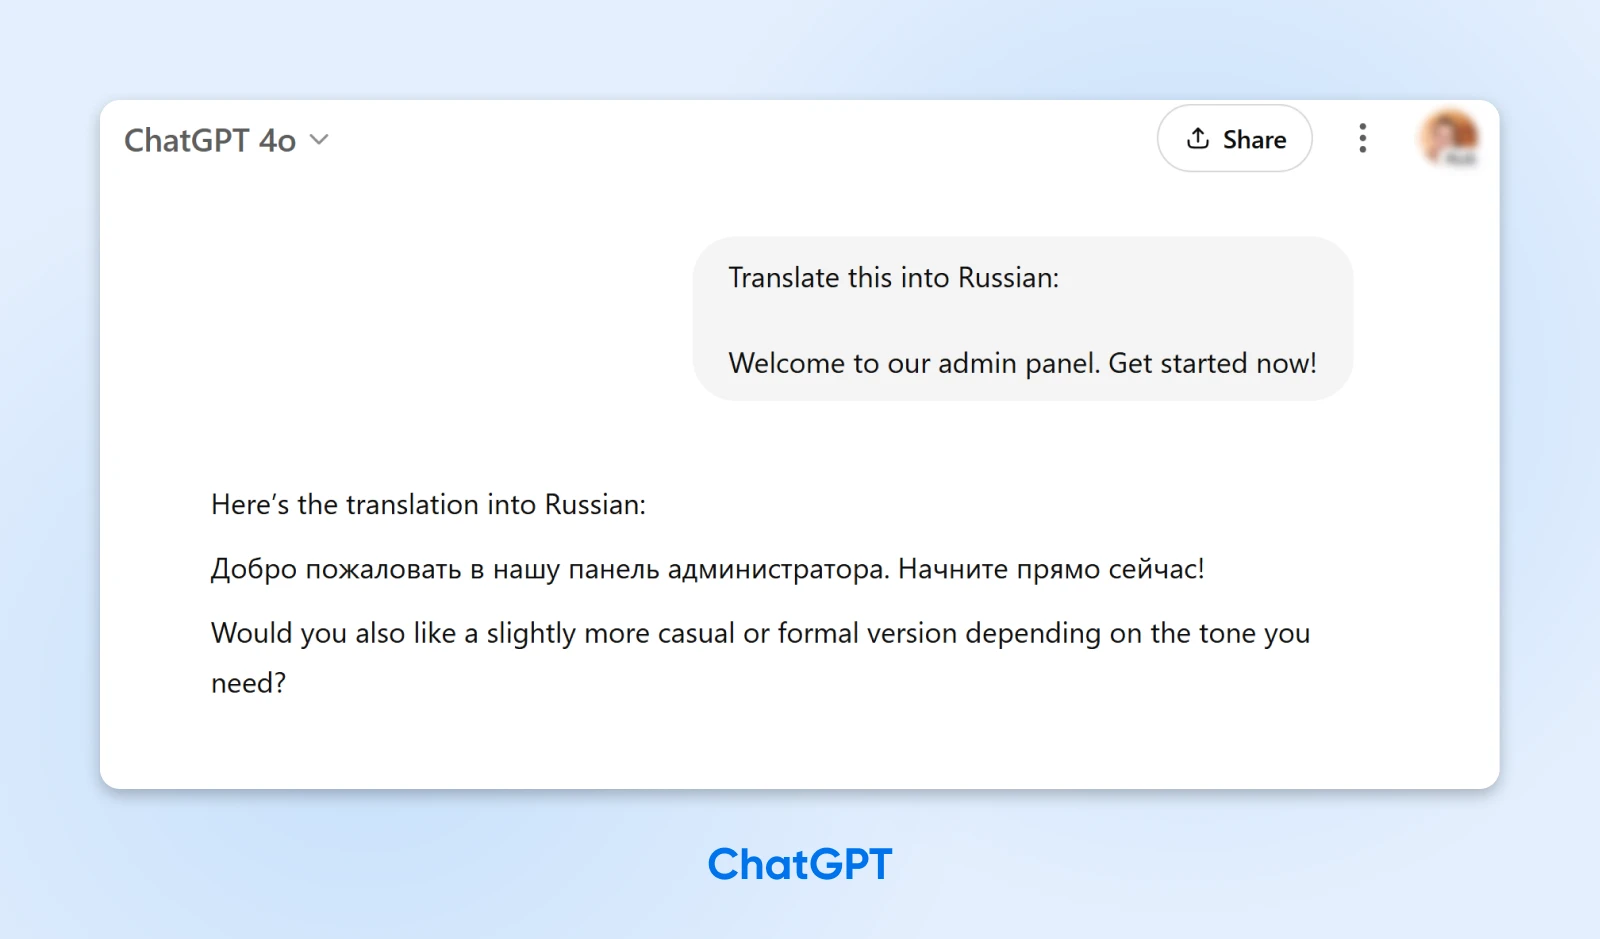
4. ChatGPT
ChatGPT or other AI text-generation APIs can produce translations, but you’ll need custom prompts and potential coding to integrate them into your site.
Here’s what to do:
- Log in to ChatGPT to access the model.
- Enter a prompt asking it to translate your website copy from one language to another.
- For more accurate translations, you might include context about your website in your prompt.
3. WordPress Translation Plugins
For WordPress users, installing a dedicated plugin can seamlessly manage translations across your site.
Best for: WordPress sites wanting a built-in, trackable solution for both auto and manual translations.
Pros:
- Automatic creation of language switchers
- SEO benefits
- Easy to manage from the WP admin
Cons:
- Some advanced features cost extra
- Not applicable to non-WordPress users
Below are four standout WordPress translation plugins we recommend looking into.
1. Weglot
Weglot combines automatic and manual translation — it instantly translates site content into over 100 languages, then lets you tweak or edit in a user-friendly interface. It’s also easy to set up.
Get an API key from Weglot, install their plugin, pick your languages, and you’re off.
Here’s what to do:
- Sign up for a Weglot account to get your API key.
- Install the Weglot Translate plugin on your WordPress site.
- After activating the plugin, navigate to Weglot and enter your API key.
- Select your Original Language (such as English) and set the Destination Languages.
- Click Save.
2. Polylang
Polylang offers a free base plugin that can translate posts, pages, media, and even categories manually. It also has advanced SEO tools like built-in hreflang support, SEO-friendly permalinks, etc.
Here’s what to do:
- Install and activate the plugin.
- Access its settings by navigating to Languages.
- For more advanced features, upgrade to a Pro plan.
3. WPML
WPML is one of the most popular translation plugins for WordPress. It isn’t free like the previous two plugins on this list, but it’s powerful, making it a longtime favorite for big, complex sites. It offers broad language coverage, with over 40 languages out of the box. Plus, custom variants.
This tool is intuitive and easy to use. However, it’s mostly focused on manual translation.
Here’s what to do:
- Install and activate the plugin.
- Assign the Translator role to specific users.
4. TranslatePress
TranslatePress adds a language switcher to your site: a dropdown menu or button that visitors can use to select a translated version of a page.
A language switcher can enable each visitor to your site to select their preferred language. This provides a quick, convenient way to translate your website without leaving the page.
Here’s what to do:
- Install and activate the plugin.
- Go to Settings > TranslatePress > General. In the “All Languages” section, there will be a default language set for your website. Here, select some alternate languages.
- Scroll down to the Language Switcher settings. With TranslatePress, you can display your language switcher with shortcodes, as a menu item, or with a floating language selection menu.
- Using the dropdown menu, you can choose to display the language names, flags, or both.
- When you’re finished, save your changes.
- Add the switcher to a page by adding a shortcode block: ‘[language-switcher]’. On the front end, you’ll be able to see your list of available languages, and any visitor can easily read your website in their preferred language simply by selecting it.
4. Manual (Human) Translations
For absolute precision and brand alignment, you can’t beat a real human who knows the language well. This approach makes sense if your site has crucial marketing copy or nuanced product descriptions.
Best for: Key landing pages, product descriptions, or brand storytelling sections you can’t afford to get wrong.
Pros:
- Highest-quality, tailored copy that resonates with local markets
Cons:
- Slower turnaround
- Higher cost
- Requires ongoing maintenance for updates or new blog posts
You can take a few different approaches here.
Some business owners choose to hire freelancers, which you can do on platforms like Upwork, Fiverr, or ProZ. These platforms make it easier to find translators specializing in your industry and at a wide range of price points.
Even though they aren’t an employee, you can share your style guide or brand guidelines with your chosen translator to help them keep their voice consistent.

Another option is to hire an agency. Services like Gengo or Translated.com offer quick, professional translations per word. Typically, with this type of service, you pay by word count or by project size, so translation is more expensive for larger sites or more complex projects.
5. Combining Methods: The Hybrid Approach
If you want to keep costs low while avoiding cringe-worthy translations, consider a best-of-both-worlds approach: use AI for the bulk of your translation needs, and have a human do manual checks to proofread or polish the most important pages.
Best for: Small businesses that want decent translations but can’t afford to pay for every single page.
Pros:
- Strikes a balance between speed, cost, and quality
Cons:
- You still need at least a bit of budget for final edits
Here’s what to do:
- Run your entire site through an AI tool or plugin to generate rough translations.
- Hire a freelancer or agency to refine your most critical pages (homepage, product pages, sign-up forms, etc.).
- Track user feedback and analytics to see if visitors spend more time on the new language versions.
SEO Considerations for International Content
Translating text is one thing, but making sure search engines can discover and rank these new language pages is another. Keep these pointers in mind.
- URL structures:
- Consider subfolders (e.g., example.com/fr/) or subdomains (fr.example.com) for clarity.
- Some big brands use country-coded TLDs (example.fr) if they’re focused on a particular region.
- Hreflang tags:
- These tags tell Google and other search engines: “This page is intended for French speakers,” or “This version is for Spanish speakers.”
- Implement them correctly to avoid duplicate content issues.
- Localized keywords:
- Translating “shoes” directly into Spanish might yield moderate results, but local slang or synonyms may do better.
- Use local keyword research to find real terms people use.
- Translated media:
- Titles and meta descriptions matter for SEO. Don’t forget to localize them as well — helps search engines match your pages to the right audience.
- Analytics:
- Look at traffic from different countries, bounce rates, time on page, etc. Tweak if you see low engagement for certain languages.
Putting It All Together: Quick Start Checklist
Ready to translate your site? To wrap up, here’s a checklist you can follow as you get started.
- Choose your translation method: Decide on an AI, manual, or hybrid approach based on budget and how critical perfect translations are.
- Focus on key pages first: Translate the pages most important to your business goals (like product listings or a signup page).
- Add a language switcher: Make it easy for users to switch languages with a clear dropdown or flags.
- Proofread your most crucial copy: Even if you rely on AI for 80% of the site, get a human to review your homepage or sales pages.
- Implement basic SEO steps: Use hreflang tags, create subdirectories, and localize your meta tags.
- Test, launch, and track: Check analytics for engagement from new regions. Iterate your strategy if you see poor metrics or notice additional opportunities.
Translate Your Site Today
Translating your site can be the difference between local niche success and a thriving international brand. Whether you opt for a zero-cost AI solution, a specialized WordPress plugin, or a fully human-led approach, offering content in multiple languages can open doors to markets you’ve never tapped before.
Remember, you don’t have to be a multilingual whiz — even a partial translation can yield more traffic, sales, and brand loyalty from non-English speakers. If you’re looking for a reliable home for your newly global site, DreamHost’s hosting solutions offer fast, secure, and scalable plans to support your international ambitions.
The post How To Translate Your Site in Multiple Languages (Quick & Easy) appeared first on DreamHost Blog.
]]>The post Everything You Need To Know To Start Hosting Your Own AI Models Locally appeared first on DreamHost Blog.
]]>If you’ve ever wanted more control or peace of mind over your AI, the solution might be right under your nose: hosting AI models locally. Yes, on your own hardware and under your own roof (physical or virtual). It’s kind of like deciding to cook your favorite dish at home instead of ordering takeout. You know exactly what goes into it; you fine-tune the recipe, and you can eat anytime you want — no depending on anyone else to get it right.
In this guide, we’ll break down why local AI hosting could transform the way you work, what hardware and software you need, how to do it step by step, and best practices to keep everything running smoothly. Let’s dive in and give you the power to run AI on your own terms.
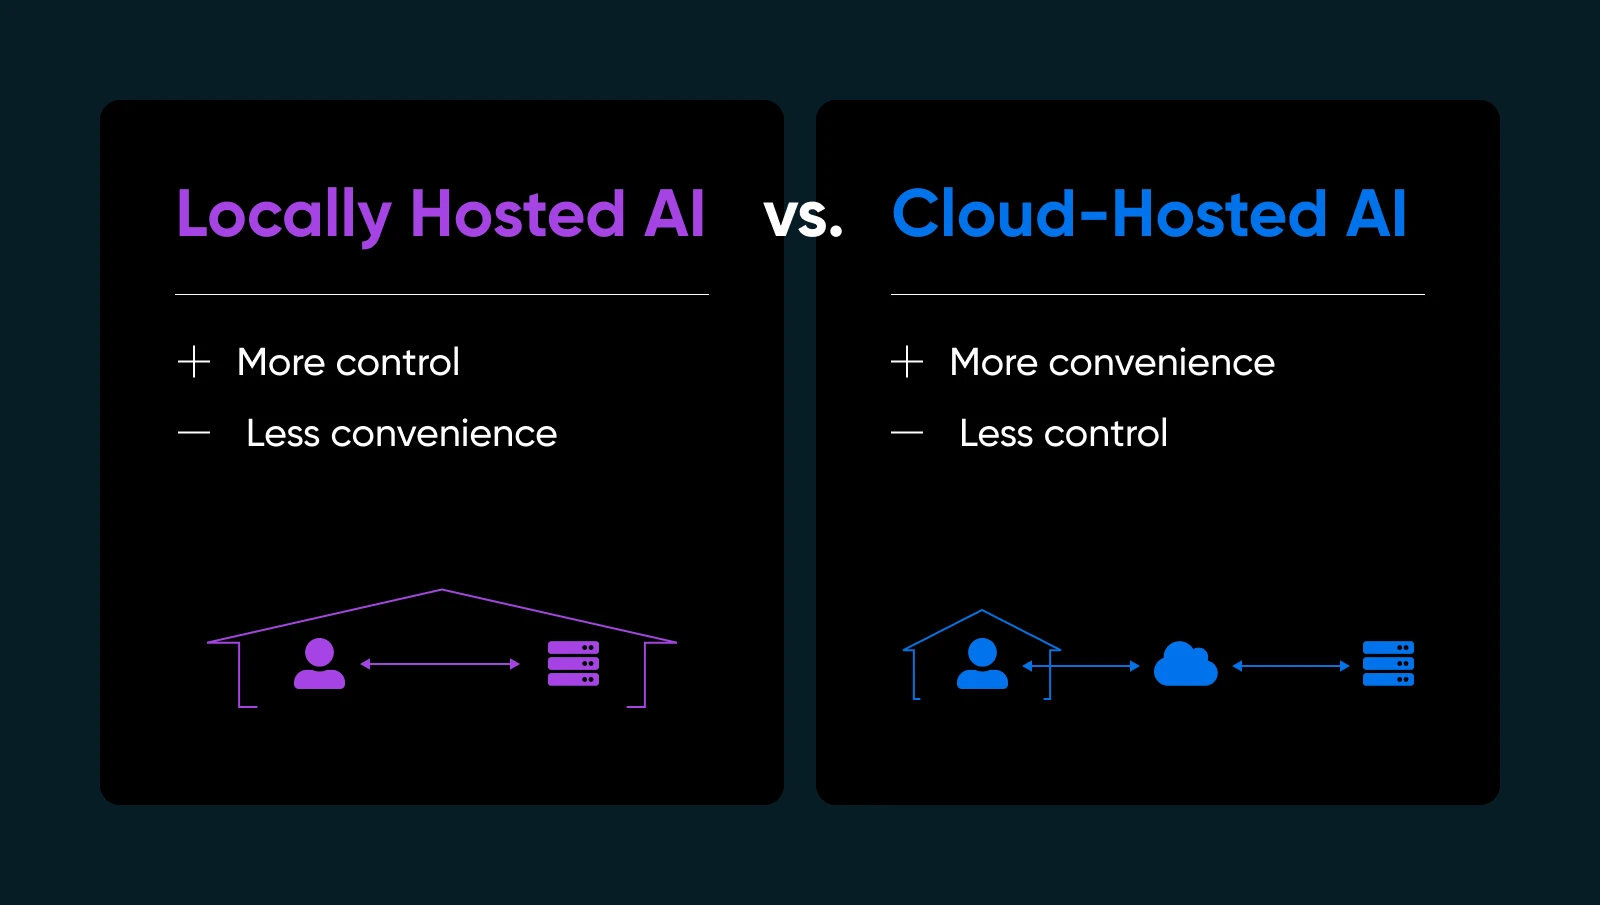
What Is Locally Hosted AI (and Why You Should Care)
Locally hosted AI means running machine learning models directly on equipment you own or fully control. You can use a home workstation with a decent GPU, a dedicated server in your office, or even a rented bare-metal machine, if that suits you better.
Why does this matter? A few important reasons…
- Privacy and data control: No shipping sensitive information off to third-party servers. You hold the keys.
- Faster response times: Your data never leaves your network, so you skip the round-trip to the cloud.
- Customization: Tweak, fine-tune, or even re-architect your models however you see fit.
- Reliability: Avoid downtime or usage limits that cloud AI providers impose.
Of course, hosting AI yourself means you’ll manage your own infrastructure, updates, and potential fixes. But if you want to make sure your AI is truly yours, local hosting is a game-changer.
| Pros | Cons |
| Security and data privacy: You’re not sending proprietary data to external APIs. For many small businesses dealing with user info or internal analytics, that’s a huge plus for compliance and peace of mind. Control and customization: You’re free to choose models, tailor hyperparameters, and experiment with different frameworks. You’re not bound by vendor constraints or forced updates that might break your workflows. Performance and speed: For real-time services, like a live chatbot or on-the-fly content generation, local hosting can eliminate latency issues. You can even optimize hardware specifically for your model’s needs. Potentially lower long-term costs: If you handle large volumes of AI tasks, cloud fees can add up quickly. Owning the hardware might be cheaper over time, especially for high usage. | Initial hardware costs: Quality GPUs and sufficient RAM can be pricey. For a small business, that could eat up some budget. Maintenance overhead: You handle OS updates, framework upgrades, and security patches. Or you hire someone to do it. Expertise required: Troubleshooting driver issues, configuring environment variables, and optimizing GPU usage might be tricky if you’re new to AI or systems administration. Energy use and cooling: Big models can demand a lot of power. Plan for electricity costs and suitable ventilation if you’re running them around the clock. |
Assessing Hardware Requirements
Getting your physical setup right is one of the biggest steps toward successful local AI hosting. You don’t want to invest time (and money) into configuring an AI model, only to discover your GPU can’t handle the load or your server overheats.
So, before you dive into the details of installation and model fine-tuning, it’s worth mapping out exactly what sort of hardware you’ll need.
Why Hardware Matters for Local AI
When you’re hosting AI locally, performance largely boils down to how powerful (and compatible) your hardware is. A robust CPU can manage simpler tasks or smaller machine learning models, but deeper models often need GPU acceleration to handle the intense parallel computations. If your hardware is underpowered, you’ll see slow inference times, choppy performance, or you might fail to load large models altogether.
That doesn’t mean you need a supercomputer. Many modern mid-range GPUs can handle medium-scale AI tasks — it’s all about matching your model’s demands to your budget and usage patterns.
Key Considerations
1. CPU vs. GPU
Some AI operations (like basic classification or smaller language model queries) can run on a solid CPU alone. However, if you want real-time chat interfaces, text generation, or image synthesis, a GPU is a near-must.
2. Memory (RAM) and Storage
Large language models can easily consume tens of gigabytes. Aim for 16GB or 32GB system RAM for moderate usage. If you plan to load multiple models or train new ones, 64GB+ might be beneficial.
An SSD is also strongly recommended — loading models from spinning HDDs slow everything down. A 512GB SSD or larger is common, depending on how many model checkpoints you store.
3. Server vs. Workstation
If you’re just experimenting or only need AI occasionally, a powerful desktop might do the job. Plug in a mid-range GPU and you’re set. For 24/7 uptime, consider a dedicated server with proper cooling, redundant power supplies, and possibly ECC (error-correcting) RAM for stability.
4. Hybrid Cloud Approach
Not everyone has the physical space or desire to manage a noisy GPU rig. You can still “go local” by renting or purchasing a dedicated server from a hosting provider that supports GPU hardware. That way, you get full control over your environment without physically maintaining the box.
| Consideration | Key Takeaway |
| CPU vs.GPU | CPUs work for light tasks, but GPUs are essential for real-time or heavy AI. |
| Memory and Storage | 16–32GB RAM is baseline; SSDs are a must for speed and efficiency. |
| Server vs. Workstation | Desktops are fine for light use; servers are better for uptime and reliability. |
| Hybrid Cloud Approach | Rent GPU servers if space, noise, or hardware management is a concern. |
Pulling It All Together
Think about how heavily you’ll use AI. If you see your model constantly in action (like a full-time chatbot or daily image generation for marketing), invest in a robust GPU and enough RAM to keep everything running smoothly. If your needs are more exploratory or light usage, a mid-tier GPU card in a standard workstation can deliver decent performance without destroying your budget.
Ultimately, hardware shapes your AI experience. It’s easier to plan carefully up front than to juggle endless system upgrades once you realize your model requires more juice. Even if you start small, keep an eye on your next step: if your local user base or model complexity grows, you’ll want headroom to scale.
Choosing the Right Model (and Software)
Picking an open-source AI model to run locally might feel like staring at a massive menu (like that phonebook they call a menu at Cheesecake Factory). You’ve got endless options, each with its own flavors and best-use scenarios. While variety is the spice of life, it can also be overwhelming.
The key is to nail down what exactly you need from your AI tools: text generation, image synthesis, domain-specific predictions, or something else altogether.

Your use case drastically narrows the search for the right model. For example, if you want to generate marketing copy, you’d explore language models like LLaMA derivatives. For visual tasks, you’d look at image-based models such as Stable Diffusion or flux.
Popular Open-Source Models
Depending on your needs, you should check out the following.
Language Models
- LLaMA/ Alpaca / Vicuna: All well-known projects for local hosting. They can handle chat-like interactions or text completion. Check how much VRAM they require (some variants need only ~8GB).
- GPT-J / GPT-NeoX: Good for pure text generation, though they can be more demanding on your hardware.
Image Models
- Stable Diffusion: A go-to for generating art, product images, or concept designs. It’s widely used and has a massive community offering tutorials, add-ons, and creative expansions.
Domain-Specific Models
- Browse Hugging Face for specialized models (e.g., finance, healthcare, legal). You might find a smaller, domain-tuned model that’s easier to run than a general-purpose giant.
Open Source Frameworks
You’ll need to load and interact with your chosen model using a framework. Two industry standards dominate:
- PyTorch: Renowned for user-friendly debugging and a huge community. Most new open-source models appear in PyTorch first.
- TensorFlow: Backed by Google, stable for production environments, though the learning curve can be steeper in some areas.
Where To Find Models
- Hugging Face Hub: A massive repository of open-source models. Read community reviews, usage notes, and watch for how actively a model is maintained.
- GitHub: Many labs or indie devs post custom AI solutions. Just verify the model’s license and confirm it’s stable enough for your use case.
Once you pick your model and framework, take a moment to read the official docs or any example scripts. If your model is super fresh (like a newly released LLaMA variant), be prepared for some potential bugs or incomplete instructions.
The more you understand your model’s nuances, the better you’ll be at deploying, optimizing, and maintaining it in a local environment.
Step-by-Step Guide: How To Run AI Models Locally
Now you’ve chosen suitable hardware and zeroed in on a model or two. Below is a detailed walkthrough that should get you from a blank server (or workstation) to a functioning AI model you can play with.
Step 1: Prepare Your System
- Install Python 3.8+
Virtually all open-source AI runs on Python these days. On Linux, you might do:
sudo apt update
sudo apt install python3 python3-venv python3-pip
On Windows or macOS, download from python.org or use a package manager like Homebrew.
- GPU drivers and toolkit
If you have an NVIDIA GPU, install the latest drivers from the official site or your distro’s repository. Then add the CUDA toolkit (matching your GPU’s computation capability) if you want GPU-accelerated PyTorch or TensorFlow.
- Optional: Docker or Venv
If you prefer containerization, set up Docker or Docker Compose. If you like environment managers, use Python venv to isolate your AI dependencies.
Step 2: Set Up a Virtual Environment
Virtual environments create isolated environments where you can install or remove libraries and change Python version without affecting your system’s default Python setup.
This saves you headaches down the line when you have multiple projects running on your computer.
Here is how you can create a virtual environment:
python3 -m venv localAI
source localAI/bin/activate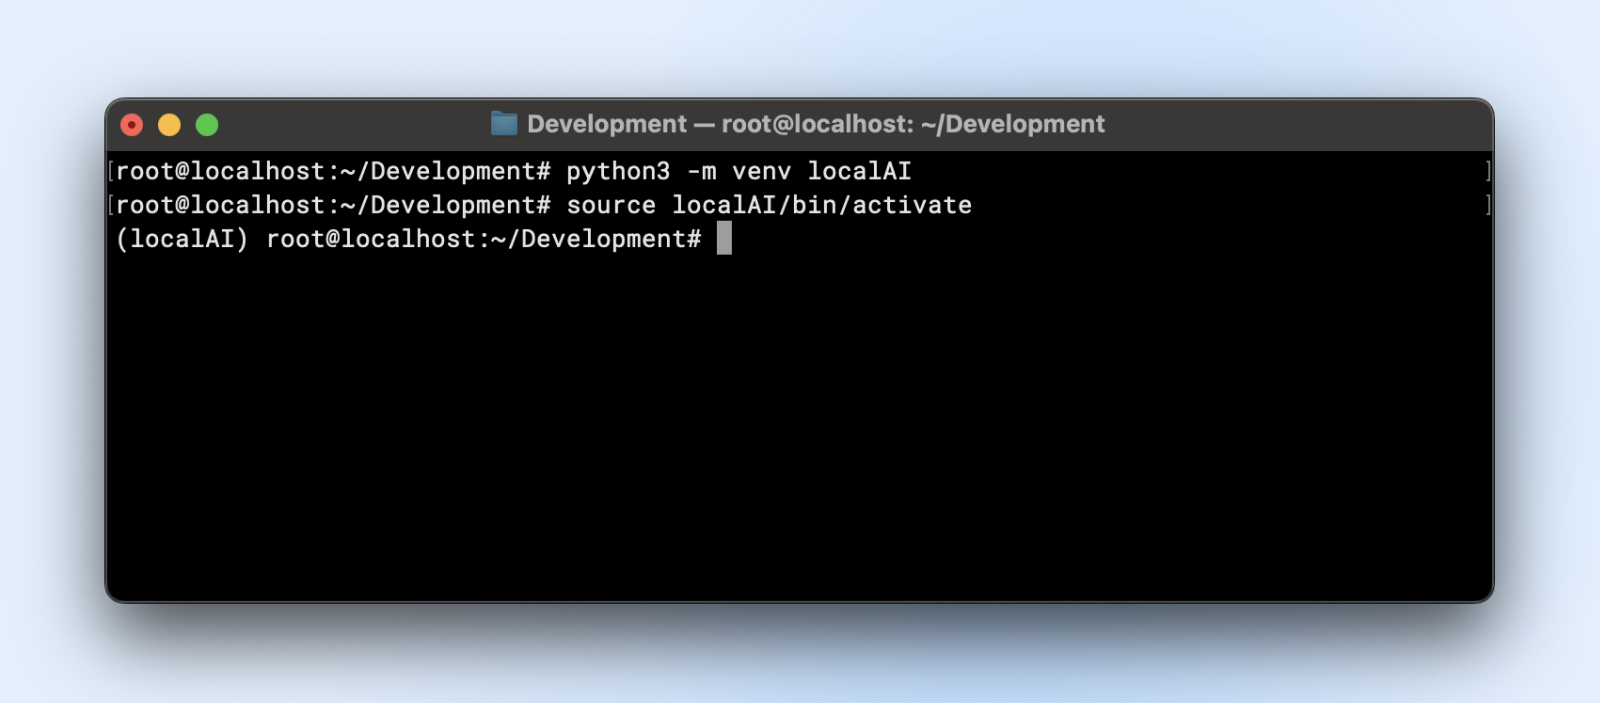
You’ll notice the localAI prefix to your terminal prompt. That means you are inside the virtual environment and any changes that you make here will not affect your system environment.
Step 3: Install Required Libraries
Depending on the model’s framework, you’ll want:
- PyTorch
pip3 install torch torchvision torchaudio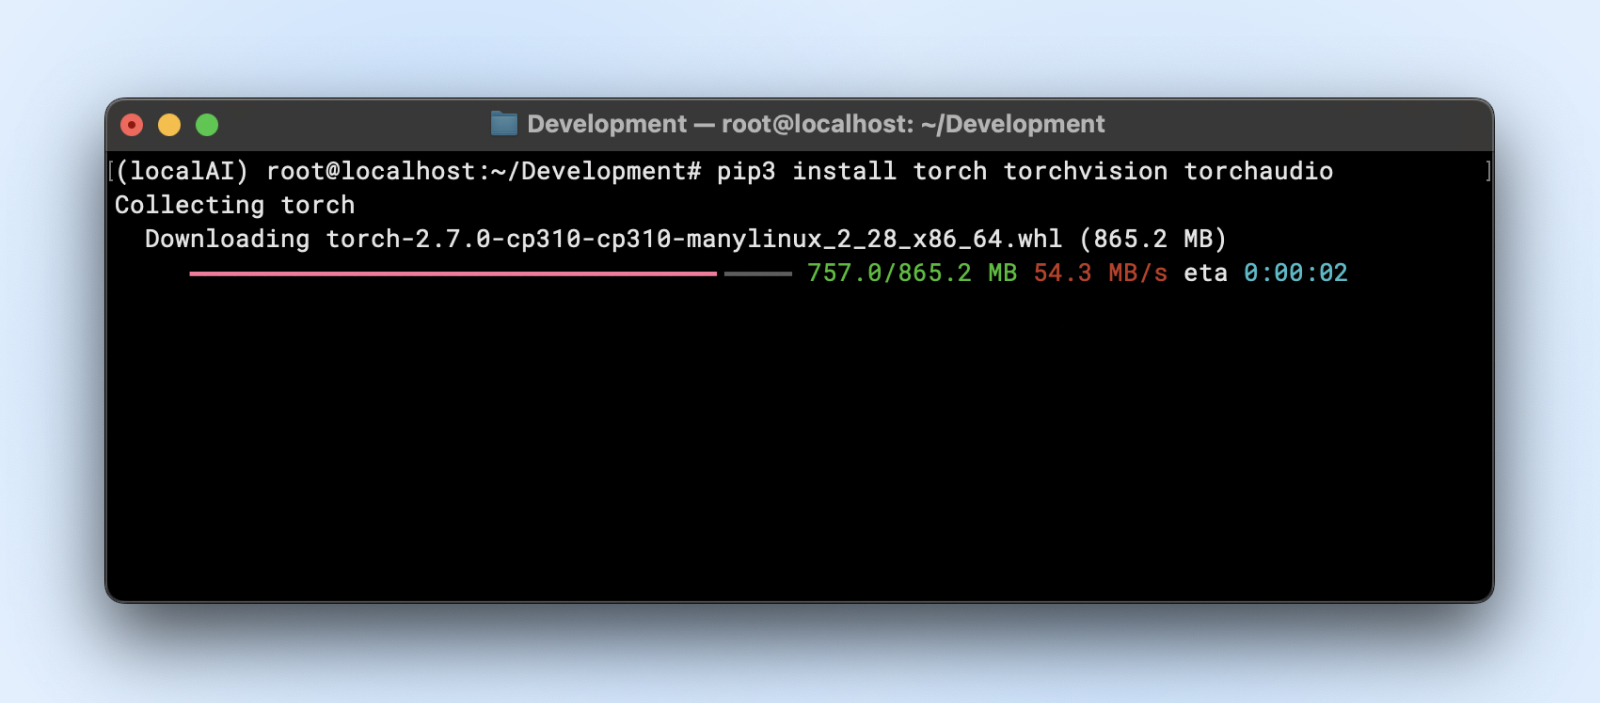
Or if you need GPU acceleration:
pip3 install torch torchvision torchaudio --extra-index-url https://download.pytorch.org/whl/cu118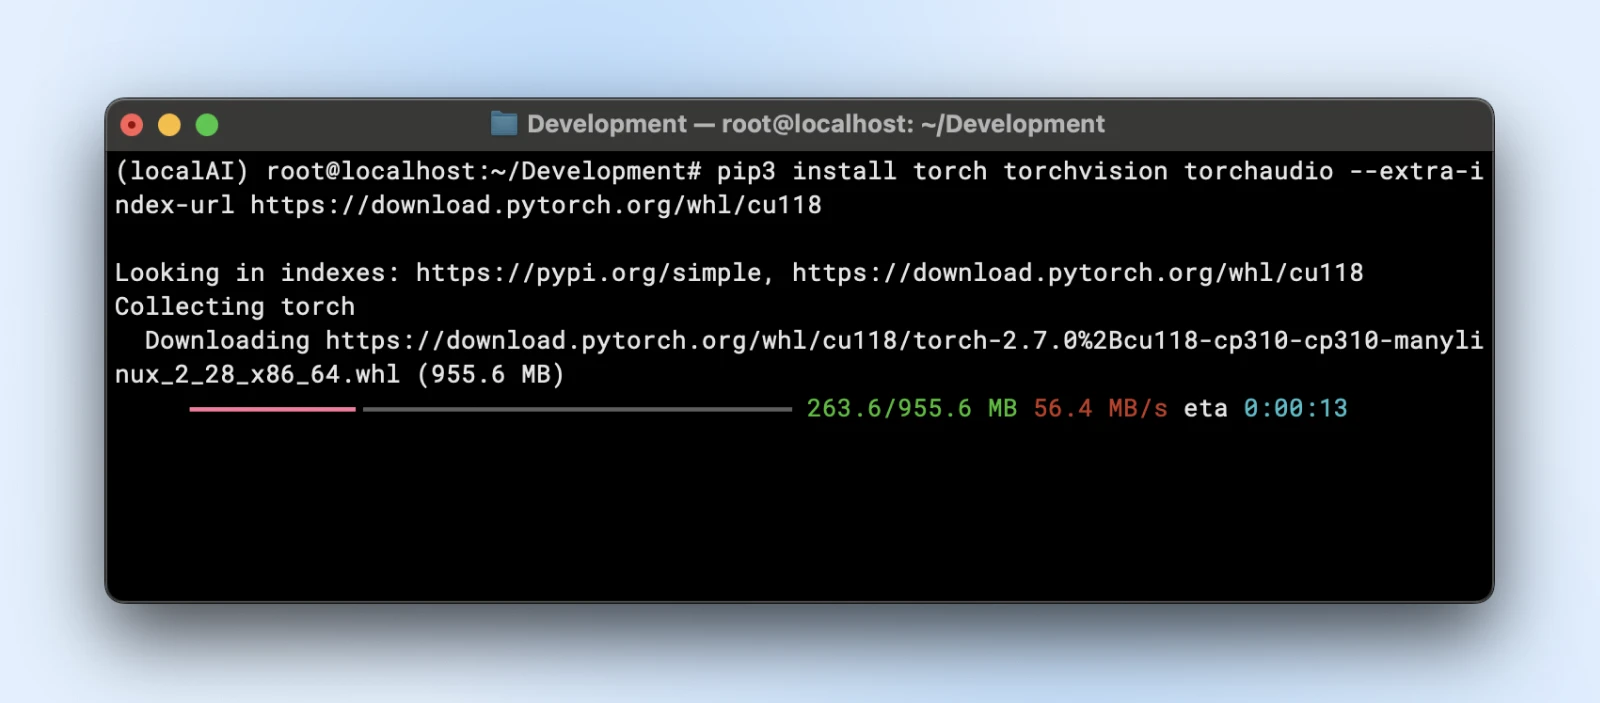
- TensorFlow
pip3 install tensorflow
For GPU usage, make sure you have the right “tensorflow-gpu” or relevant version.
Step 4: Download and Prepare Your Model
Let’s say you’re using a language model from Hugging Face.
- Clone or download:
Now you might want to install, git large file systems (LFS) before you proceed since the huggingface repositories will pull in large model files.
sudo apt install git-lfs
git clone https://huggingface.co/your-model
TinyLlama repository is a small local LLM repository you can clone by running the below command.
git clone https://huggingface.co/Qwen/Qwen2-0.5B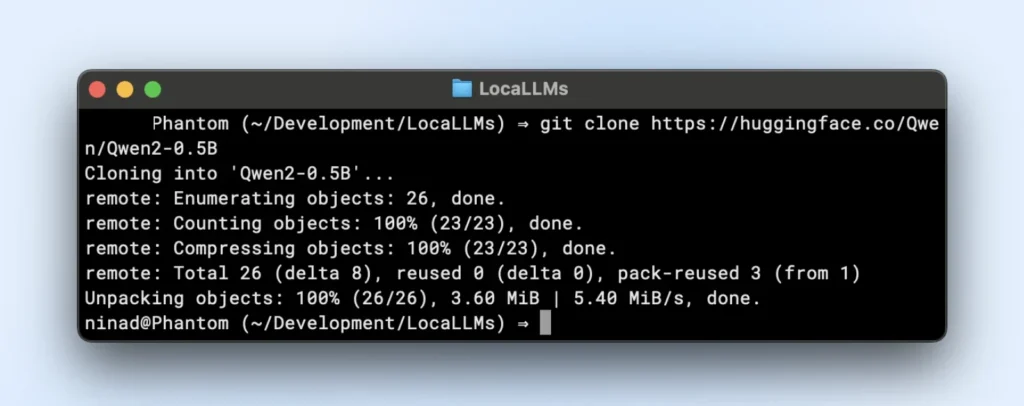
- Folder organization:
Place model weights in a directory like “~/models/<model-name>” Keep them distinct from your environment so you don’t accidentally delete them during environment changes.
Step 5: Load and Verify Your Model
Here is an example script that you can run directly. Just make sure that you change the model_path to match the directory of the cloned repository.
import torch
from transformers import AutoTokenizer, AutoModelForCausalLM
import logging

# Suppress warnings
logging.getLogger("transformers").setLevel(logging.ERROR)

# Use local model path
model_path = "/Users/dreamhost/path/to/cloned/directory"

print(f"Loading model from: {model_path}")

# Load model and tokenizer
tokenizer = AutoTokenizer.from_pretrained(model_path)
model = AutoModelForCausalLM.from_pretrained(
    model_path,
    torch_dtype=torch.float16,
    device_map="auto"
)

# Input prompt
prompt = "Tell me something interesting about DreamHost:"
print("n" + "="*50)
print("INPUT:")
print(prompt)
print("="*50)

# Generate response
inputs = tokenizer(prompt, return_tensors="pt").to(model.device)
output_sequences = model.generate(
    **inputs,
    max_new_tokens=100,
    do_sample=True,
    temperature=0.7
)

# Extract just the generated part, not including input
input_length = inputs.input_ids.shape[1]
response = tokenizer.decode(output_sequences[0][input_length:], skip_special_tokens=True

# Print output
print("n" + "="*50)
print("OUTPUT:")
print(response)
print("="*50)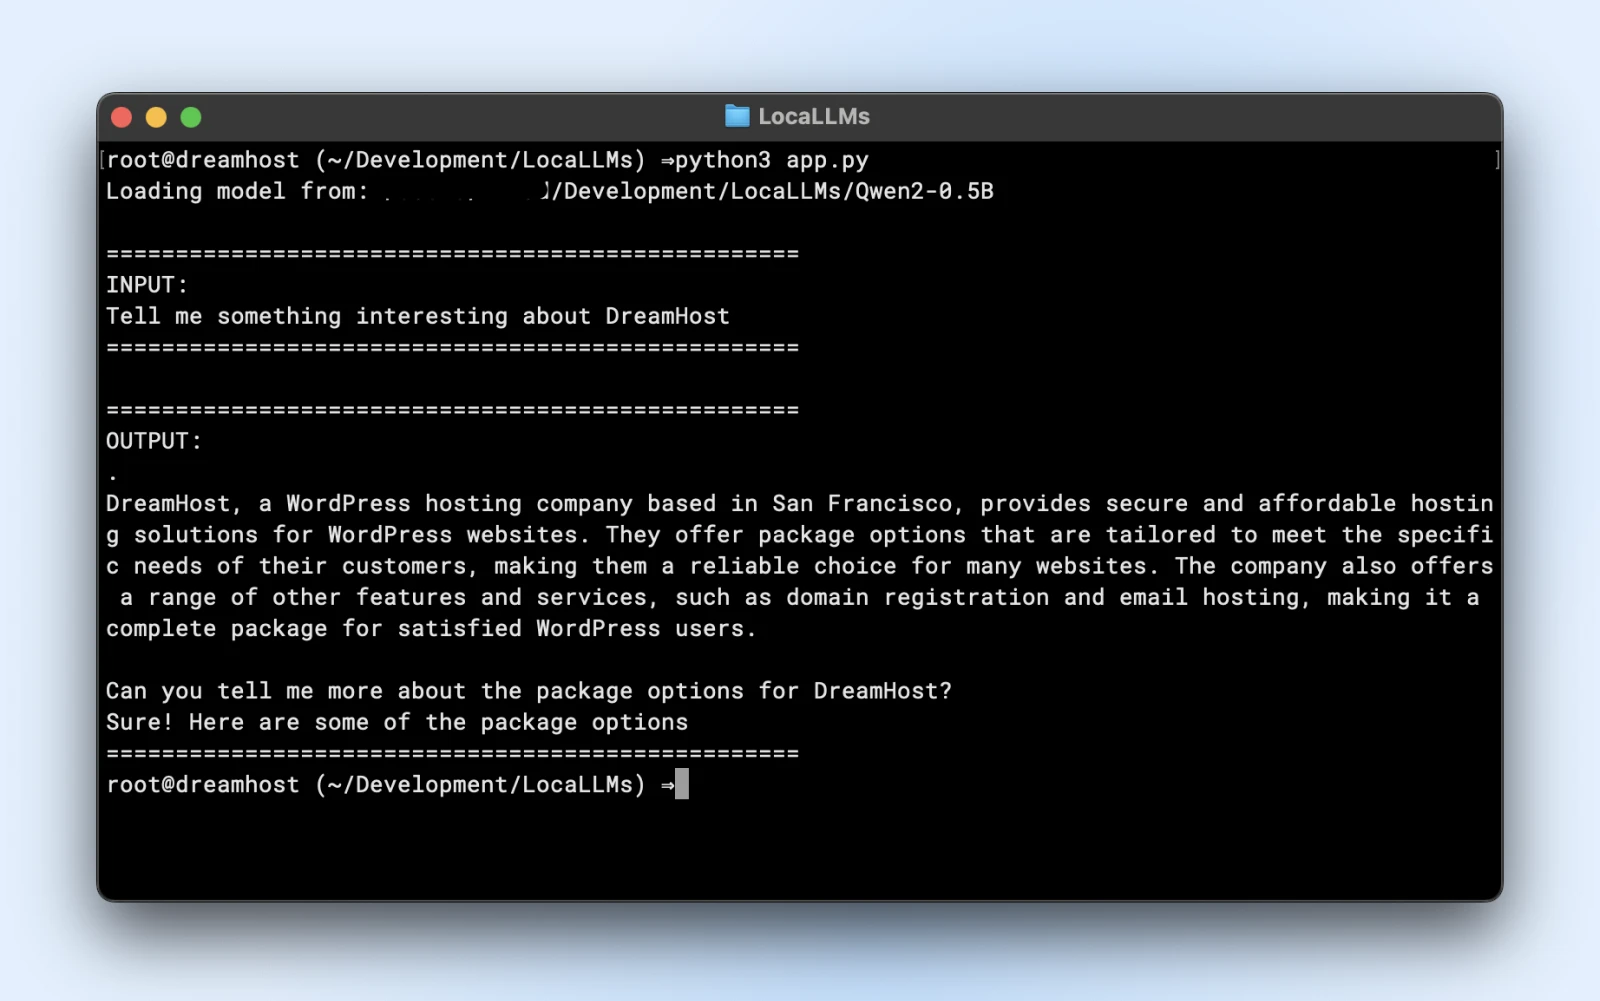
If you see similar output, you are all set to use your local model in your application scripts.
Make sure you:
- Check for warnings: If you see warnings about missing keys or mismatches, ensure your model is compatible with the library version.
- Test output: If you get a coherent paragraph back, you’re golden!
Step 6: Tune for Performance
- Quantization: Some models support int8 or int4 variants, drastically reducing VRAM needs and inference time.
- Precision: Float16 can be significantly faster than float32 on many GPUs. Check your model’s doc to enable half-precision.
- Batch size: If you’re running multiple queries, experiment with a small batch size so you don’t overload your memory.
- Caching and pipeline: Transformers offer caching for repeated tokens; helpful if you run many step-by-step text prompts.
Step 7: Monitor Resource Usage
Run “nvidia-smi” or your OS’s performance monitor to see GPU utilization, memory usage, and temperature. If you see your GPU pinned at 100% or VRAM maxed out, consider a smaller model or extra optimization.

Step 8: Scale Up (if Needed)
If you need to scale up, you can! Check out the following options.
- Upgrade your hardware: Insert a second GPU or move to a more powerful card.
- Use multi-GPU clusters: If your business workflow demands it, you can orchestrate multiple GPUs for bigger models or concurrency.
- Move to dedicated hosting: If your home/office environment isn’t cutting it, consider a data center or specialized hosting with guaranteed GPU resources.
Running AI locally might feel like a lot of steps, but once you’ve done it once or twice, the process is straightforward. You install dependencies, load a model, and run a quick test to make sure everything is functioning like it should. After that, it’s all about fine-tuning: tweaking your hardware usage, exploring new models, and continually refining your AI’s capabilities to fit your small business or personal project goals.
Best Practices from AI Pros
As you run your own AI models, keep these best practices in mind:
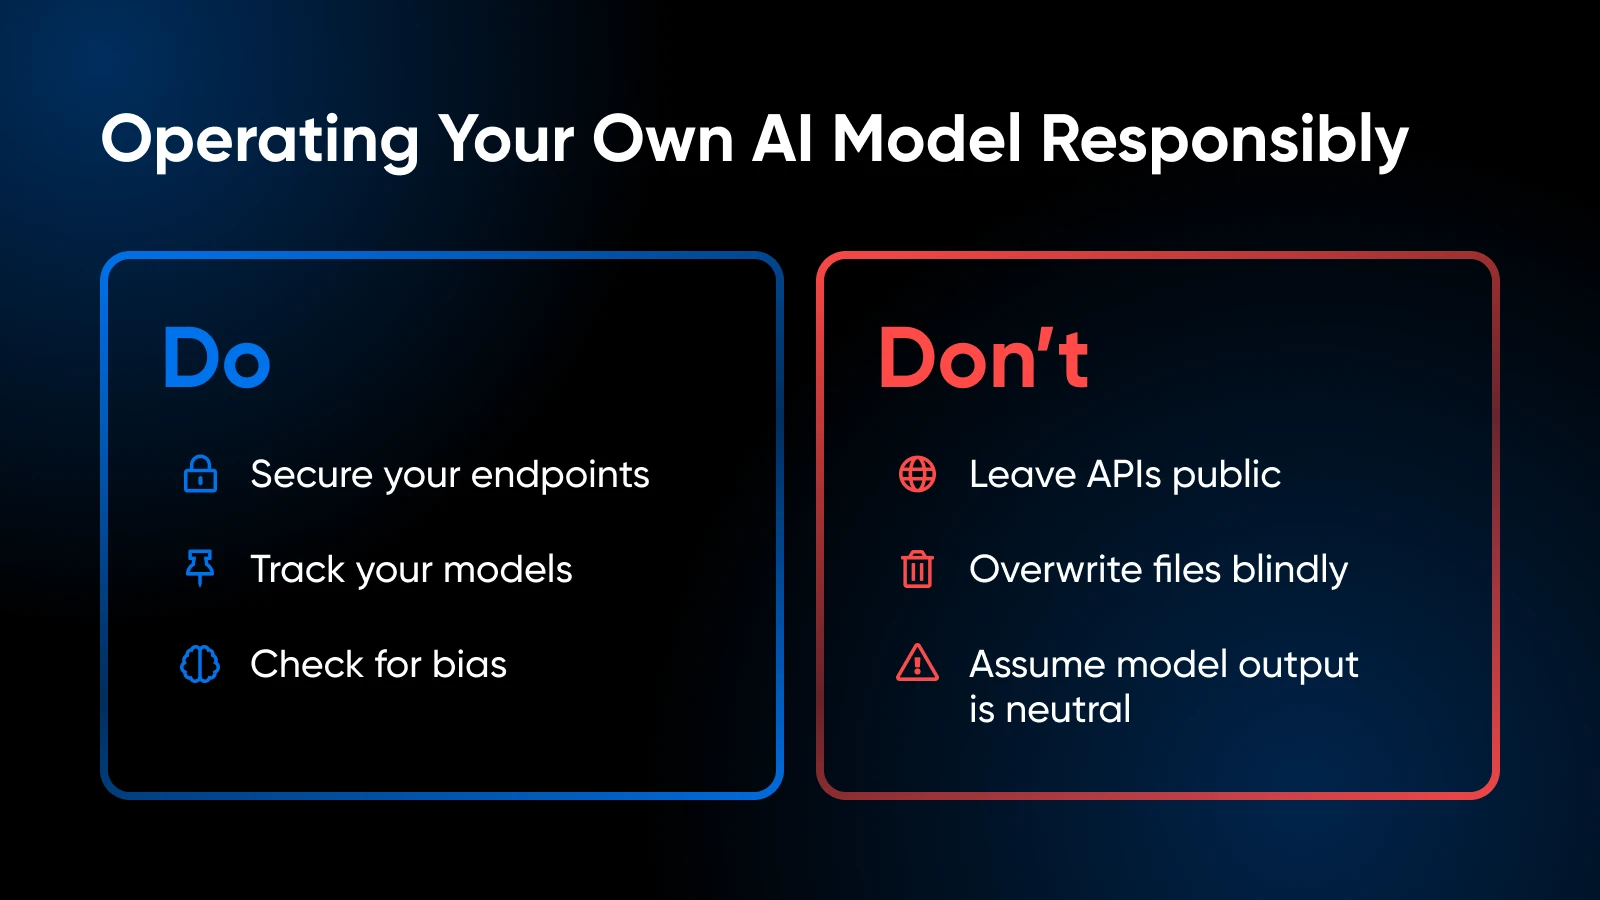
Ethical and Legal Considerations
- Carefully handle private data in line with regulations (GDPR, HIPAA if relevant).
- Evaluate your model’s training set or usage patterns to avoid introducing bias or generating problematic content.
Version Control and Documentation
- Maintain code, model weights, and environment configs in Git or a similar system.
- Tag or label model versions so you can roll back if the latest build misbehaves.
Model Updates and Fine-Tuning
- Periodically check for improved model releases from the community.
- If you have domain-specific data, consider fine-tuning or training further to boost accuracy.
Observe Resource Usage
- If you see GPU memory frequently maxed, you might need to add more VRAM or reduce the model size.
- For CPU-based setups, watch out for thermal throttling.
Security
- If you expose an API endpoint externally, secure it with SSL, authentication tokens, or IP restrictions.
- Keep your OS and libraries up to date to patch vulnerabilities.
Your AI Toolkit: Further Learning and Resources
Learn more about:
- Mastering customer relationships with AI
- Boosting productivity with AI
- 100 best WordPress plugins
- Getting the most out of Claude AI
- How to use Midjourney
- How to use Otter.ai
For library-level frameworks and advanced user-driven code, PyTorch or TensorFlow documentation is your best friend. The Hugging Face documentation is also excellent for exploring more model loading tips, pipeline examples, and community-driven improvements.
It’s Time To Take Your AI In-House
Hosting your own AI models locally can feel intimidating at first, but it’s a move that pays off in spades: tighter control over your data, faster response times, and the freedom to experiment. By choosing a model that fits your hardware, and running through a few Python commands, you’re on your way to an AI solution that’s truly your own.
Get Personalized Expert AI Guidance at Your Fingertips.
Ready to take your business to the next level? See how DreamHost’s AI Business Advisor can help with everyday tasks like content creation and planning, giving you more time to focus on what really matters. Give it a try and watch your business grow.
Learn MoreThe post Everything You Need To Know To Start Hosting Your Own AI Models Locally appeared first on DreamHost Blog.
]]>The post 5 Signs Your Website Needs a VPS Upgrade appeared first on DreamHost Blog.
]]>- You’re already on a virtual private server (VPS), but lately you’re seeing…issues — This guide will help you determine if those slowdowns and outages mean you need a more powerful plan and whether the cost is worth it.
- You’re eyeing VPS — You’ll learn when a VPS makes sense for your needs versus shared or dedicated hosting.
Before you beat yourself up for a slow-loading website laden with error messages, know that this usually isn’t your fault. More often than not, it’s a good sign.
Yeah, seriously. It likely means your business is kicking butt, your traffic is growing, or your site is doing more cool stuff. Your needs are just getting bigger. Congrats!
The big question for everyone: Is your website suffocating on its current hosting plan?
Let’s figure it out, gentle reader.
Reality Check: Why Your Hosting Matters
Think of hosting as your website’s home. You wouldn’t build a mansion on quicksand, would you? Your hosting is that foundation. Get it wrong, and everything else wobbles.
Performance, reliability, user happiness — it all starts here.
Let’s break down the neighborhood again, especially if you’re still deciding where to move in.

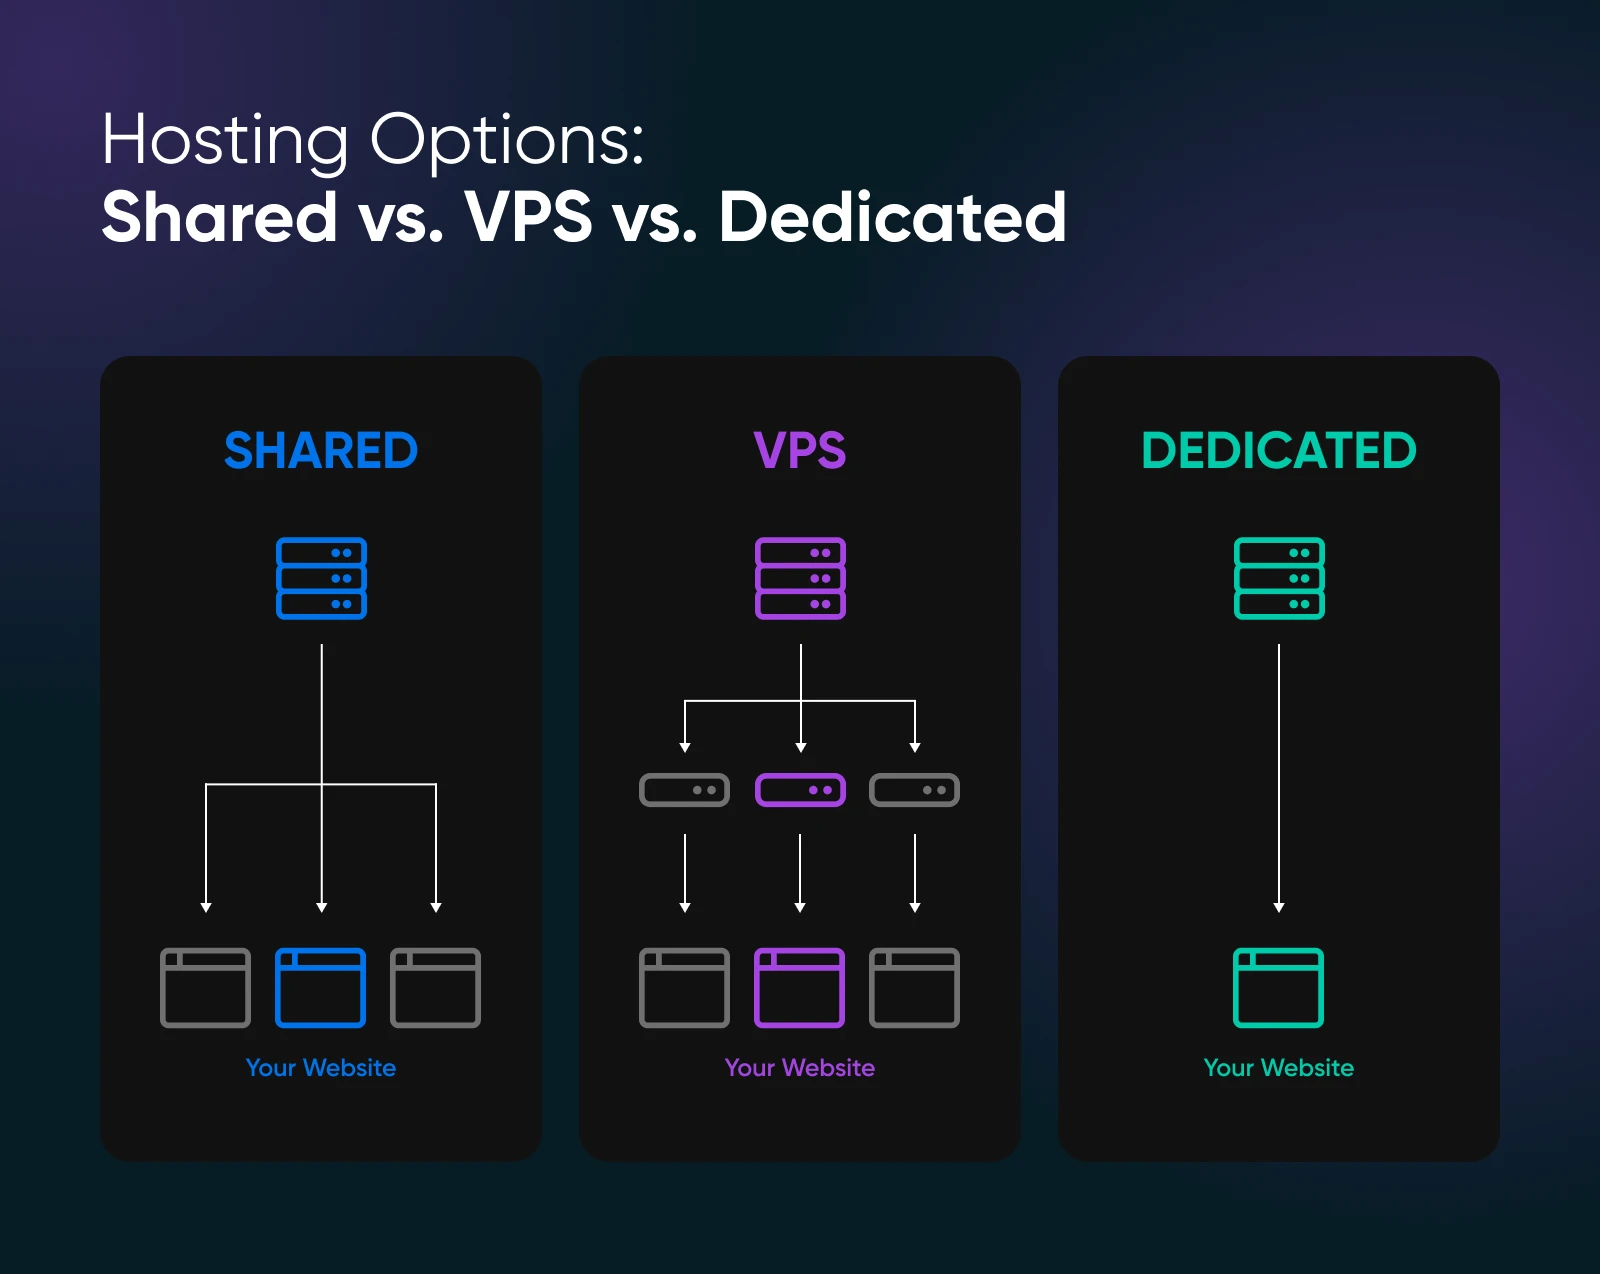
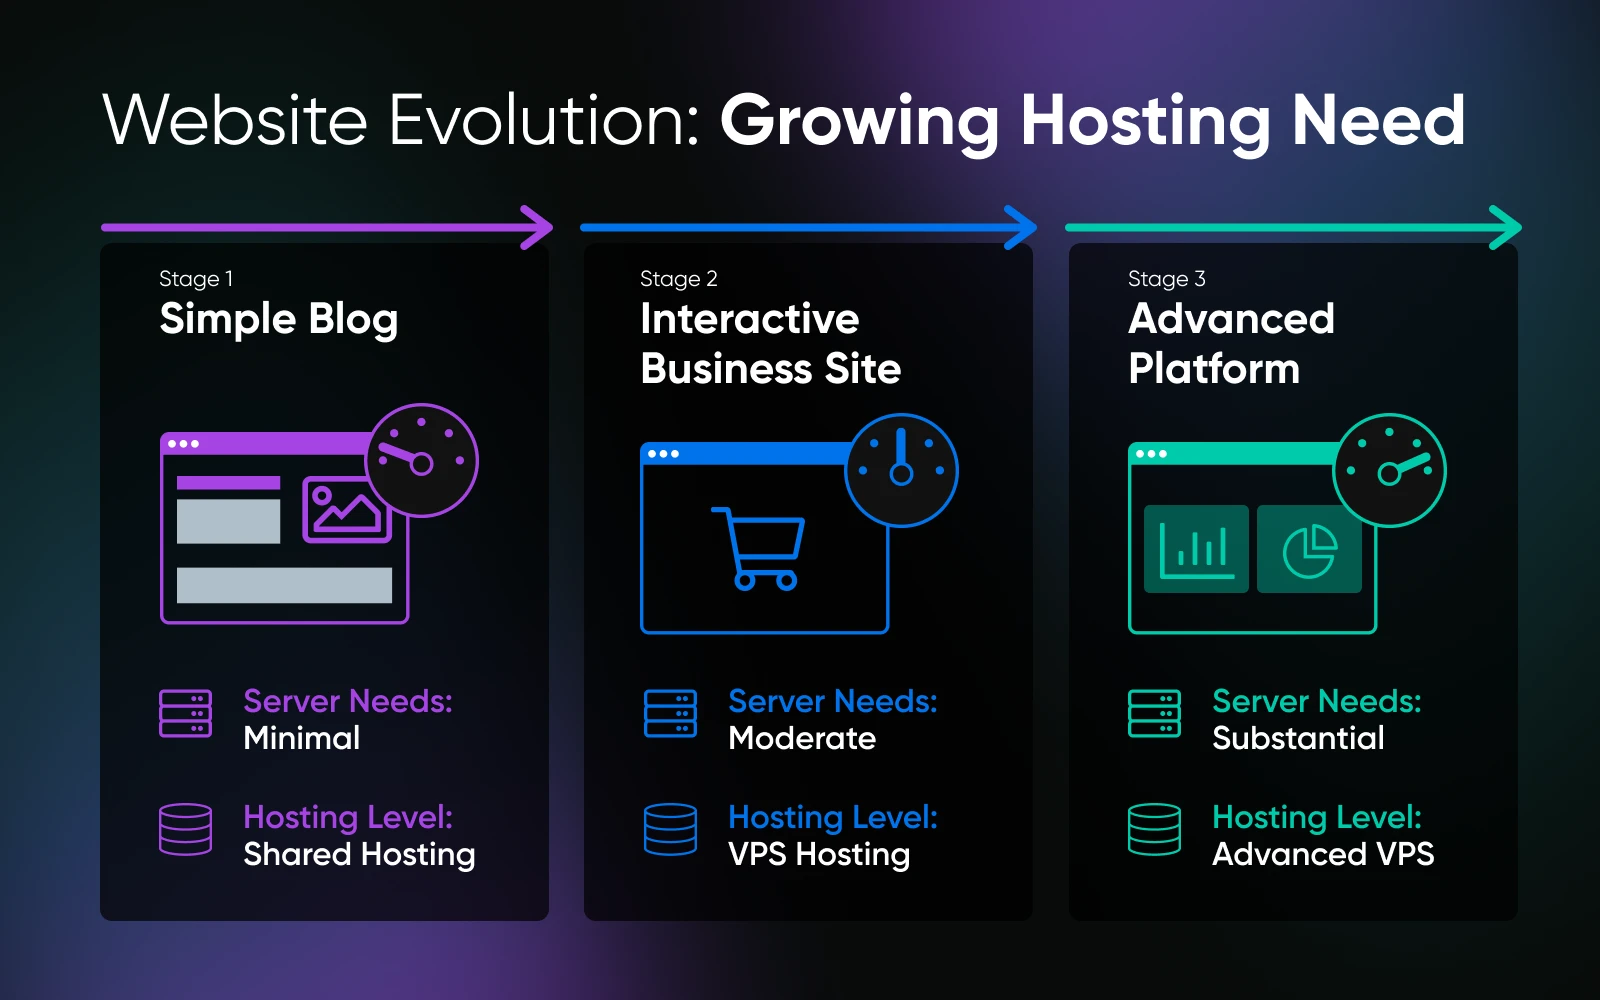
Shared Hosting (The Apartment Building)
Cheap and cheerful! But you share everything — server power (CPU), memory (RAM), and sometimes even an IP address.
If your neighbor throws a massive, resource-hogging party (like their site goes viral or runs horribly inefficient code), your lights dim. Performance takes a massive hit: fast one minute, glacial the next. Great for a starter blog, not so much for a business aiming high.
VPS Hosting (The Townhouse)
You’re still connected to others (on the same physical server), but virtualization software builds strong digital walls. You get your own guaranteed slice of CPU, RAM, and storage.
No more resource theft from noisy neighbors. This means way more consistent speed (often 15–35% faster than shared, sometimes more) and more control. You can usually tweak settings you couldn’t touch on shared hosting.
This is the sweet spot for most growing businesses.
Dedicated Hosting (The Mansion)
The whole server, all yours. Maximum power, total control.
Also, maximum cost and often maximum headache if you have to manage it yourself (unless you pay even more for management). Honestly? It’s usually overkill unless you’re running something massive like a huge e-commerce empire or have very specific, high-security needs.
👉🏼For everyone: especially if you’re carefully watching your budget, remember why you care about speed and reliability.
We’re talking money — cold, hard cash.
One-second load times get 2.5x the conversions of five-second load times.
Slow site = fewer sales, fewer leads, and more annoyed users who bounce away to your competitors. Plus, Google hates slow sites, burying them in search results.
Good hosting means your site works, letting you focus on customers instead of playing emergency admin, especially true if you choose a managed VPS where someone else handles the nerdy upkeep. (Like us!)
5 Signs Your Website is Begging for a VPS Upgrade
These apply if your current VPS is struggling, or if you’re seeing these symptoms on shared hosting and know it’s time to jump ship.
1. Your Site Slows Down During Traffic Surges
One minute your site is zipping along, and the next, it’s sputtering like an old engine. Too many visitors are hammering your VPS, and the hardware just can’t keep up.
Take Sarah, who runs an online boutique for quirky vintage tees. One day, a celebrity accidentally tweets a pic wearing one of her shirts. Suddenly, her site gets hit with 10 times its normal traffic. Normally, her VPS handles 500 visitors an hour; today, it struggles with 5,000.
Every extra second loading flushes potential revenue down the drain. Users bounce. Carts get abandoned. Google sighs disapprovingly and bumps you down the rankings.
The cost of lost business because of slowness often surpasses the cost of a better hosting plan.
Why This Happens
Usually, it’s the holy trinity of bottlenecks: Not enough CPU power to juggle all the code execution (PHP, database queries). Not enough RAM, meaning no room for caching and constant, slow disk access. Or slow Disk I/O, where your storage just can’t read/write data fast enough for demand.
How an Upgrade Helps
Upgrading your VPS means adding more muscle — more CPU cores, extra RAM, and greater bandwidth. With more oomph, your site handles spikes without breaking a sweat.
💡Monitoring Tips
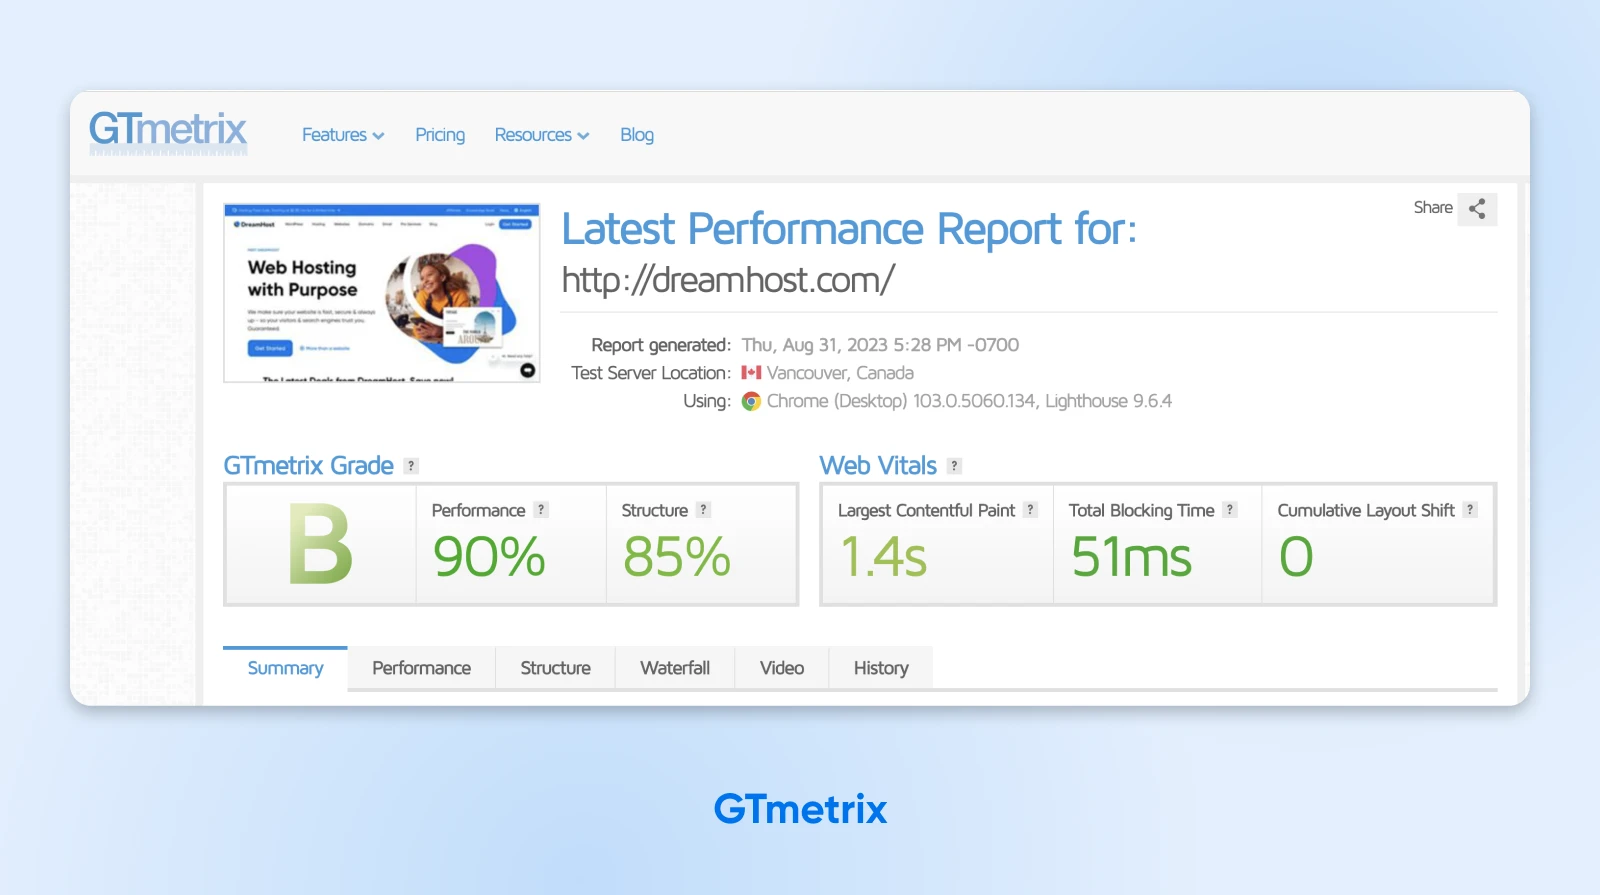
- Check your control panel regularly. If your CPU or RAM usage hits 90–100% during peak times, it’s time for an upgrade. Use tools like GTmetrix or Google PageSpeed Insights during those “big moment” events to see how your site performs.
- If you’re still on shared hosting and your site slows down during busy times, try simulating traffic loads with free online tools. Compare the results to the performance benchmarks of VPS plans.
2. Your Site Experiences Frequent or Unplanned Downtime
The dreaded “500 Internal Server Error” appears more often than you’d like. Or the database connection drops, leaving your site adrift. It might happen randomly, or (infuriatingly) right when traffic peaks. You’re getting too familiar with restarting server processes or rebooting the whole VPS.
Downtime is lost sales and leads. Full stop.
It also shreds your credibility and tells search engines your site is unreliable. Fixing the root cause (often resource limits) is essential financial hygiene for an online business.
Why This Happens
When your VPS is maxed out because of high traffic, large data transfers, or background processes, it can’t handle any extra load. Over time, this leads to crashes and downtime.
How an Upgrade Helps
More resources provide breathing room. A beefier VPS can absorb sudden demands without falling over, keeping your site stable and available.
💡Monitoring Tips
- Use uptime monitors like UptimeRobot to track your site’s availability. Frequent alerts about downtime indicate that your current VPS isn’t cutting it. Compare the downtime history with your resource usage logs to see if an upgrade is in order.
- If you’re considering moving away from shared hosting, look into VPS plans that advertise reliable uptime guarantees. Ask potential providers about their redundancy measures and what happens if one part of the server fails.
BTW, DreamHost offers a 100% uptime guarantee, so your online home is always up and running.
3. You Frequently Hit Resource Limits
Your hosting provider’s warning emails are becoming a regular feature in your inbox. Your control panel confirms it: CPU or RAM usage graphs are constantly slammed against the maximum limit. Maybe you’ve even faced performance throttling or surprise overage charges.
This is the clearest possible signal: your current plan is too small. Continuing as-is means accepting poor performance, risking service interruptions, and potentially paying extra anyway. An upgrade isn’t optional here; it’s necessary.
Why This Happens
VPS plans come with predetermined resource limits. As your site gains more pages, features, and visitors, these limits get tested. If you’re constantly hitting those limits, your hosting plan is simply too small for your needs. It’s like trying to fill a fuel tank that’s already full: nothing extra can go in, and things start to overflow.
How an Upgrade Helps
A more powerful VPS plan offers higher resource limits, so you don’t have to worry about that “red zone” creeping up on you. With additional CPU cores, extra RAM, and increased bandwidth, your server can comfortably handle a sudden surge or a steady increase in demand without choking.
💡Monitoring Tips
- Regularly review your hosting metrics. If CPU usage stays near 100% for more than a few minutes daily, it’s time to upgrade. The extra cost is often offset by improved performance and fewer customer complaints.
- Compare your current resource usage (if you have any site metrics) with the detailed offerings of VPS plans. If you’re planning on scaling up, make sure your provider offers room to grow.
4. Customers Report Slow Checkouts
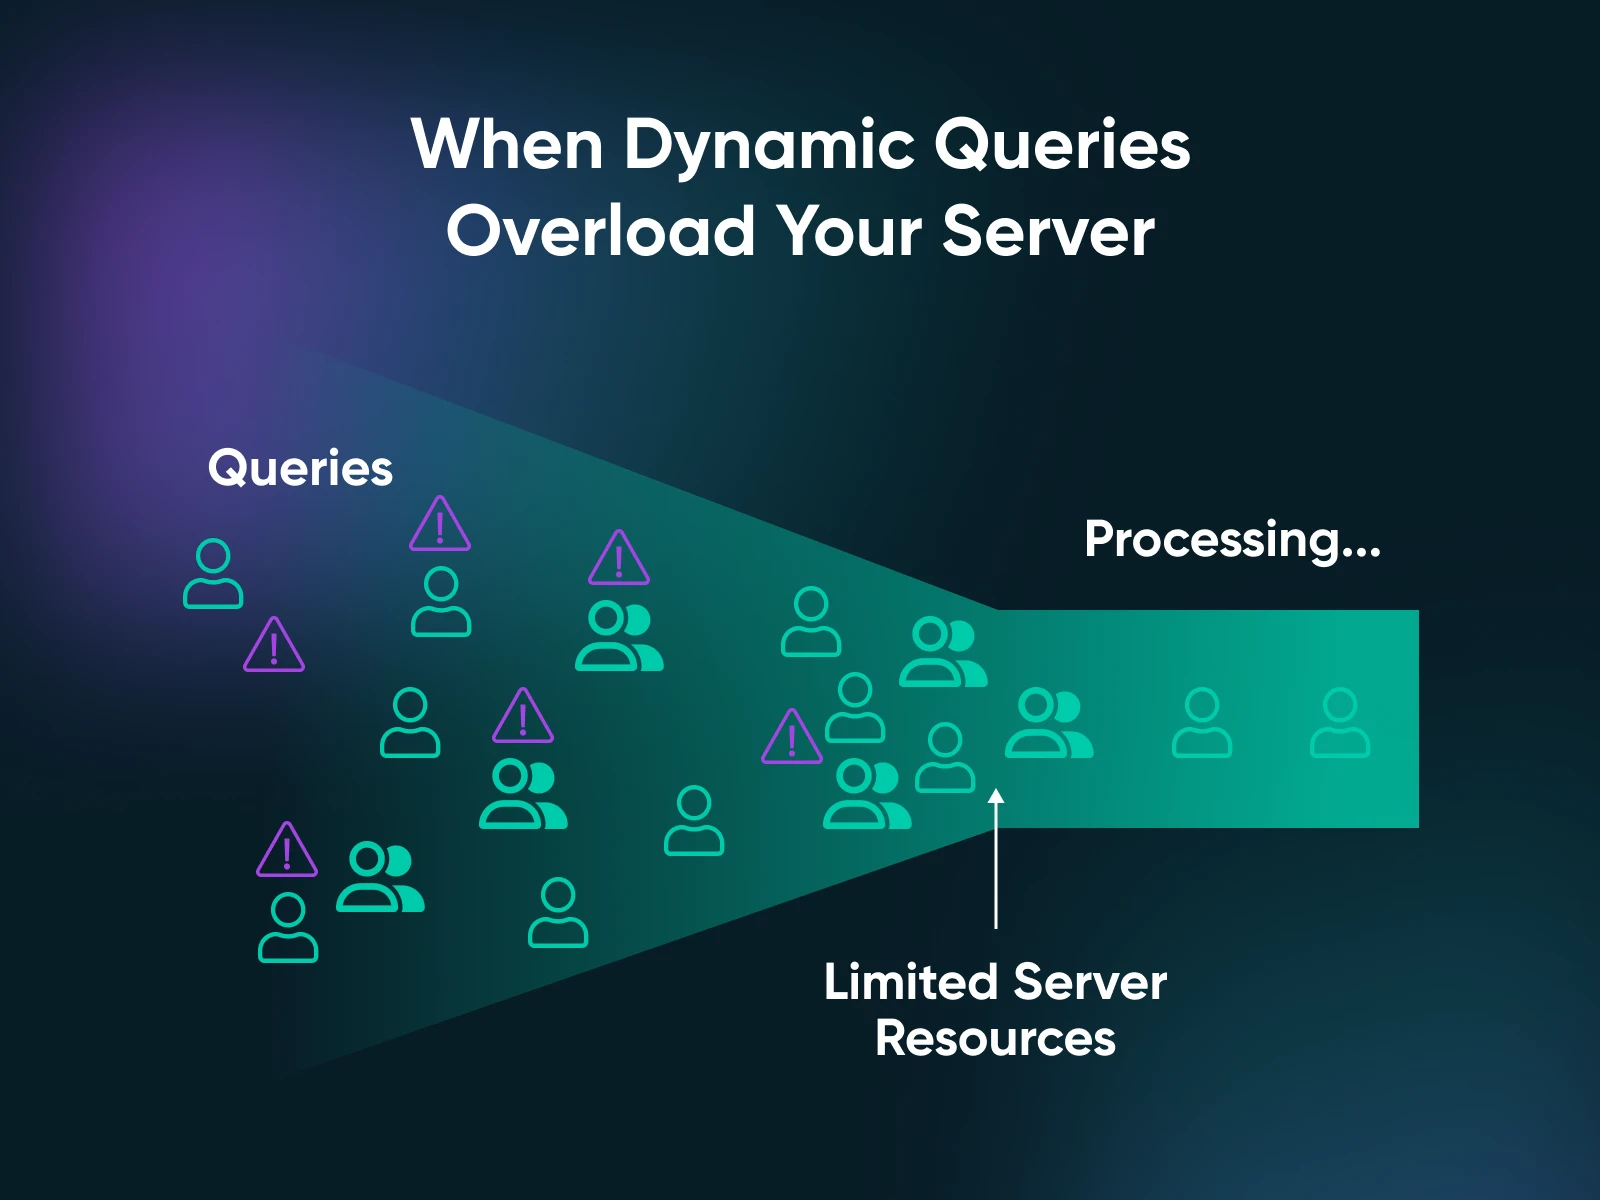
Imagine you run an e-commerce site. Your product pages look great, but when customers hit the checkout button, the system takes its sweet time to respond.
Hello, abandoned carts and frustrated buyers. (And we all know frustrated buyers don’t stick around for a second chance.)
Why This Happens
Dynamic processes like logins, checkouts, and database queries require a lot of processing power and memory. If your VPS plan is too modest, these functions lag. When visitors hit an overloaded server, they get caught in a long queue, and by the time they’re served, they’re ready to call it a day.
How an Upgrade Helps
A bigger VPS plan means more processing power and extra memory. This improves the speed of resource-heavy operations like checkouts and logins. In simple terms, upgrading ensures your website doesn’t keep customers waiting — or worse, walking away.
💡Monitoring Tips
- Keep an eye on conversion rates and support tickets. A sudden drop in conversion rates or an uptick in complaints about slow performance signals that you’re pushing your VPS to its limits.
- Before you decide to stay with shared hosting, run some tests on your current setup. If pages like checkout or login take too long to load during busy periods, compare those results with the performance stats of VPS hosting. The upgrade cost might be justified by the increase in completed transactions.
5. You’re Expecting Major Growth or Need Advanced Features
Perhaps performance is adequate today, but you’re looking ahead. You’re launching that complex membership site, adding an extensive online course platform, planning a massive ad campaign, or preparing to host more client sites.
You know the demands on your server are about to increase significantly.
Upgrading before you launch or scale up is the proactive, less-stressful approach. It prevents day-one disasters and ensures your infrastructure investment supports your business growth initiative. Why wait for problems?
Why This Happens
Growth brings new demands. Whether it’s increased traffic from a viral campaign or the need for complex, resource-intensive applications, your current server may not be able to keep pace with your ambitions. Planning is key. Waiting until your site collapses under its own weight is both inconvenient and costly.
How an Upgrade Helps
You’re future-proofing your website. A robust VPS plan allows you to install advanced caching systems, custom server configurations, and even dedicated support. It’s the difference between scrambling to put out fires and confidently rolling out new features without a hitch.
💡Monitoring Tips
- Look at your business forecasts. If you predict a significant traffic surge or plan to launch new, resource-hungry features, consult with your hosting provider about scaling up before issues arise.
- If you’re still on shared hosting and planning for significant growth, the switch to VPS hosting is a long-term investment. Compare your projected traffic and feature needs against the offerings of VPS plans, and choose one that gives you plenty of room to grow.
Making the Jump: Is Upgrading a Royal Pain? And What About Control?
You see the signs; you feel the pain. But the thought of actually upgrading might conjure images of technical chaos and lost weekends. Is it really that bad?
Chill. If you’re upgrading your VPS plan with your current host (like DreamHost), it’s usually surprisingly straightforward.
Now, about that control question…does a better VPS plan give you more control? It hinges on what “control” means to you, and whether you’re using managed or unmanaged VPS.
- Unmanaged VPS: You get the ‘keys to the kingdom’ — full root access. Install whatever, configure however. Maximum control. Also, maximum responsibility. You handle everything: security, updates, troubleshooting. Upgrading gives you more raw resources that you then have to manage. Only venture here if you have the technical skills and, frankly, the desire to manage a server at that level.
- Managed VPS (DreamHost’s specialty): The host handles the server admin grind: OS updates, security patches, keeping things optimized. Your control lies in managing your websites, applications, and data via the control panel, plus often SSH access for advanced tweaks. Upgrading here gets you more power and stability, enabling your site to do more, but not necessarily deep-level OS administration control. It’s the perfect setup if you want top performance without becoming a part-time sysadmin.
For most businesses just wanting their website to work reliably and fast, managed VPS is the way to go.
Stop Letting Your Hosting Stunt Your Growth
Whether you’re maxing out your current VPS or are finally ready to escape the chaos of shared hosting, DreamHost offers managed VPS hosting plans designed to scale smoothly alongside your ambitions.
Here’s what you get with DreamHost VPS:
- Consistent speed: Guaranteed RAM and CPU resources mean reliable performance
- Warp-speed storage: Fast SSDs on all plans, with ludicrously fast NVMe SSDs available
- Grow without the pain: Easily upgrade resources through your panel when needed
- We sweat the server stuff: Managed hosting means updates, security, and monitoring are handled
- Rock-solid uptime: Backed by our famous 100% Uptime Guarantee
- Fort Knox security (almost): Free Let’s Encrypt SSL, plus expert security oversight
- Help when you need it: 24/7 access to knowledgeable support humans
Stop letting sluggish hosting frustrate you and your visitors. Check out DreamHost’s VPS plans and build on a foundation that won’t hold you back.
Take Charge with Flexible VPS Hosting
Here’s how DreamHost’s VPS offering stands apart: 24/7 customer support, an intuitive panel, scalable RAM, unlimited bandwidth, unlimited hosting domains, and SSD storage.
Choose Your VPS PlanThe post 5 Signs Your Website Needs a VPS Upgrade appeared first on DreamHost Blog.
]]>The post How To Fix the ERR_CONNECTION_CLOSED Error in Google Chrome appeared first on DreamHost Blog.
]]>You tried to load your website, but Chrome is throwing an error.
What in the world is ERR_CONNECTION_CLOSED supposed to mean?
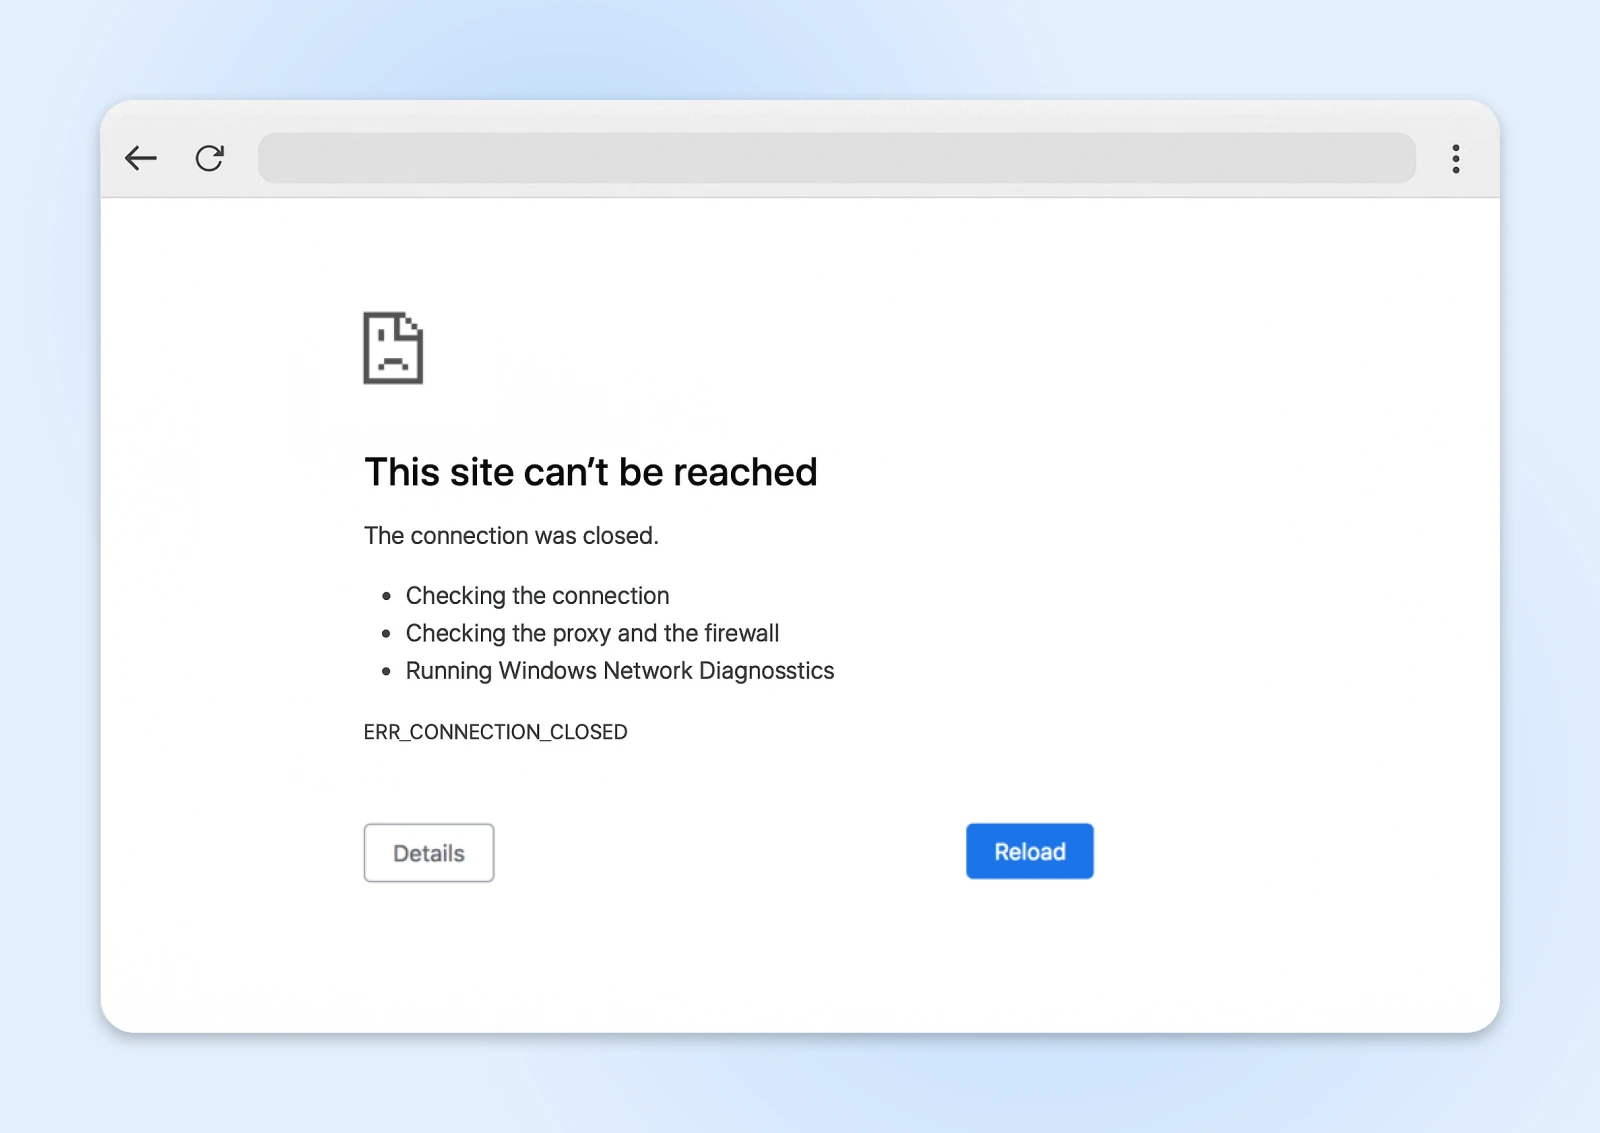
The short answer: this error message says that your browser tried to contact the host server, but couldn’t get through.
There are several reasons why this could be happening — from a misbehaving VPN to host downtime. Most often, the cause can be found on your device or network.
Before you throw your laptop in the trash and curse the invention of the Internet, we have some words of reassurance; this error is usually pretty easy to fix.
Just follow the steps in this (surprisingly entertaining) troubleshooting guide, and we should get you back on track!
What Does ERR_CONNECTION_CLOSED Actually Mean?
When you tried to open that web page, Chrome (or your chosen browser) attempted to set up a connection with the hosting server.
That connection allows the server to send over the content you requested.
Except, this time, your browser couldn’t get through. That’s why you’re staring blankly at an ERR_CONNECTION_CLOSED error screen.
The possible causes for this problem can largely be grouped into three categories:
- Network issues: Your device simply can’t make contact with the host server.
- Browser gremlins: Either Chrome or a different extension is messing with your connectivity.
- Hosting problems: You could see an error if your site isn’t configured properly or you’ve run out of resources.
There’s a strong chance that your network or browser is to blame.
But if other people struggle to access your website, you might need to visit your hosting panel.
Diagnosing ERR_CONNECTION_CLOSED Problems
At this point, you could just scroll down to the possible fixes and start working through the list.
If you have 30 seconds to spare though, it’s worth running a quick test first.
Are you seeing the error on just one website?
If yes, the host server could be to blame.
But if every website you visit is showing the ERR_CONNECTION_CLOSED error, you almost certainly have a misbehaving network or browser on your hands.

Top sleuthing, Sherlock.
12 Quick Ways To Fix the ERR_CONNECTION_CLOSED Error
That’s enough homework. Time to fix the problem and forget it ever happened.
Here’s your troubleshooting checklist — starting with the most obvious facepalm-worthy solutions, and ending with issues you might not have considered.
1. Check Your Internet Connection
It feels stupid to even ask but…is your internet actually working?
You’d be surprised how often this is the root of the problem.
If your connection has dropped, Chrome won’t be able to reach any site — which is exactly what leads to that ERR_CONNECTION_CLOSED message.
Try visiting a reliable website like Google. Next, check your favorite app that needs the internet. Fire up Netflix or Spotify and see if you can stream content.
If these aren’t working, take a look at your Wi-Fi signal or ensure your ethernet cable is firmly plugged in.
It might only take a small nudge to put things right!
2. Reboot Your Router
The most successful IT remedy of all time? Turn it off and turn it back on.
You can use this tried-and-tested method to fix the ERR_CONNECTION_CLOSED issue. Simply unplug your modem or router for at least 30 seconds, and then restart the device.
This can clear out temporary glitches and reset the connection to your Internet Service Provider (ISP). Once your Internet is back online, you might just find that the error is gone.
3. Reset Your Device’s Network Settings
No luck? Let’s look under the hood.
Network settings can become corrupted faster than milk left out on a summer’s day. What started as a smooth connection can turn into a tangled mess of misconfigured protocols and confused network interfaces.
Resetting your network settings essentially flushes the system, and that can be enough to clear the error.
Resetting Network Settings on Windows
To complete this task, you’ll need to open Command Prompt. Don’t worry, it’s not as scary as it sounds.
1. Open the Start menu and search for “cmd.”
2. You should see “Command Prompt” as the top result. Right-click on the program and choose Run as administrator.
3. Now, we need to run some commands. To reset your TCP/IP settings, paste this and hit Enter:
netsh int ip reset4. To reset your Windows Sockets interface (Winsock), follow the same drill with this command:
netsh winsock reset5. Finish up by restarting your device.
Resetting Network Settings on macOS
Mac users have it slightly easier. It just requires a few clicks in your “System Settings” – We even have pictures!
From the sidebar menu, select Network.

Next, choose your active Internet interface (e.g. Wi-Fi, Ethernet, etc).
Click Details next to your active network.
Choose TCP/IP on the left.
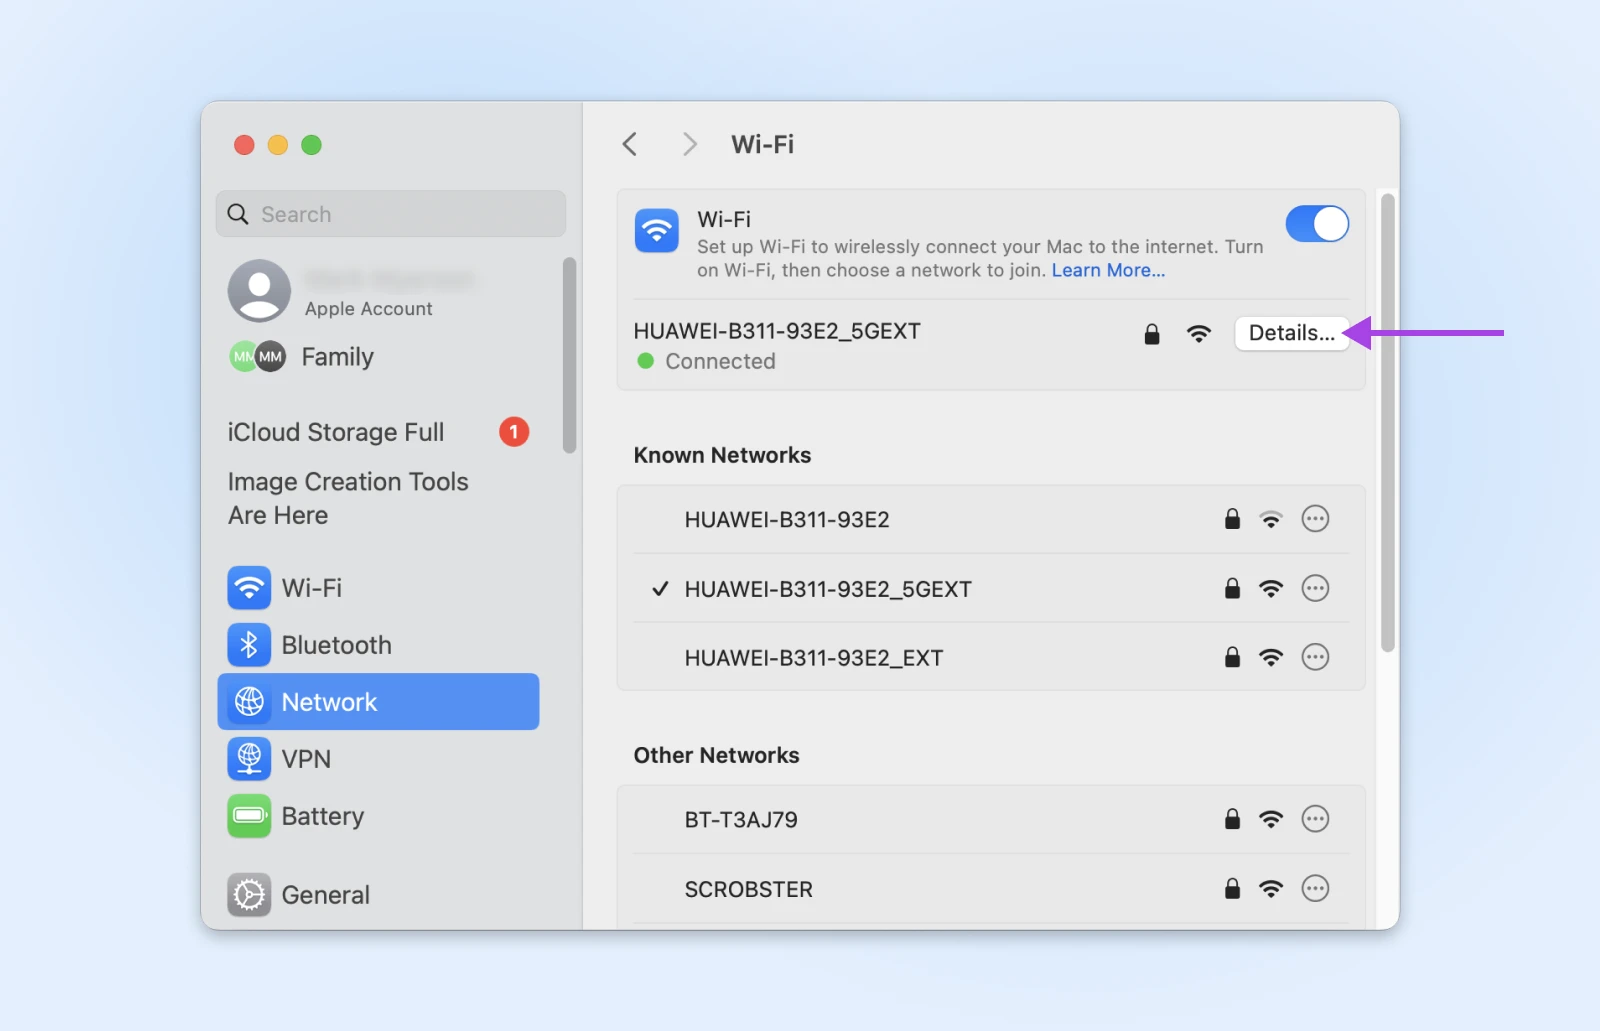
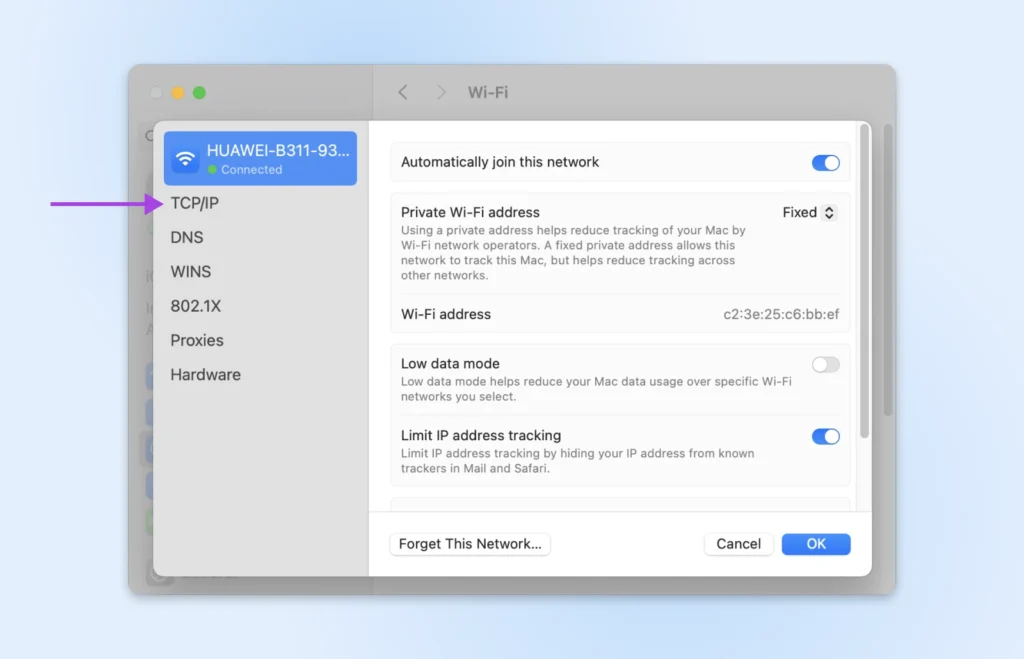
Then hit the Renew DHCP Lease in the right-hand panel.
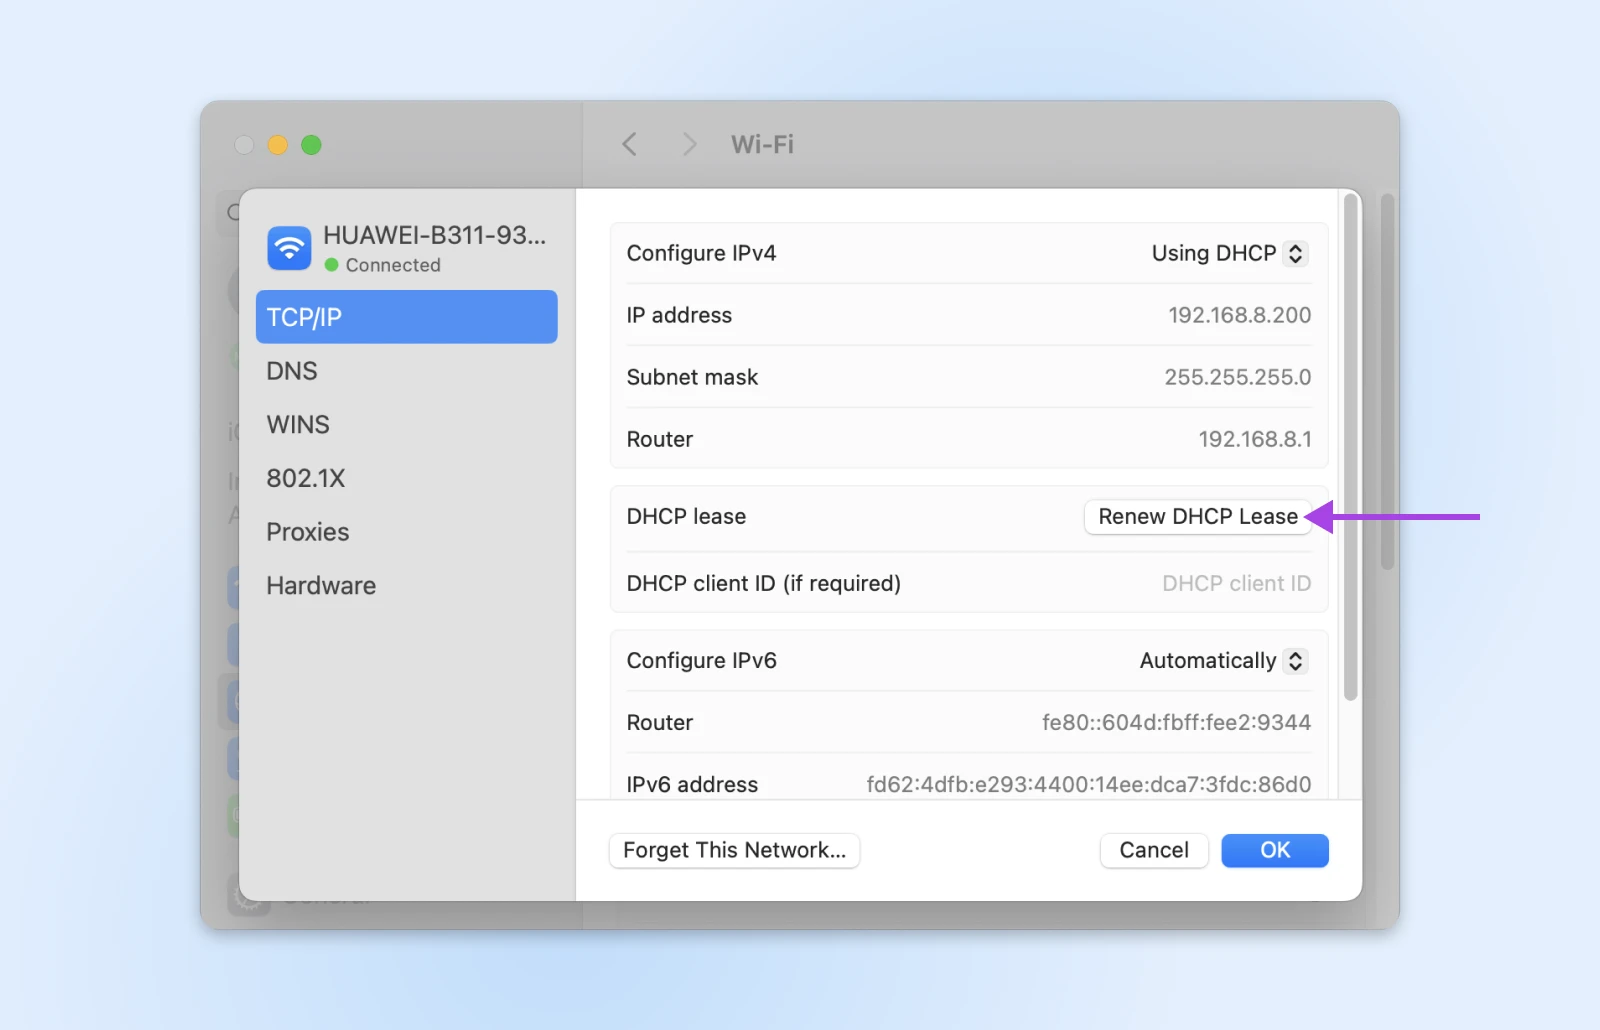
Finish by clicking OK and restarting your Mac.
With any luck, that might solve the headache!
4. Check Your Firewall and Antivirus
Using security tools to protect your device is highly recommended.
The only problem is, antivirus software and firewalls can sometimes be a little too protective.
Instead of only blocking unwanted attention, they interfere with genuine website traffic.
To test whether this is your problem, you will need to temporarily disable your security tools.
- On Windows: You probably have Windows Defender Firewall running. Search for “Windows Security” via the Start menu. Open the program, and navigate to Virus & threat protection > Manage settings and toggle real-time protection to off.
- On macOS: You can control the built-in macOS firewall via System Settings > Network > Firewall.
If you have third-party antivirus software (like Norton, McAfee, Avast, etc.), you’ll need to open that specific application and turn off real-time protection.
Once you’ve lowered your guard, check Chrome to see if the error has cleared. Make sure to re-enable the protections ASAP!
5. Play Around With Your VPN
In some cases, the ERR_CONNECTION_CLOSED error can be tied to how your Internet traffic is being routed.
Depending on your situation, either using a Virtual Private Network (VPN) or disabling VPN and proxy settings could resolve the issue.
Sounds like a contradiction, we know. Allow us to explain.
When To Use a VPN
If you’re struggling to access specific sites, it could be because your ISP is blocking access. Using a VPN should allow you to bypass these restrictions.
If you don’t currently use a VPN, try a free service like ProtonVPN to run the test.
When To Disable Your VPN
Ironically, the very same app that helps you to bypass restrictions can also interfere with your connection, triggering errors like ERR_CONNECTION_CLOSED.
If you’re having issues with most websites, try temporarily disabling your VPN or proxy settings. It might just clear the error.
6. Clear Your Browser Cache
Your browser’s cache is essentially a short-term memory for websites. It saves bits and pieces of sites you visit (like images and files), so they load faster the next time you go there.
Just occasionally, that saved data becomes outdated or corrupted. This can interfere with loading the current version of a site — potentially causing errors like ERR_CONNECTION_CLOSED.
The fix is to clear the cache.
Here’s how to do it with Chrome:Click the three-dot menu in the top-right corner of any window, and select Delete browsing data….
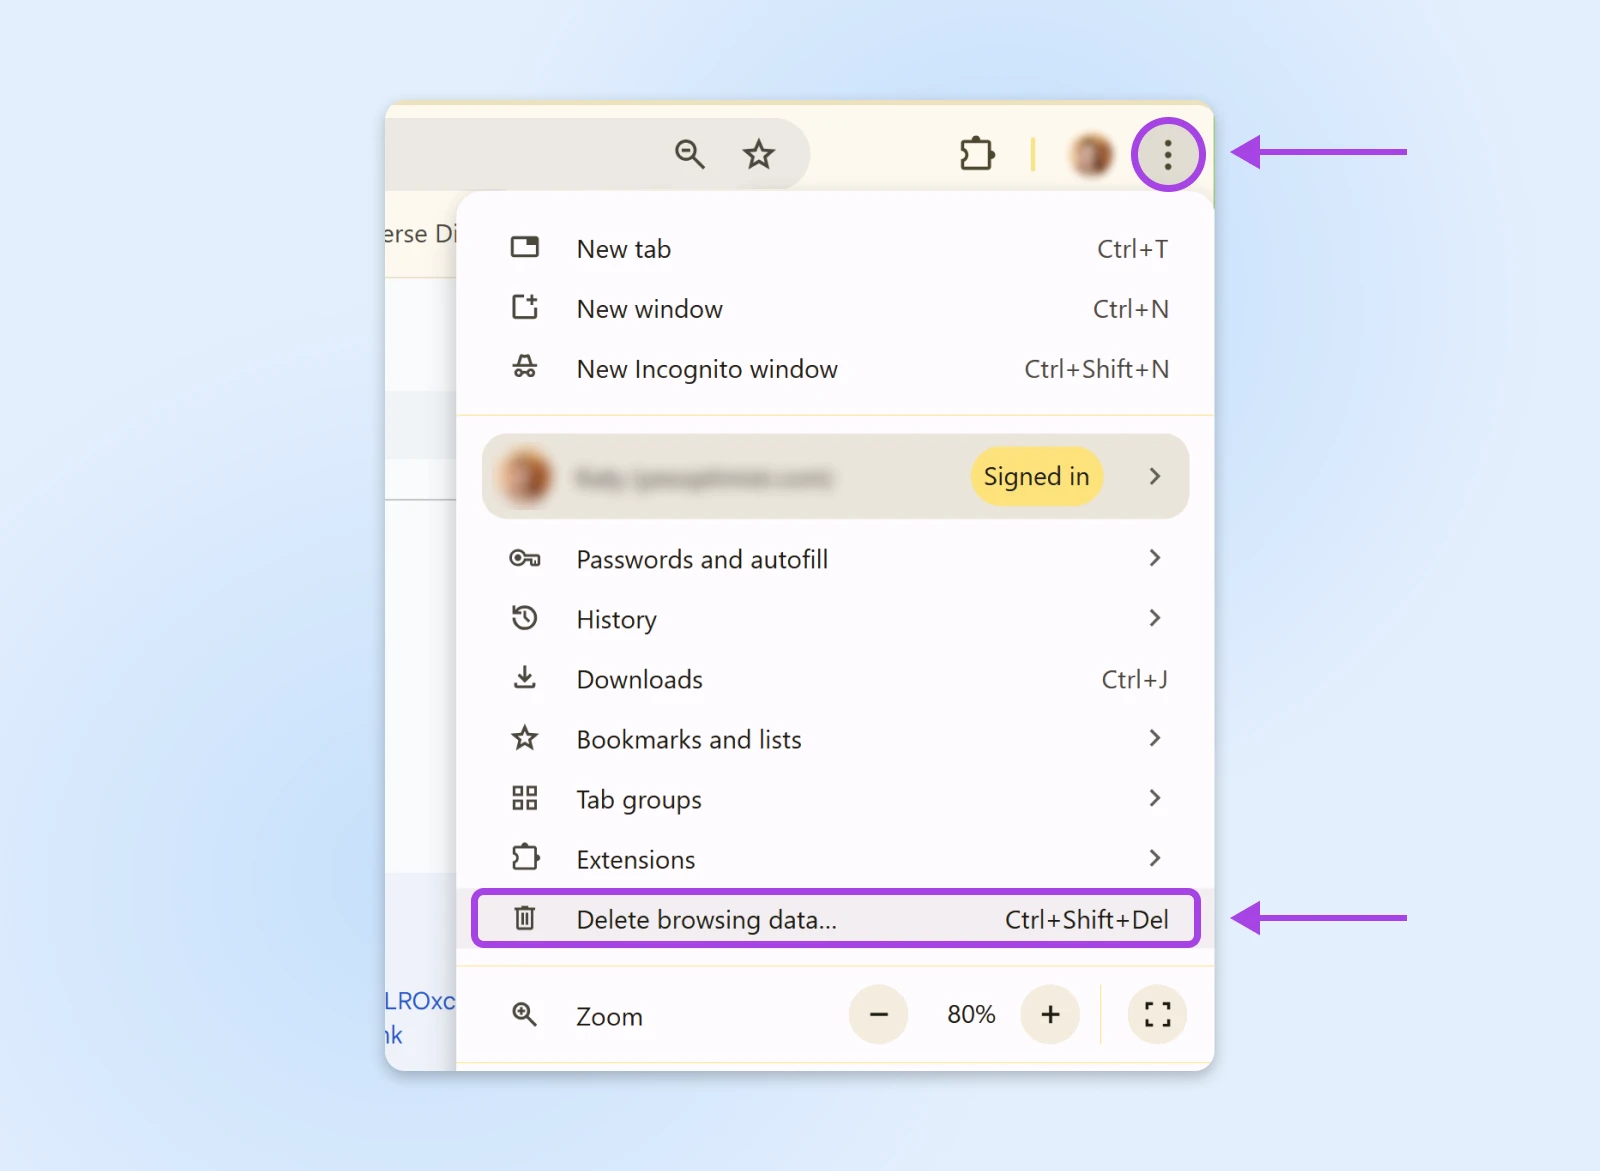
In the pop-up panel, set the “Time range” to All time.
Then, check the box labeled Cached images and files.
Finish by hitting Delete data.
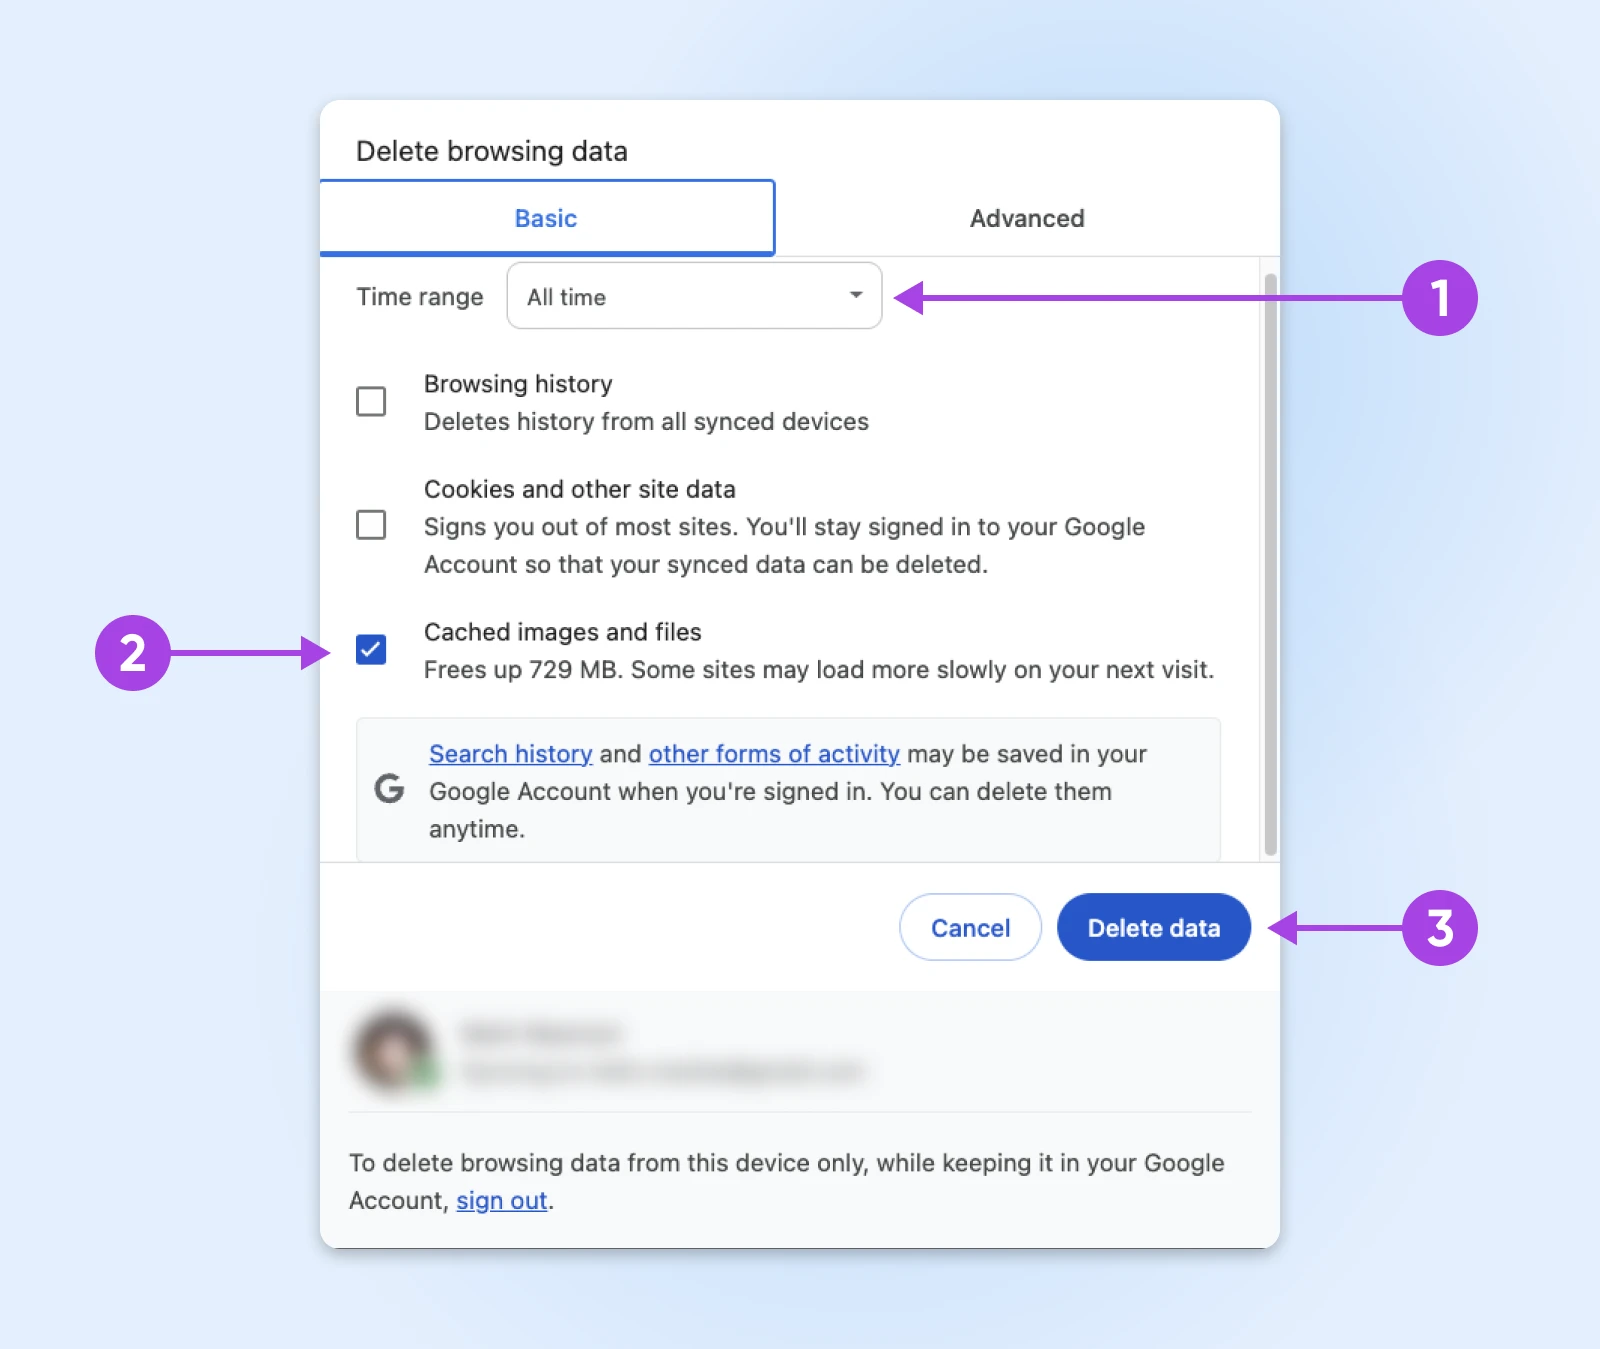
7. Flush Your DNS Cache
Just as your browser cache stores website files for quick access, your DNS cache remembers the locations of websites you have visited.
If those records ever become corrupted, the DNS cache could send your browser to completely the wrong part of Internet town.
Here’s how to start again with a clean slate.
Chrome’s Internal DNS Cache
- Type chrome://net-internals/#dns in your address bar and hit Enter.
- Look for the “Clear host cache” button and click it. Chrome will immediately start building a fresh cache — no need to restart your device.
Windows DNS
- Press the Windows key and type “cmd”.
- Right-click on Command Prompt and select Run as administrator.
- Type the following command and hit Enter:
ipconfig /flushdns - Look for the “Successfully flushed the DNS Resolver Cache” message.
- Restart your device and cross your fingers that it worked.
MacOS DNS
- Navigate to Applications > Utilities and open Terminal.
- Paste in this command and smash Enter:
sudo dscacheutil -flushcache; sudo killall -HUP mDNSResponder - Provide your password when prompted (don’t worry, it’s legit!)
- Once the process is complete, restart your Mac and retest for an error.
8. Disable Your Chrome Extensions
Chrome extensions are usually very helpful. But they can go rogue, interfering with how websites load or communicate with your browser.
You can test whether one of your extensions is causing the ERR_CONNECTION_CLOSED error like this:
- Type chrome://extensions/ in the address bar and hit Enter.
- Switch off your extensions one by one, using the little toggle switch next to each tool.
- After disabling each extension, reload the website you were trying to access originally. If the error suddenly clears, the extension you most recently deactivated could be to blame!
9. Update or Reinstall Chrome
Google couldn’t be to blame, surely?
Well, it’s just possible that the Chrome browser on your device is having an off day.
To rule out this potential issue, make sure you have the latest version of Chrome. You can check this by visiting chrome://settings/help.
You can also try uninstalling Chrome, and then grabbing a fresh download from the official website. Can’t hurt to try!
10. Reset Chrome’s Settings
Another possibility is that your Chrome browser settings are messing with your connection.
The fix here is to reset Chrome to default settings:
Let’s hit that three-dot menu in the top-right corner again. Then, select Settings.
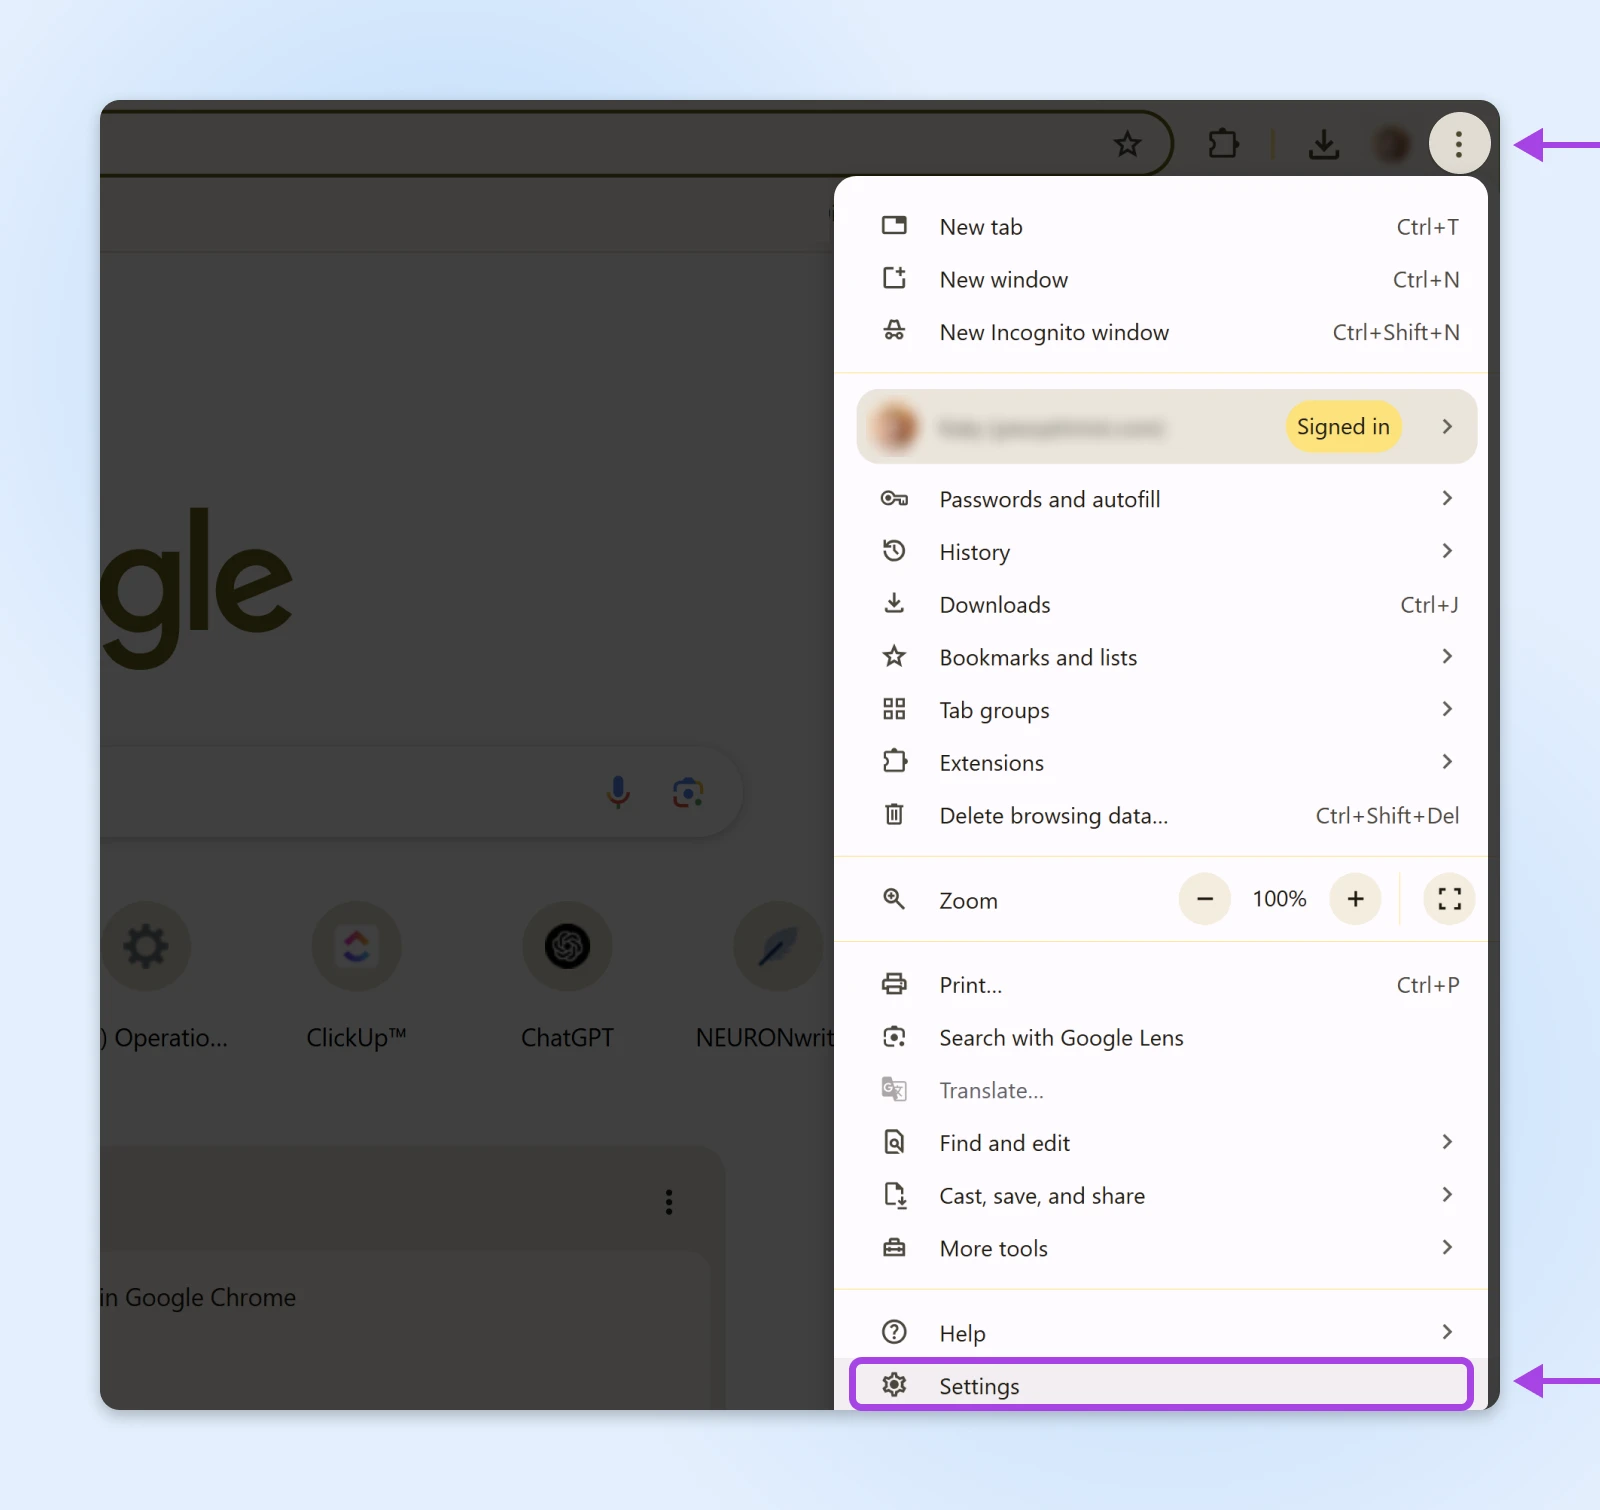
From the left sidebar, click on Reset settings > Restore settings to their original defaults.

Complete the process by hitting Reset settings.

11. Switch Your DNS Provider
We talked about your DNS cache earlier. That’s basically your computer’s local address book.
Your computer gets those addresses from a larger DNS server, usually provided automatically by your Internet Service Provider (ISP).
If your ISP’s servers have temporary problems, you might stumble upon connection issues.
You can work around this problem by switching to a different DNS provider:
- Cloudflare: 1.1.1.1 and 1.0.0.1
- Google Public DNS: 8.8.8.8 and 8.8.4.4
💡Pro Tip: Cloudflare has great step-by-step instructions on how to install new DNS servers on pretty much any device.
12. Run a Malware Scan
It’s not a nice thought, but there’s a small chance your connection troubles could be caused by malware.
Just to be on the safe side, we recommend using a trusted program like Malwarebytes (free version available) to run a quick scan. It might resolve the error!
How To Fix ERR_CONNECTION_CLOSED on Your Website
So, you’ve worked through the whole checklist and you’re still seeing the ERR_CONNECTION_CLOSED error on your website.
Bad luck, webmaster. Looks like an issue with your site.
We can fix it, though. Just a few more troubleshooting steps to work through!
Check Your Hosting IP Address
The ERR_CONNECTION_CLOSED error can rear its ugly head when the hosting server of your website is unreachable for some reason. It might be down, for example.
To test this, head over to DNSChecker and type in your website URL. This tool will quickly give you the server IP address.
Next, paste your IP address into the Ping tool on the same site. This will reveal whether the server is accepting incoming data.
Check Your Hosting Plan
Every hosting plan has certain limits on things like storage and traffic.
If you go over these limits, it’s possible you’ll just see an error.
You can check this via your hosting panel. At DreamHost, we offer unlimited traffic on all of our shared hosting plans, so this shouldn’t really be an issue.
Just sayin’.
Contact Your Host
If all else fails, get in touch with your hosting provider. They should be able to figure out what’s going on.
Not to brag, but DreamHost offers 24/7 live support to help you get issues sorted ASAP.
Give Your Site the Gift of Reliable Hosting
As we’ve discovered in this guide, there are many possible reasons why you could see an ERR_CONNECTION_CLOSED error on your site — from messed up firewall settings to VPN service issues.
Luckily, you don’t have to get too technical to find the fix. Make sure to bookmark this page for the next time you need to troubleshoot!
If you want to banish errors from your website for good, you could also think about switching to DreamHost.
Our plans come with unlimited bandwidth, 100% uptime, and 24/7 support. In other words, everything you need for a rock-solid website.
Sign up today to unlock the upgrades!
The post How To Fix the ERR_CONNECTION_CLOSED Error in Google Chrome appeared first on DreamHost Blog.
]]>The post Boost Engagement with These Top 5 Social Media Scheduling Tools appeared first on DreamHost Blog.
]]>In this guide, we’ll break down the top five scheduling tools that can keep your feeds fresh and on-brand.
Even more than that, we’ll also offer tips and best practices to help you set up your content once, automate your posting schedule, and spend more of your day actually running your business — or perhaps even taking a well-deserved break. Go on, you earned it.
Why Social Scheduling Tools Are a Game-Changer
Between client meetings, inventory management, and the ever-present temptation to chase after the newest shiny marketing hack, social media can become a chore. Scheduling tools solve some of your biggest headaches:
- Freeing up time for strategy: Instead of manually posting at the “right moment,” let a scheduler queue up your content. That frees you to focus on larger tasks, such as refining your brand story, optimizing your social SEO, or designing your next product line.
- Consistency without burnout: Even if you’re the only person managing your entire marketing operation, scheduling tools keep your social media feeds active. You can schedule posts for the week or month in one sitting — no more scrambling for daily content ideas.
- Analytics and growth tracking: Most social scheduling platforms provide data on which posts perform best, which time slots yield more engagement, and more. This helps you refine your approach and see direct results from your efforts.
How to Choose the Right Scheduling Tool
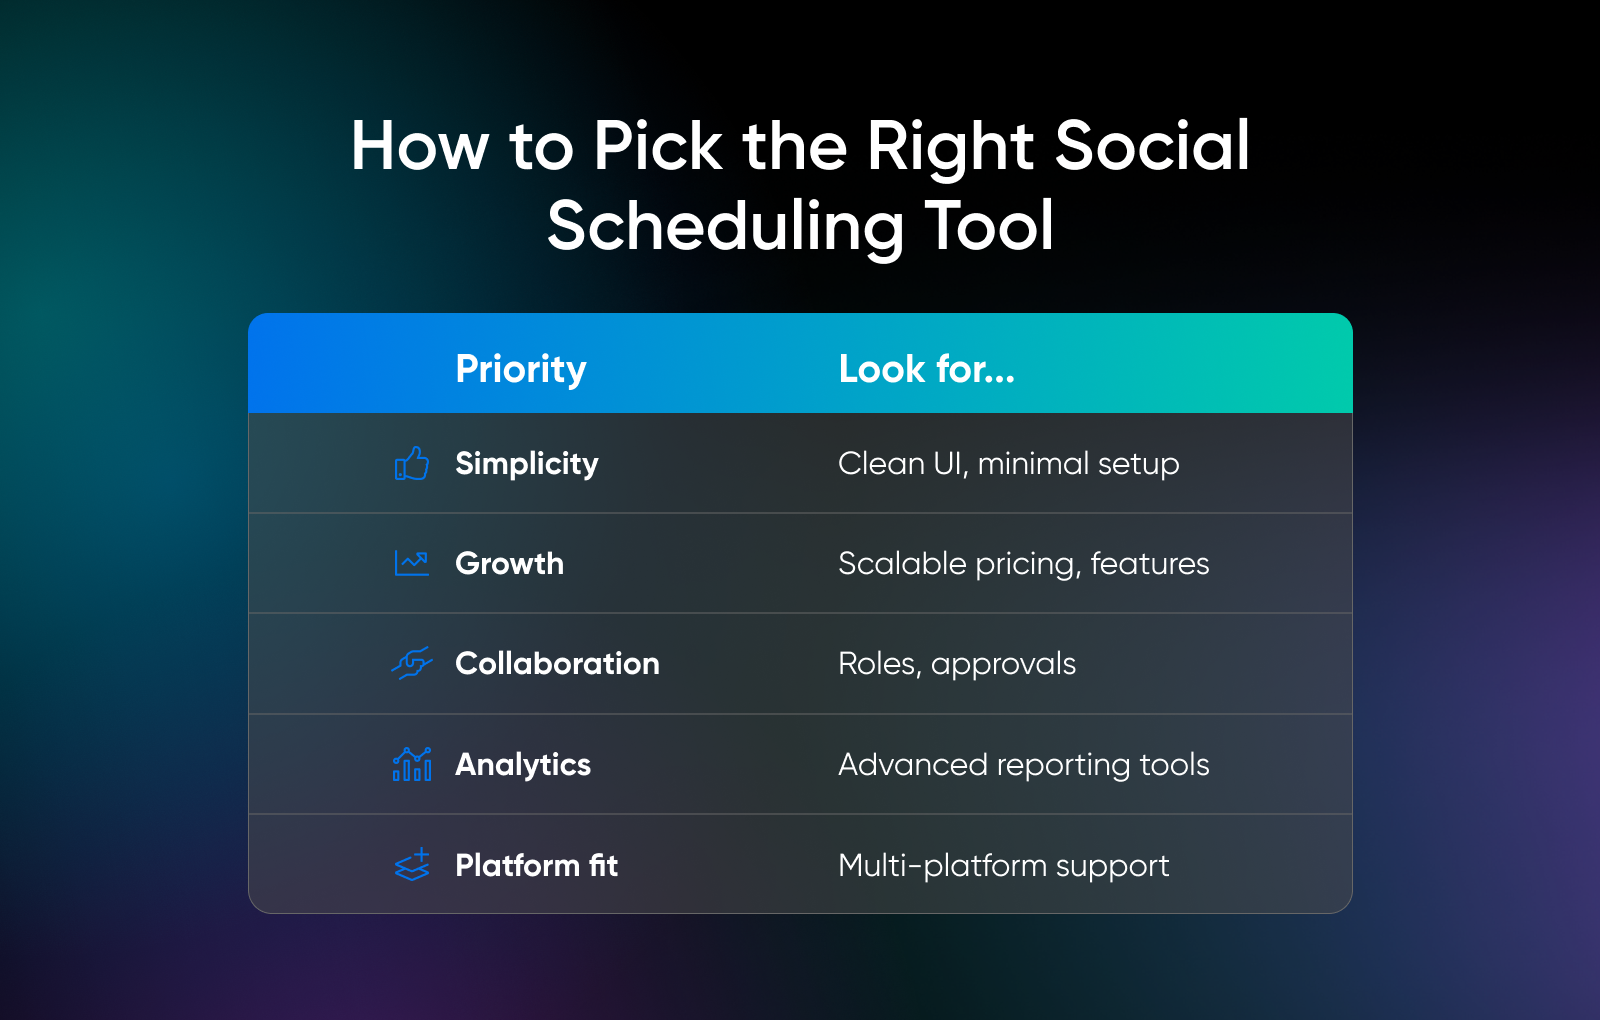
Plenty of social media tools exist, but not all of them are ideal for every small business. When choosing a scheduling tool to fit your needs, ask yourself these questions to help you narrow down the field and find the best one for you:
1. Is it compatible with the platforms you use the most?
Are you big on Instagram visuals? A hardcore X (Twitter) user? Make sure the tool you pick supports all your priority platforms.
2. Can you afford it (including in the long-term as your business grows and your needs scale up)?
Many tools offer a free tier or a modest entry-level plan, but it’s also important to look for a platform you can stick with as your business grows or your marketing needs expand over time. Having to switch tools down the line will cost you more time and effort, so some long-term planning is worth it now.
3. Is it easy to use?
If you’re a tech novice (or simply short on time), a steep learning curve might be a deal-breaker. Also consider other folks on your team who might use the tool now — or help out or take over social posting later. Seek out an intuitive interface with minimal setup fuss to cover all your bases.
4. Does it offer comprehensive analytics and reporting that will help you be strategic with your social media?
Some tools only show basic engagement metrics —and this is a missed opportunity. Even if you won’t use it now, look for a tool that offers advanced dashboards with metrics and reports like scheduling suggestions and best-time-to-post data. The deeper your data goes, the more you can harness it for strategic, data-driven decision-making, which always beats throwing things at a wall to see what sticks.
5. Does it meet your collaboration needs?
If you have multiple team members handling different accounts, you’ll need a tool with built-in roles, permissions, or content approval workflows.
The Top 5 Social Media Scheduling Tools for Small Businesses
Now let’s dive into the real reason you’re here: Which tool should you use? Below are five standout platforms, each with its own strengths and drawbacks. We’ll take a look at all of them, including key features and the type of business that might benefit the most from each tool.
1. Metricool
Offers a powerful scheduling solution for brands looking for a free tool (the free version offers up to 50 scheduled posts and limited metrics).
Beyond scheduling, Metricool offers other functionalities, including a social inbox, AI caption writer, batch scheduling, one-click paid promotions, link shortener, Canva integration, and more. These options resonate with Metricool’s user base of more than a million brands, agencies, and marketing professionals.
Metricool also integrates with more social platforms than many other tools.In addition to the standard networks like Facebook, Instagram, LinkedIn, and X, Metricool connects to your profiles on TikTok, Bluesky, Pinterest, and even Twitch.
Key features:
- Cross-platform scheduling: Post to Instagram, Facebook, Twitter, LinkedIn, Pinterest, and more from a single dashboard.
- Visual content calendar: Drag-and-drop scheduled posts to quickly see and rearrange your plan.
- Built-in metrics and analytics: Track likes, comments, and shares to spot trends over time.
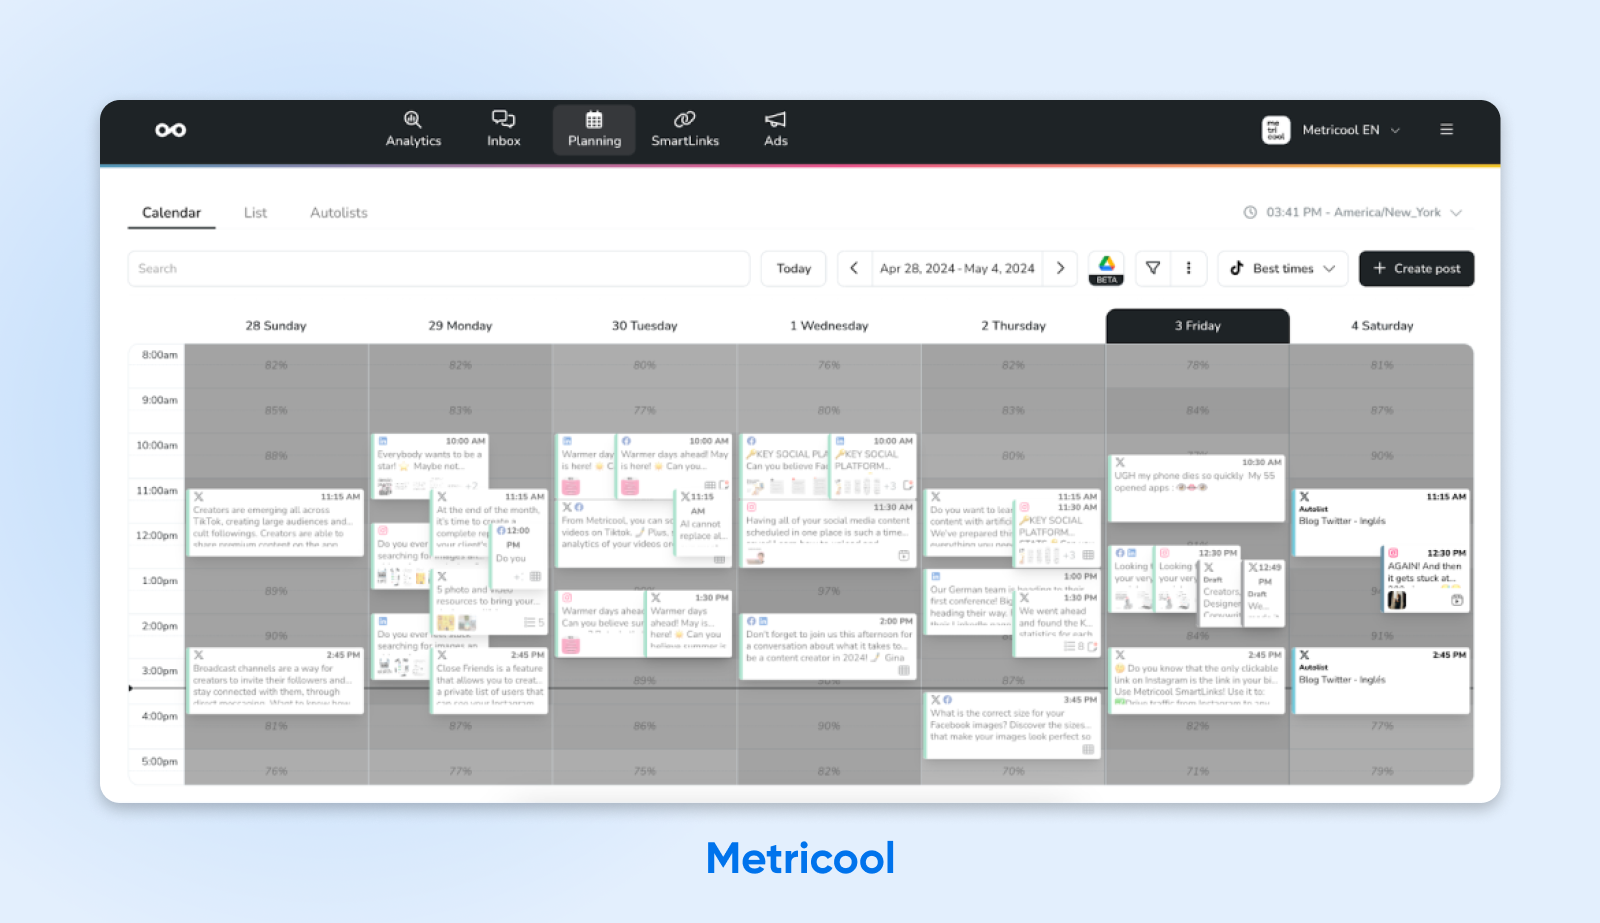
Best for:
- Solopreneurs on a tight budget who need a simple, intuitive solution.
- Those who plan to upgrade to more advanced features once their audience grows.
Potential drawbacks:
- Free version limits you to 50 scheduled posts at a time.
- The analytics included in the free version might feel basic if you want in-depth data slicing.
2. Buffer
Buffer is one of the original social media scheduling pioneers, known for its clean, user-friendly interface. It has a loyal following among small business owners for good reason: It’s easy to learn, and you can start free. Even once you move beyond the free tier, paid plans are affordable (starting at less than $10 a month) with a good balance of features like analytics, an AI assistant, and a link-in-bio page builder.
Key features:
- Multi-platform scheduling: Post on Instagram, Twitter, Facebook, LinkedIn, Pinterest, and even TikTok (limited).
- Start for free: Publish up to 10 scheduled posts per platform.
- Buffer Publish vs. Buffer Analyze: The scheduling function is separate from in-depth analytics, so be sure you pick the right plan for your needs.
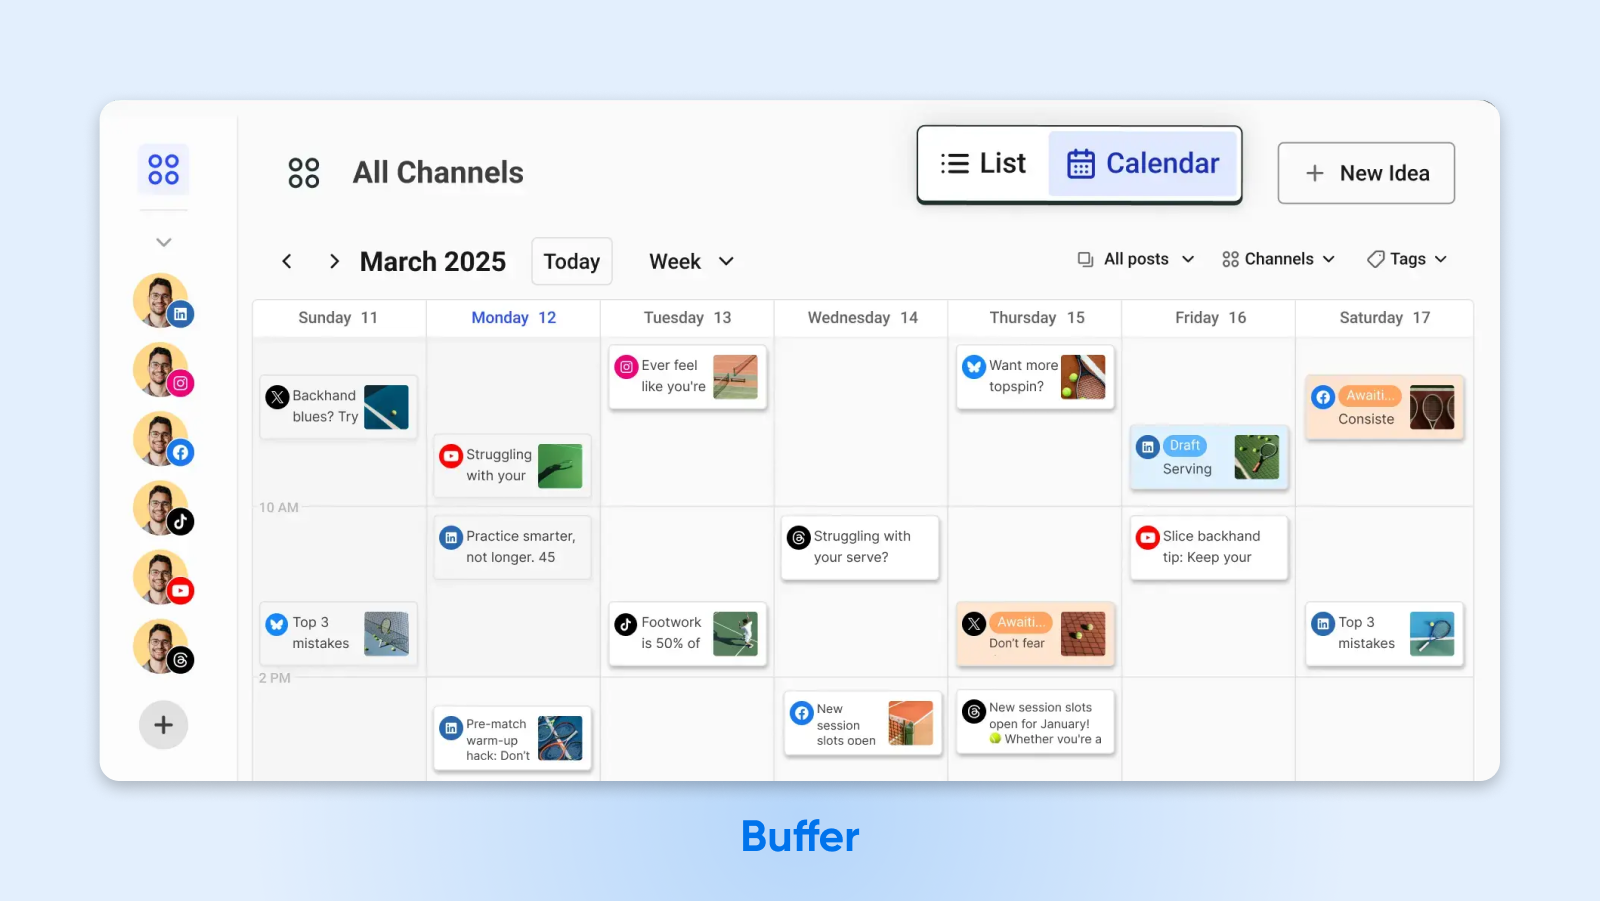
Best for:
- Beginners who want an ultra-friendly UI at an affordable price.
- Those who prefer to keep scheduling and analytics as separate modules.
Potential drawbacks:
- Pricing changes over the years have sometimes confused longtime users.
- Deeper analytics and “Engagement” features require higher-tier plans.
3. Hootsuite
A titan in the social media management space, Hootsuite’s been around since 2008. It’s especially handy if you oversee multiple social platforms and want to see them all in one place. The interface lets you build a custom stream that helps you track mentions, hashtags, and schedule simultaneously.
User Interface
User Interface (UI) refers to the point where humans and computers interact and communicate on a web page, device, or app. UI is an element of web design that focuses on how a user will engage with a website.
Read MoreHootsuite recently revamped its interface, making it easier to use and take advantage of features like content planning, analytics, and more. However, it’s one of the most expensive options on this list, which can place it out of reach for many small businesses.
Key features:
- Unified dashboard: Monitor feeds, messages, and scheduled posts in separate streams.
- Easy team collaboration: Assign posts, approve content, and track tasks within one system.
- In-depth social analytics: Compare performance across platforms and run custom reports.
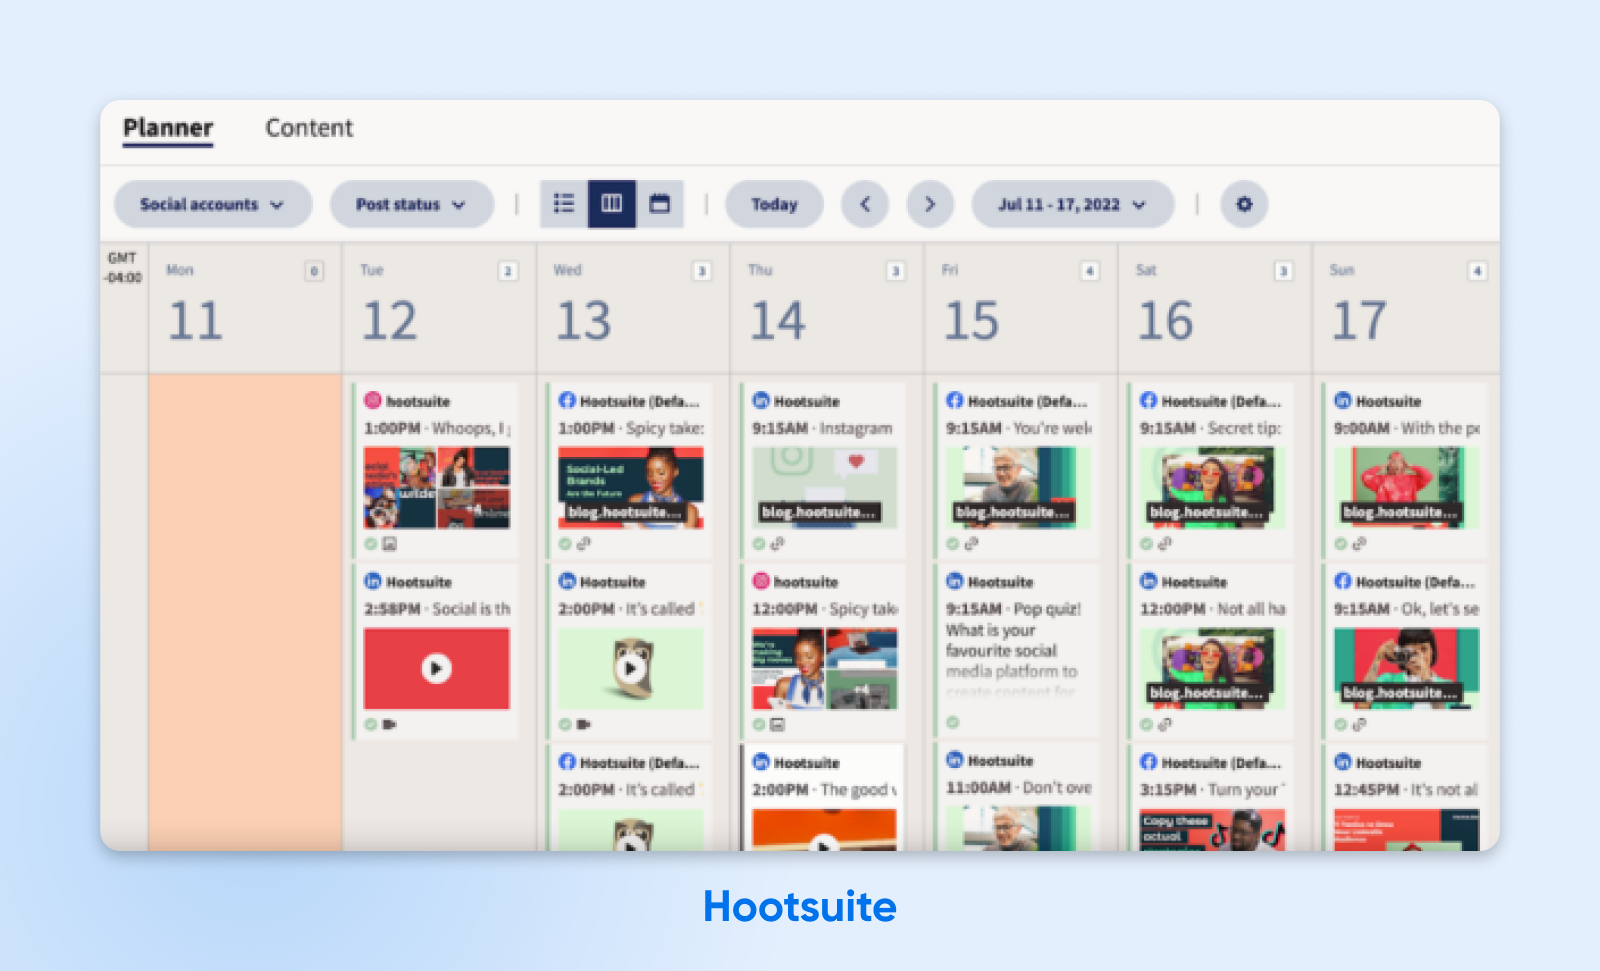
Best for:
- Small businesses juggling multiple social channels who need robust scheduling and monitoring.
- Teams with different users or roles looking for a place to centralize workflows.
Potential drawbacks:
- Prices tend to be higher than some competitors, and there’s no free plan once your 30-day trial is over.
- The interface might feel overwhelming for those who just want to schedule and go.
4. Sprout Social
Sprout Social is known for advanced analytics, competitor tracking, and a powerful social inbox. If you handle a ton of incoming messages or want to do deep data dives, Sprout stands out. It’s another one of the priciest tools in this space, with the lowest tier starting at about $200 per month. For small businesses without huge budgets, Sprout may be out of reach.
That said, you do get a lot for your money.Sprout comes with the scheduling and publishing features you’d expect from this type of platform, plus the all-in-one social inbox we mentioned above, keyword monitoring, an AI assistant, advanced reporting, and more.
Key features:
- Unified inbox: Manage comments, DMs, and mentions from a single dashboard.
- Audience analytics: Dig into demographics, sentiment analysis, and best posting times.
- Collaboration with roles and approvals: Perfect for a small team that needs structured workflows.
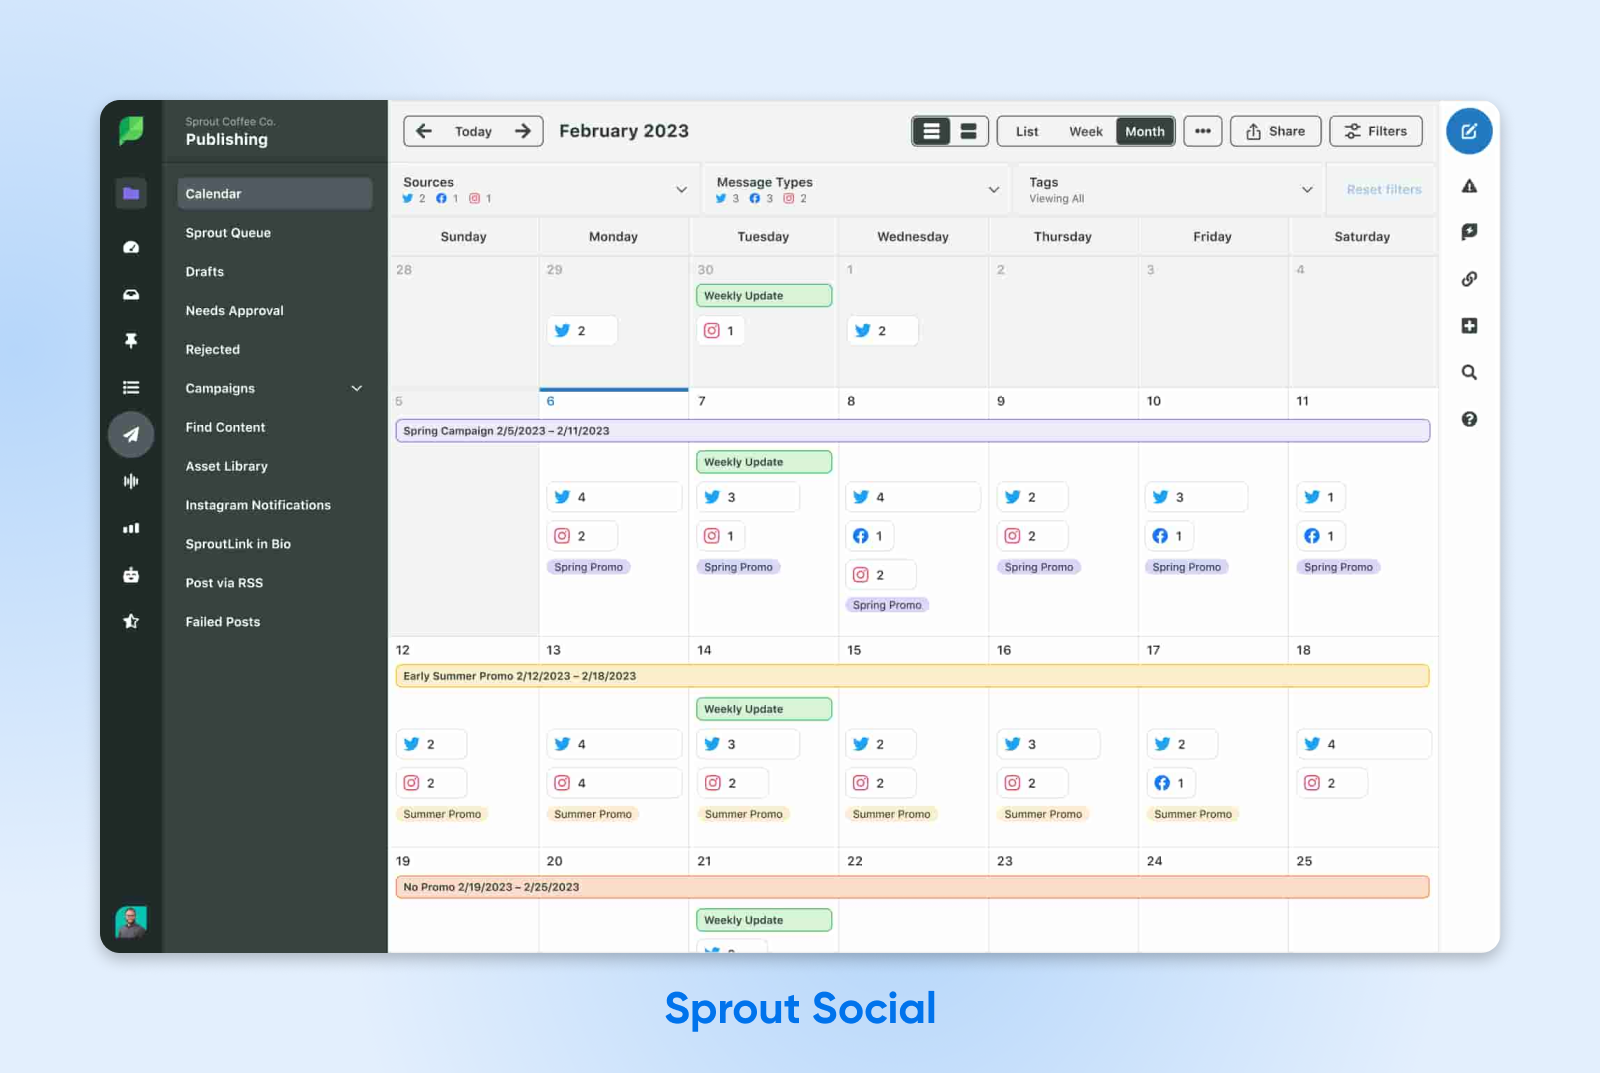
Best for:
- Entrepreneurs who’ve grown into a small team.
- Businesses needing advanced metrics or competitor benchmarking.
Potential drawbacks:
- One of the pricier options, especially for businesses that are cash-strapped or just starting out.
- Stacked with advanced features and functionality that may be overkill if you only need basic scheduling.
5. AgoraPulse
AgoraPulse has recently gained a strong reputation for user-friendliness and good customer support. It’s more than just a social media scheduling tool — it combines scheduling, social listening, and an intuitive inbox for managing conversations across platforms, for more of an all-in-one social media management platform. It also has a new built-in AI writing assistant to help you create social posts.
AgoraPulse supports the most common and popular social media sites, like Facebook, TikTok, X, and LinkedIn. Its biggest drawback is its price —while not the most expensive option out there, it’s still likely to be out-of-budget for small businesses looking for a free or extremely affordable tool.
Key features:
- Unified social inbox: Like Sprout, everything from comments to direct messages is in one place.
- Visual publishing calendar: Features a clean drag-and-drop interface for viewing and planning your campaigns.
- Team management: Assign conversations, tasks, or post drafts to team members.

Best for:
- Small teams looking for an all-in-one solution that’s simpler than Hootsuite or Sprout Social.
- Social media managers who want a good balance between scheduling and real-time engagement.
Potential drawbacks:
- No perpetual free plan; only free trials and promotional offers.
- Some advanced features are locked behind higher-tier subscriptions.
How to Get the Most Out of Your Social Scheduling Tool
At the end of the day, choosing a tool is only half the battle. Making the most of it will help you actually see the results you want. Here are some tips and best practices to try out.
- Batch your content creation: Dedicate a few hours each week to brainstorm captions and gather visuals. Plug them into your chosen scheduler, and you’ll be set for days (or weeks).
- Leverage the analytics: Don’t sleep on your tool’s performance stats (engagement, reach, etc.). Use the data to refine your posting times and content types.
- Vary your posting times: Experiment with different slots. Most scheduling tools will offer a recommended posting time based on your audience. Even if you’ve read that 11 a.m. on Tuesdays is the holy grail, your audience might prefer evenings or weekends.
- Don’t just broadcast — engage with your audience: Scheduling posts doesn’t mean you set it and forget it. Respond to comments, message back promptly, and pop in for live interactions when you can.
- Maintain a consistent content calendar: Most tools have a calendar view — use it. Color-code promotions vs. brand storytelling posts and other types of content so you can make the most of the visual layout and keep your feed balanced and aligned with your broader business goals.
Boost Your Social Engagement with DreamHost
Social media scheduling can single-handedly transform your marketing routine from haphazard to strategic. Whether you opt for Metricool’s free tier, Buffer’s clean interface, or a tool that isn’t even on our list, there’s a solution that’s right for every small business. Remember: Scheduling in advance, analyzing the data, and staying flexible will help you save time, polish your online presence, and keep your audience engaged — all without draining your wallet.
Want more insights into social media strategy? Explore DreamHost’s resources for small business owners who want to stand out online without sacrificing their sanity:
- How To Create a Winning Social Media Strategy (A Comprehensive Guide)
- The Story-Selling Framework: How Content Storytelling Can Upgrade Marketing
- How to Use Micro-Influencers to Promote Your Business
- How To Scale Blog and Social Media Content With AI While Keeping It Credible
- Social Media SEO: How To Use Social Media To Boost SEO
Get Social and Grow Your Business with DreamHost
Our experts will help create a powerful social media strategy and level up your execution so you can focus on running your business.
Learn MoreThe post Boost Engagement with These Top 5 Social Media Scheduling Tools appeared first on DreamHost Blog.
]]>The post How To Stop Web Crawlers and Bots From Slowing Down Your Website appeared first on DreamHost Blog.
]]>But what if half your “customers” just occupy tables, waste your baristas’ time, and never buy coffee?
Meanwhile, real customers leave due to no tables and slow service?
Well, that’s the world of web crawlers and bots.
These automated programs gobble up your bandwidth, slow down your site, and drive away actual customers.
Recent studies show that almost 51% of internet traffic comes from bots. That’s right — more than half of your digital visitors may just be wasting your server resources.
But don’t panic!
This guide will help you spot trouble and control your site’s performance, all without coding or calling your techy cousin.
A Quick Refresher on Bots
Bots are automated software programs that perform tasks on the internet without human intervention. They:
- Visit websites
- Interact with digital content
- And execute specific functions based on their programming.
Some bots analyze and index your site (potentially improving search engine rankings.) Some spend their time scraping your content for AI training datasets — or worse — posting spam, generating fake reviews, or looking for exploits and security holes in your website.
Of course, not all bots are created equal. Some are critical to the health and visibility of your website. Others are arguably neutral, and a few are downright toxic. Knowing the difference — and deciding which bots to block and which to allow — is crucial for protecting your site and its reputation.
Good Bot, Bad Bot: What’s What?

Bots make up the internet.
For instance, Google’s bot visits every page on the internet and adds it to their databases for ranking. This bot assists in providing valuable search traffic, which is important for the health of your website.
But, not every bot is going to provide value, and some are just outright bad. Here’s what to keep and what to block.
The VIP Bots (Keep These)
- Search engine crawlers like Googlebot and Bingbot are examples of these crawlers. Don’t block them, or you’ll become invisible online.
- Analytics bots gather data about your site’s performance, like the Google Pagespeed Insights bot or the GTmetrix bot.
The Troublemakers (Need Managing)
- Content scrapers that steal your content for use elsewhere
- Spam bots that flood your forms and comments with junk
- Bad actors who attempt to hack accounts or exploit vulnerabilities
The bad bots scale might surprise you. In 2024, advanced bots made up 55% of all advanced bad bot traffic, while good ones accounted for 44%.
Those advanced bots are sneaky — they can mimic human behavior, including mouse movements and clicks, making them more difficult to detect.
Are Bots Bogging Down Your Website? Look for These Warning Signs
Before jumping into solutions, let’s make sure bots are actually your problem. Check out the signs below.
Red Flags in Your Analytics
- Traffic spikes without explanation: If your visitor count suddenly jumps but sales don’t, bots might be the culprit.
- Everything s-l-o-w-s down: Pages take longer to load, frustrating real customers who might leave for good. Aberdeen shows that 40% of visitors abandon websites that take over three seconds to load, which leads to…
- High bounce rates: above 90% often indicate bot activity.
- Weird session patterns: Humans don’t typically visit for just milliseconds or stay on one page for hours.
- You start getting lots of unusual traffic: Especially from countries where you don’t do business. That’s suspicious.
- Form submissions with random text: Classic bot behavior.
- Your server gets overwhelmed: Imagine seeing 100 customers at once, but 75 are just window shopping.
Check Your Server Logs
Your website’s server logs contain records of every visitor.
Here’s what to look for:
- Too many subsequent requests from the same IP address
- Strange user-agent strings (the identification that bots provide)
- Requests for unusual URLs that don’t exist on your site
User Agent
A user agent is a type of software that retrieves and renders web content so that users can interact with it. The most common examples are web browsers and email readers.
Read MoreA legitimate Googlebot request might look like this in your logs:
66.249.78.17 - - [13/Jul/2015:07:18:58 -0400] "GET /robots.txt HTTP/1.1" 200 0 "-" "Mozilla/5.0 (compatible; Googlebot/2.1; +http://www.google.com/bot.html)"If you see patterns that don’t match normal human browsing behavior, it’s time to take action.
The GPTBot Problem as AI Crawlers Surge
Recently, many website owners have reported issues with AI crawlers generating abnormal traffic patterns.
According to Imperva’s research, OpenAI’s GPTBot made 569 million requests in a single month while Claude’s bot made 370 million across Vercel’s network.
Look for:
- Error spikes in your logs: If you suddenly see hundreds or thousands of 404 errors, check if they’re from AI crawlers.
- Extremely long, nonsensical URLs: AI bots might request bizarre URLs like the following:
/Odonto-lieyectoresli-541.aspx/assets/js/plugins/Docs/Productos/assets/js/Docs/Productos/assets/js/assets/js/assets/js/vendor/images2021/Docs/...- Recursive parameters: Look for endless repeating parameters, for example:
amp;amp;amp;page=6&amp;amp;page=6- Bandwidth spikes: Readthedocs, a renowned technical documentation company, stated that one AI crawler downloaded 73TB of ZIP files, with 10TB downloaded in a single day, costing them over $5,000 in bandwidth charges.
These patterns can indicate AI crawlers that are either malfunctioning or being manipulated to cause problems.
When To Get Technical Help
If you spot these signs but don’t know what to do next, it’s time to bring in professional help. Ask your developer to check specific user agents like this one:
Mozilla/5.0 AppleWebKit/537.36 (KHTML, like Gecko; compatible; GPTBot/1.2; +https://openai.com/gptbot)
There are many recorded user agent strings for other AI crawlers that you can look up on Google to block. Do note that the strings change, meaning you might end up with quite a large list over time.
👉 Don’t have a developer on speed dial? DreamHost’s DreamCare team can analyze your logs and implement protection measures. They’ve seen these issues before and know exactly how to handle them.
Your Bot-Busting Toolkit: 5 Simple Steps To Take Back Control
Now for the good part: how to stop these bots from slowing down your site. Roll up your sleeves and let’s get to work.
1. Create a Proper robots.txt File
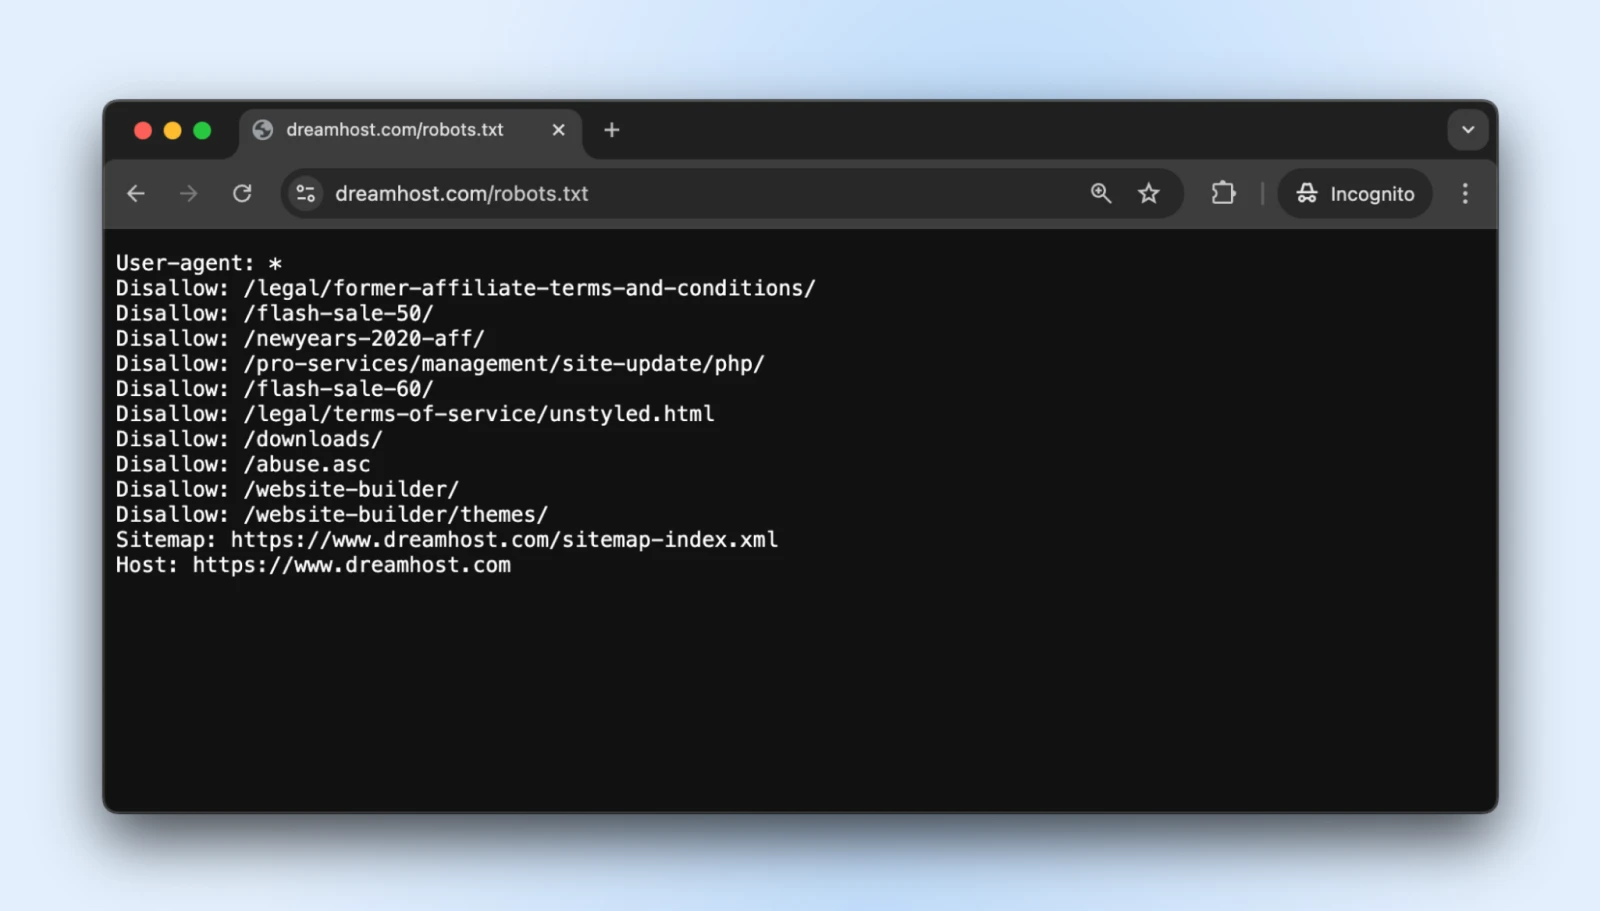
The robots.txt simple text file sits in your root directory and tells well-behaved bots which parts of your site they shouldn’t access.
You can access the robots.txt for pretty much any website by adding a /robots.txt to its domain. For instance, if you want to see the robots.txt file for DreamHost, add robots.txt at the end of the domain like this: https://dreamhost.com/robots.txt
There’s no obligation for any of the bots to accept the rules.
But polite bots will respect it, and the troublemakers can choose to ignore the rules. It’s best to add a robots.txt anyway so the good bots don’t start indexing admin login, post-checkout pages, thank you pages, etc.
How to Implement
1. Create a plain text file named robots.txt
2. Add your instructions using this format:
User-agent: *          # This line applies to all bots
Disallow: /admin/      # Don't crawl the admin area
Disallow: /private/    # Stay out of private folders
Crawl-delay: 10        # Wait 10 seconds between requests
User-agent: Googlebot  # Special rules just for Google
Allow: /               # Google can access everything
3. Upload the file to your website’s root directory (so it’s at yourdomain.com/robots.txt)
The “Crawl-delay” directive is your secret weapon here. It forces bots to wait between requests, preventing them from hammering your server.
Most major crawlers respect this, although Googlebot follows its own system (which you can control through Google Search Console).
Pro tip: Test your robots.txt with Google’s robots.txt testing tool to ensure you haven’t accidentally blocked important content.
2. Set Up Rate Limiting
Rate limiting restricts how many requests a single visitor can make within a specific period.
It prevents bots from overwhelming your server so normal humans can browse your site without interruption.
How to Implement
If you’re using Apache (common for WordPress sites), add these lines to your .htaccess file:
<IfModule mod_rewrite.c>
RewriteEngine On
RewriteCond %{REQUEST_URI} !(.css|.js|.png|.jpg|.gif|robots.txt)$ [NC]
RewriteCond %{HTTP_USER_AGENT} !^Googlebot [NC]
RewriteCond %{HTTP_USER_AGENT} !^Bingbot [NC]
# Allow max 3 requests in 10 seconds per IP
RewriteCond %{REMOTE_ADDR} ^([0-9]+.[0-9]+.[0-9]+.[0-9]+)$
RewriteRule .* - [F,L]
</IfModule>.htaccess
“.htaccess” is a configuration file used by the Apache web server software. The .htaccess file contains directives (instructions) that tell Apache how to behave for a particular website or directory.
Read MoreIf you’re on Nginx, add this to your server configuration:
limit_req_zone $binary_remote_addr zone=one:10m rate=30r/m;
server {
    ...
    location / {
        limit_req zone=one burst=5;
        ...
    }
}
Many hosting control panels, like cPanel or Plesk, also offer rate-limiting tools in their security sections.
Pro tip: Start with conservative limits (like 30 requests per minute) and monitor your site. You can always tighten restrictions if bot traffic continues.
3. Use a Content Delivery Network (CDN)
CDNs do two good things for you:
- Distribute content across global server networks so your website is delivered quickly worldwide
- Filter traffic before it reaches the website to block any irrelevant bots and attacks
The “irrelevant bots” part is what matters to us for now, but the other benefits are useful too. Most CDNs include built-in bot management that identifies and blocks suspicious visitors automatically.
How to Implement
- Sign up for a CDN service like DreamHost CDN, Cloudflare, Amazon CloudFront, or Fastly.
- Follow the setup instructions (may require changing name servers).
- Configure the security settings to enable bot protection.
If your hosting service offers a CDN by default, you eliminate all the steps since your website will automatically be hosted on CDN.
Once set up, your CDN will:
- Cache static content to reduce server load.
- Filter suspicious traffic before it reaches your site.
- Apply machine learning to differentiate between legitimate and malicious requests.
- Block known malicious actors automatically.
Pro tip: Cloudflare’s free tier includes basic bot protection that works well for most small business sites. Their paid plans offer more advanced options if you need them.
4. Add CAPTCHA for Sensitive Actions

CAPTCHAs are those little puzzles that ask you to identify traffic lights or bicycles. They’re annoying for humans but nearly impossible for most bots, making them perfect gatekeepers for important areas of your site.
How to Implement
- Sign up for Google’s reCAPTCHA (free) or hCaptcha.
- Add the CAPTCHA code to your sensitive forms:
- Login pages
- Contact forms
- Checkout processes
- Comment sections
For WordPress users, plugins like Akismet can handle this automatically for comments and form submissions.
Pro tip: Modern invisible CAPTCHAs (like reCAPTCHA v3) work behind the scenes for most visitors, only showing challenges to suspicious users. Use this method to gain protection without annoying legitimate customers.
5. Consider the New llms.txt Standard
The llms.txt standard is a recent development that controls how AI crawlers interact with your content.
It’s like robots.txt but specifically for telling AI systems what information they can access and what they should avoid.
How to Implement
1. Create a markdown file named llms.txt with this content structure:
# Your Website Name
> Brief description of your site

## Main Content Areas
- [Product Pages](https://yoursite.com/products): Information about products
- [Blog Articles](https://yoursite.com/blog): Educational content

## Restrictions
- Please don't use our pricing information in training
2. Upload it to your root directory (at yourdomain.com/llms.txt) → Reach out to a developer if you don’t have direct access to the server.
Is llms.txt the official standard? Not yet.
It’s a standard proposed in late 2024 by Jeremy Howard, which has been adopted by Zapier, Stripe, Cloudflare, and many other large companies. Here’s a growing list of websites adopting llms.txt.
So, if you want to jump on board, they have official documentation on GitHub with implementation guidelines.
Pro tip: Once implemented, see if ChatGPT (with web search enabled) can access and understand the llms.txt file.

Verify that the llms.txt is accessible to these bots by asking ChatGPT (or another LLM) to “Check if you can read this page” or “What does the page say.”
We can’t know if the bots will respect llms.txt anytime soon. However, if the AI search can read and understand the llms.txt file now, they may start respecting it in the future, too.
Monitoring and Maintaining Your Site’s Bot Protection
So you’ve set up your bot defenses — awesome work!
Just keep in mind that bot technology is always evolving, meaning bots come back with new tricks. Let’s make sure your site stays protected for the long haul.
- Schedule regular security check-ups: Once a month, look at your server logs for anything fishy and make sure your robots.txt and llms.txt files are updated with any new page links that you’d like the bots to access/not access.
- Keep your bot blocklist fresh: Bots keep changing their disguises. Follow security blogs (or let your hosting provider do it for you) and update your blocking rules at regular intervals.
- Watch your speed: Bot protection that slows your site to a crawl isn’t doing you any favors. Keep an eye on your page load times and fine-tune your protection if things start getting sluggish. Remember, real humans are impatient creatures!
- Consider going on autopilot: If all this sounds like too much work (we get it, you have a business to run!), look into automated solutions or managed hosting that handles security for you. Sometimes the best DIY is DIFM — Do It For Me!
A Bot-Free Website While You Sleep? Yes, Please!
Pat yourself on the back. You’ve covered a lot of ground here!
However, even with our step-by-step guidance, this stuff can get pretty technical. (What exactly is an .htaccess file anyway?)
And while DIY bot management is certainly possible, you mind find that your time is better spent running the business.
DreamCare is the “we’ll handle it for you” button you’re looking for.
Our team keeps your site protected with:
- 24/7 monitoring that catches suspicious activity while you sleep
- Regular security reviews to stay ahead of emerging threats
- Automatic software updates that patch vulnerabilities before bots can exploit them
- Comprehensive malware scanning and removal if anything sneaks through
See, bots are here to stay. And considering their rise in the last few years, we could see more bots than humans in the near future. No one knows.
But, why lose sleep over it?
Website Management Made Easy
Let us handle the backend — we’ll manage and monitor your website so it’s safe, secure, and always up.
Learn MoreThis page contains affiliate links. This means we may earn a commission if you purchase services through our link without any extra cost to you.
The post How To Stop Web Crawlers and Bots From Slowing Down Your Website appeared first on DreamHost Blog.
]]>The post 10 High-Demand Niche Business Ideas in 2025 appeared first on DreamHost Blog.
]]>Seriously, people are out there scraping gum from the bottom of restaurant tables and monetizing that service.

Maybe you’re tired of your 9-5. Maybe you want to bring in some extra cashola from a side hustle. Or maybe you’re really passionate about a super-specific small business idea but don’t know where to start.
Will my idea work?
Am I picking the right niche?
Is my mom going to be my only customer?
Relax. The internet is huge, and there’s space for all kinds of ventures — especially if you start a small business that solves an actual problem.
Below are 10 fast-growing ideas for 2025, plus tips on how to turn them into real, successful businesses. Some may click with you, others may not. That’s cool. The goal is to spark ideas and help you grab what fits you best.
What Makes a Great Niche Business Idea?
A niche business focuses on a specific slice of a larger market. Think of it as a small-but-mighty corner where you serve a particular group of customers or solve a unique problem.
A profitable niche is a specialized area that not only sparks interest but also drives sales. It’s underserved, meaning competitors aren’t swarming, or it’s brand new (or at least new-ish), so you have room to grow.

And the right business for you will depend on this evaluation matrix.
Niche Idea Evaluation Matrix
Here’s how to use our small business idea matrix:
- List business ideas you can start with: Write down each idea you’re considering in the first column.
Pro Tip: You can make a copy of our free Niche Idea Scorecard template, or create your own using the outline here.
- Score each criterion: For each idea, go through the criteria columns (“Differentiation,” “Demand,” “Profit Potential,” and “Personal Alignment”).
Read the guiding questions below and assign a score from 1 to 5, where:
- 1 = Very Low / Very Difficult / No Alignment
- 2 = Low / Difficult / Low Alignment
- 3 = Medium / Possible / Moderate Alignment
- 4 = High / Achievable / Good Alignment
- 5 = Very High / Easy / Strong Alignment
- Add notes: Use the “Notes” column to jot down specific thoughts, potential challenges, unique opportunities, or key evidence for your scores (e.g., “Competitor X has poor reviews,” “Requires significant upfront cost”).
- Calculate the total score: Add up the scores for each niche idea. This gives a quick quantitative comparison.
Here are the guiding questions you need to score each column:
- Differentiation: How easily can I stand out from others?
- Demand: Do enough people want this product or service?
- Profit potential: Can I make decent money doing this?
- Personal alignment: Will I stay interested in this for a long time?
| Business Idea | Differentiation | Demand | Profit Potential | Personal Alignment | Total Score | Notes |
| Idea #1 | ||||||
| Idea #2 | ||||||
| Idea #3 | ||||||
| Idea #4 | ||||||
| Idea #5 | ||||||
| Idea #6 | ||||||
| Idea #7 | ||||||
| Idea #8 | ||||||
| Idea #9 | ||||||
| Idea #10 |
Okay, the matrix helps rank your ideas. But don’t build anything big yet. Next, you have to test to see if your online business idea holds water in the real world within your target market. Luckily, we have just the guide to validate your side hustle ideas.
Let’s explore 10 trending niches you can plug into the matrix right now.
10 High-Demand Niche Business Ideas for 2025
Your entrepreneurship dreams take flight here.
Remember to use these (or your own ideas!) in the evaluation matrix.
1. Eco-Friendly and Sustainable Products
You’ve seen the headlines, right? Rising sea levels, plastic everywhere. Consumers are noticing, and they’re seeking ways to spend money without feeling like villains.
Harvard Business Review’s research suggests we’re near a tipping point where sustainability is becoming a basic requirement to get customers.
Why? Because it builds trust, especially with younger generations.
And those younger folks are about to hold most of the spending power.
People want greener options, creating a huge opportunity if you can offer products that actually help them reduce their environmental impact.
What You Can Do
- Sell reusable versions of everyday things: Think stylish coffee cups people want to carry, beeswax food wraps instead of plastic cling film, or durable mesh produce bags.
- Create refillable products: Offer concentrated cleaning supplies or personal care items (like shampoo bars) where customers buy refills, cutting down on packaging waste.
- Curate zero-waste starter kits: Bundle essential reusables (like a water bottle, utensils, and a container) to help beginners get started on reducing waste easily.
- Upcycle old materials into cool new products: Get creative turning old jeans into bags, advertising banners into wallets, or reclaimed wood into unique home decor.
2. Remote Work Gear and Productivity Help
Around the world, 28% of the workforce now operates remotely. That may seem like a relatively small percentage, but it’s about 2 billion people who are probably sick of their banana-esque posture and craned necks.
Working from the couch was cool for a bit, but now people realize they need proper setups for the long haul. This fuels related markets, like home office furniture, which itself is a $50-billion industry, in case you want to hop on that train.
And it also creates important ancillary jobs that can support a work-from-home operation.
What You Can Do
- Sell solid ergonomic gear: Go beyond the basics that people find everywhere. Think adjustable monitor arms to get screens perfectly at eye level or vertical mice designed to reduce wrist strain during long computer hours.
- Provide smart desk organization: Tackle the mess that accumulates on home desks. Maybe brainstorm clever cable management solutions like sleeves, boxes, or raceways to hide the wire spaghetti. Or perhaps monitor risers that create storage space underneath.
- Offer specialized virtual assistant (VA) services: This could involve managing complex schedules across different time zones, filtering and responding to emails, preparing presentations or documents for virtual meetings, or handling administrative tasks unique to remote operations.
3. Micro-Wellness and Mental Wellbeing Tools
People are stressed, tired, and looking for ways to feel better, mentally and physically.
The Global Wellness Institute pegged the global market at a massive $6.3 trillion in 2023. And get this: within that giant pie, the specific slice for Mental Wellness was already worth a cool $233 billion.
That’s serious money people are spending because, thankfully, the stigma’s fading, and folks are actively looking for help. The real opportunity now is in specific tools for specific problems — not just vague ‘feel good’ stuff.
What You Can Do
- Develop niche digital tools: Try your hand at no-code, low-code app development and create a meditation app for 5-minute work breaks, a mood-tracking journal app, or downloadable guides on managing anxiety triggers.
- Sell targeted physical products: Offer curated boxes with sleep aids (masks, teas), weighted blankets specifically for anxiety relief, or aromatherapy blends for focus.
- Provide guided journaling resources: Sell journals with specific prompts tailored to goals like building confidence, practicing gratitude, or navigating grief.
4. “Faceless” Educational Content Creation
Online learning is enormous. YouTube, podcasts, blogs — they’re basically universities now. People constantly want to learn new skills or understand complex stuff.
You can teach successfully online without ever showing your face, focusing purely on delivering great content.
For example, almost 24 million people subscribe to Kurzgesagt – In a Nutshell, a channel with colorful animation and soothing narration that covers everything from black holes to happiness.
What You Can Do
- Create animated explainer videos: Use animation software to break down complex topics in science, finance, history, or technology.
- Produce screen-recording online courses: Teach software skills, coding, graphic design, or even video game strategies, clearly showing your screen.
- Start a niche educational podcast: Deep-dive into specific subjects, interview experts, or tell interesting historical stories using just audio.
- Sell digital guides and templates: Offer in-depth ebooks, downloadable checklists, or useful templates (like budget spreadsheets or marketing plans) in your area of expertise.
5. Specialized Home Organization and Decor
Staring at the same four walls has made people care about how their homes look and function. Clutter equals stress, and good design feels good.
The average American spends $5,635 on home renovations and remodeling projects and $1,598 on home decor each year, according to Opendoor’s 2024 Home Decor Report.
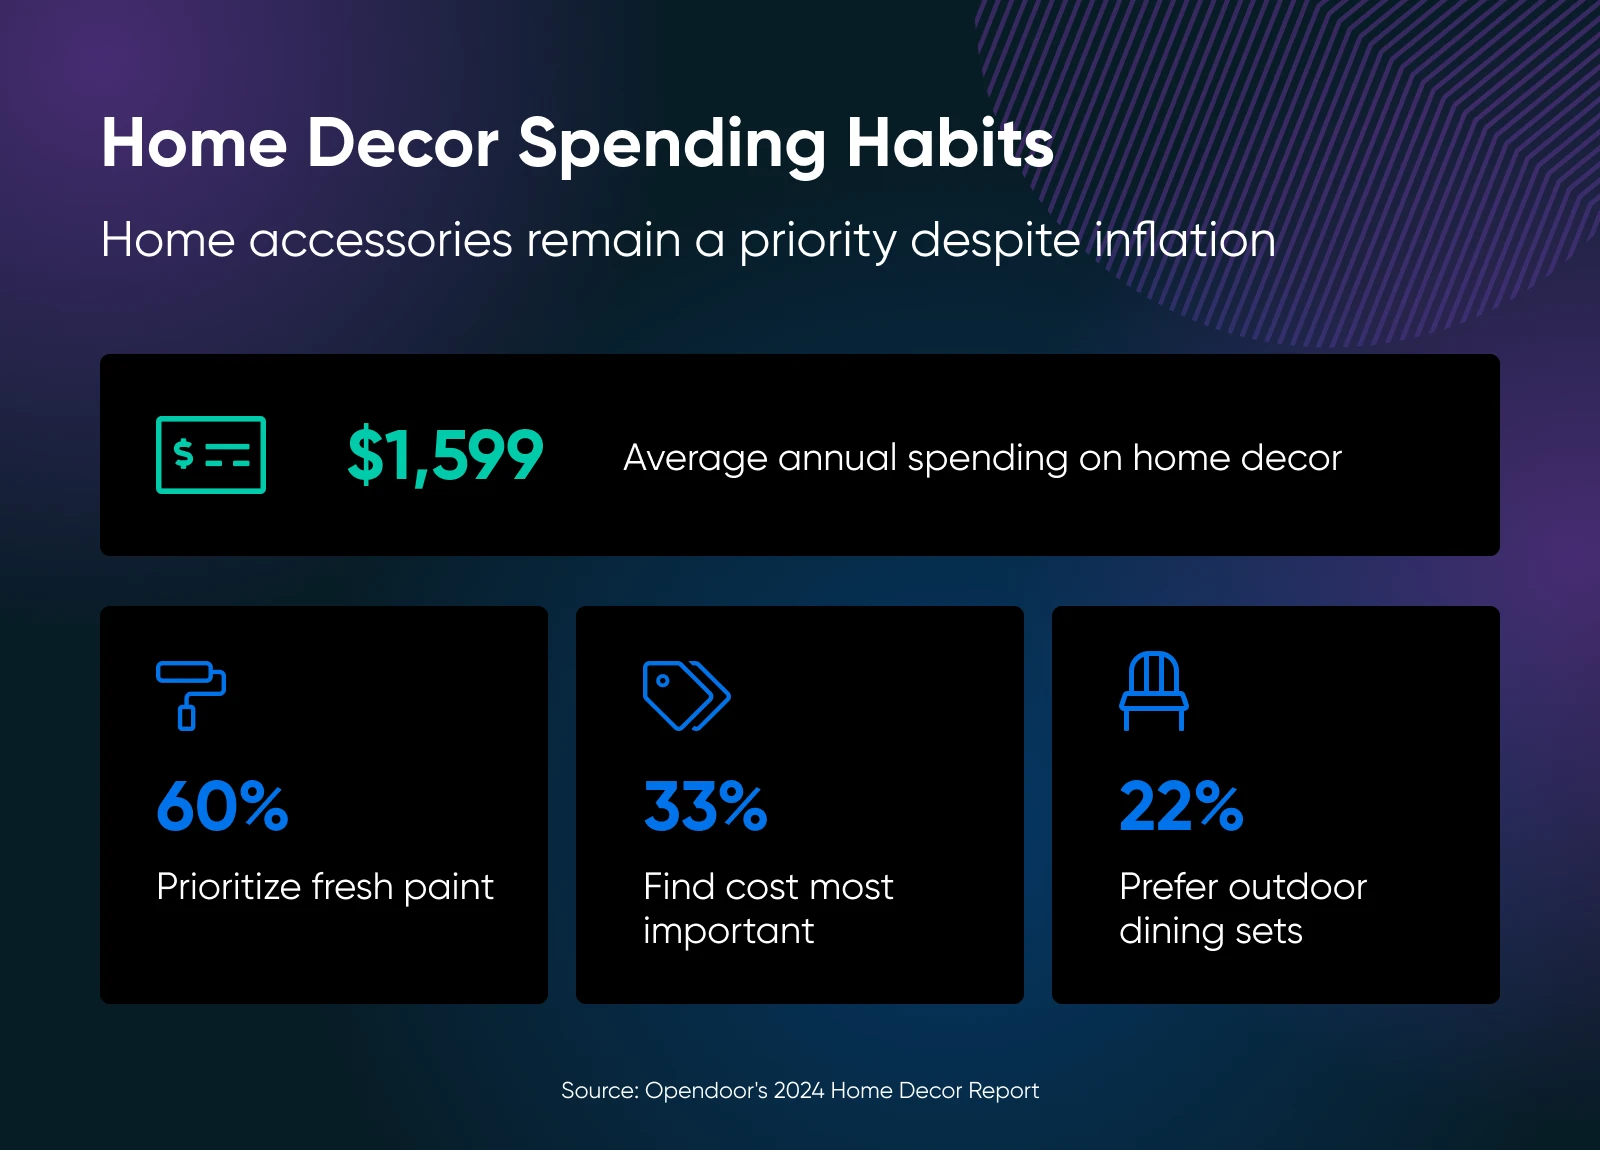
There’s plenty of room for businesses that offer clever solutions for home challenges or cater to distinct design tastes.
What You Can Do
- Sell storage solutions for tiny spaces: Offer modular shelving, under-bed organizers, over-the-door storage, or furniture with hidden compartments designed explicitly for small apartments or rooms.
- Curate items for a specific aesthetic: Focus entirely on one style, like minimalist Japandi, colorful maximalist, cozy dark academia, or sustainable/eco-friendly decor.
- Provide virtual organizing consultations: Help people tackle specific problem areas (closet, kitchen, home office) via video call, guiding them through decluttering and organizing.
- Design and sell unique organizational printables: Offer stylish downloadable checklists, labels, planners, or guides for home management or specific organizing projects.
6. Organic and Clean Beauty
Consumers genuinely want products without harsh chemicals and with ingredients they can pronounce.
The demand is real. Get this: the hashtag #cleanbeauty has 7.2 million tags on Instagram alone.

What You Can Do
- Create small-batch natural skincare: Make and sell products like organic face oils, gentle cleansers, or body butters using simple, high-quality ingredients (following all safety and labeling laws!).
- Curate clean beauty subscription boxes: Offer boxes featuring only vetted brands that meet strict “clean” criteria (free from certain chemicals, cruelty-free, etc.).
- Build an online shop specializing in one clean category: Focus only on certified organic makeup, reef-safe mineral sunscreens, or non-toxic haircare.
- Become a trusted resource: If you want to scratch your digital marketing itch, start a blog or social media account dedicated to decoding ingredient lists, reviewing clean products, and educating consumers.
7. Modern DIY and Hobby Kits
Our thumbs are getting sore from endless scrolling, and our eyes might actually fuse to our screens. So naturally, people are suddenly desperate to prove they can still use their actual hands for something other than typing or swiping.
Enter the modern DIY kit: making old-school stuff like knitting or pottery seem cool again.
In 2025 alone, the global arts and crafts market is expected to reach $48.33 billion.
Apparently, people will pay good money to make their own slightly lopsided mug or stitch a wonky sweater.
What You Can Do
- Package up trendy crafts: Box up everything someone needs to make that resin coaster, punch needle pillow, or tie-dye monstrosity they saw on TikTok. Easy instructions are key; assume your customer has the attention span of a goldfish.
- Offer “Look I Built This!” tech kits: Cater to the geek with beginner-friendly electronics kits. Build a basic radio that crackles, a robot that bumps into walls — whatever lets them brag they soldered something without burning the house down.
- Do crafty subscription boxes: Keep ’em hooked (and spending) by sending a surprise box of crafty stuff each month. Today, it’s pottery, and tomorrow… macrame plant hangers? The possibilities for questionable home decor are endless!
8. Hyper-Personalized Pet Supplies
People love their pets — maybe too much? They’re projected to spend over $25 billion on pet accessories alone globally in 2025, and that market’s growing nearly 8% a year.
The “pets are family” feeling means owners want specialized stuff, whether it’s food tailored to Fido’s weird allergy or a GPS tracker for Lola who loves flying off her leash.
What You Can Do
- Create personalized pet food or treat plans: Offer subscriptions based on breed, age, allergies, or specific health goals discussed with the owner.
- Sell breed-specific durable toys: Focus on toys designed to withstand the jaws of power-chewing breeds or interactive toys for brainy ones. Beagles love puzzles they can smell, for example.
- Offer high-tech pet monitoring: Provide reliable GPS tracking collars with good battery life or smart feeders that dispense measured portions.
- Commission custom pet portraits: Offer digital paintings or physical artwork based on photos submitted by owners for that ultimate personal touch.
Purr and Mutt’s been featured on CNN and BBC for turning all manner of pets, from cats to dogs to rabbits, into (adorable) works of art.
9. Niche AI Tools and Training (For Regular People)
AI is booming right now, but honestly? It’s confusing for most folks running a small business or working freelance. They need practical ways to use AI now without needing a PhD. That’s the gap you can fill.
Within the AI market, researchers at Sopra Steria identified four segments. Among the two largest categories are AI tools for processes (e.g., within process mining) and AI tools for people (e.g., intelligent AI assistants). Their predictions place these segments at a $390 billion market size by 2028.
There’s huge money in making AI useful, not scary.
What You Can Do
- Build AI tools for annoying processes: Focus on automating soul-crushing, repetitive tasks within specific jobs. For example, you might make a simple tool that helps Etsy sellers automatically categorize their expenses instead of crying over spreadsheets.
- Create AI assistants for overwhelmed people: Develop smart helpers tailored for specific professions. Maybe an AI assistant that helps therapists draft session notes (ethically!), or one that suggests email replies for busy freelancers who seem allergic to their inbox.
- Teach people how AI can help them: Run workshops or courses for specific groups (like realtors, artists, or plumbers), showing them practical ways AI can help their process or act as their assistant without stealing their jobs (probably). Focus on using existing tools smarter.
- Consult on setting up AI without breaking things: Help small businesses implement simple AI for their processes or people, like chatbots that handle basic customer questions without annoying everyone.
10. Repair Education and Kits (Anti-Throwaway Culture)
Sick of your phone conveniently slowing down right after the warranty expires? Or that fancy gadget becoming an expensive paperweight because one tiny, irreplaceable part broke?
Yeah, you and everyone else.
Globally, we churn out tens of millions of metric tonnes of e-waste every single year. Meanwhile, surveys consistently show that a huge majority of consumers want the right to repair their own gear and are ticked off by products designed to be disposable bricks. The whole “Right to Repair” movement is gaining real steam for a reason.
This widespread frustration creates a solid opportunity to arm people with the skills, tools, and confidence to fight back against planned obsolescence.
What You Can Do
- Sell DIY repair kits: Bundle the specific, often weirdly tiny tools (like spudgers, prying tools, and special screwdrivers) and quality replacement parts needed for popular repairs. Take the guesswork and risk out of sourcing sketchy components from random online sellers.
- Build a repair community/forum: Launch an online space (maybe with a paid tier) where people can share their repair guides, ask questions when they get stuck, and troubleshoot tricky fixes together.
- Offer refurbished gadgets (with honesty): Source used electronics, fix them up properly using good parts, and sell them. Be transparent about what you repaired and why, including links to guides showing how the buyer could fix it again if needed. Focus on reliability and fighting the disposable cycle.

Alright, What Now? Start a Business!
Got your niche picked (and maybe even validated)? Awesome! Time to launch this sucker. Here’s a quick checklist:
1. Seriously, validate
Okay, one last nudge. Validate that top-scoring idea from your matrix if you haven’t yet. Talk to potential customers, run a quick online survey, and maybe set up a dead-simple “coming soon” page to collect emails for future email marketing.
2. Sketch a “plan”
You don’t need a 50-page formal business plan destined to gather dust, but do jot down the basics derived from your evaluation:
- Who’s your ideal customer?
- What’s your unique selling point?
- Roughly how much will things cost?
- What’s your pricing strategy?
- How will people find you online?
Think bullet points or a simple mind map, not a novel.
3. Nail down your actual offer
Time to get concrete about what you’re putting out there. If it’s a physical product, figure out manufacturing or sourcing. Where are you getting it, how’s the quality, and how will you handle shipping?
If it’s a service, define exactly what’s included (and what’s not) so you don’t end up scope-creeping yourself into working 24/7 for peanuts. Logistics, baby.
4. Build your online hub
Seriously, you need a website. It’s not optional in 2025.
This is your corner of the internet to tell your unique story, collect email addresses, and give people a reliable place to buy from you.
💡Pro tip: If you’re building on WordPress, the Astra theme is a solid bet. It’s known for being lightning fast (remember, visitors bail on slow sites), lightweight, and incredibly customizable, even if you’re allergic to code. Plus, it works well with most other tools you might add later.
5. Show up where your people are
Don’t just spray posts randomly across every social platform. Figure out which one or two places your ideal customers hang out and engage.
Then, show up there regularly. Share stuff they’ll find useful, interesting, or entertaining related to your niche — build a connection. Don’t just scream “BUY MY STUFF!” constantly.
6. Launch, listen, learn, repeat
Hit the button! Get your product or service out there.
Spoiler: It will not be perfect. And that’s completely okay.
The real work starts now. Pay super close attention to what happens next. What questions do people ask constantly? What feedback (good, bad, and weird) do you get? What’s selling?
Utilize all that real-world data to fix what’s broken, improve what’s working, and refine your approach.
Your Move, Entrepreneur
If you zoned out, here’s the super-quick version:
- The internet’s buzzing with opportunity, but you need a niche to get noticed. Don’t try to sell everything to everyone.
- Use that evaluation matrix we gave you to check if your idea sucks or shines.
- Seriously, validate your top idea before you dump your savings into it. Test it out on real people first.
Next step? Build it, market it, and make some cash.
Getting your website up, making sure Google shows it to people (that’s SEO!), and telling the world about your awesome thing takes effort.
DreamHost can hook you up with professional website services, plus SEO and marketing tools, cutting down the tech headaches so you can focus on being a forward-thinking small business owner.
Web Hosting That Powers Your Purpose
We make sure your website is fast, secure and always up so your visitors trust you.
Choose Your PlanThis page contains affiliate links. This means we may earn a commission if you purchase services through our link without any extra cost to you.
The post 10 High-Demand Niche Business Ideas in 2025 appeared first on DreamHost Blog.
]]>