The post Cron Jobs: For When Your Sleep Schedule Matters appeared first on DreamHost Blog.
]]>Well, me neither. Nor do the millions of server admins who manage the 14+ billion servers across the world.
So, stop the madness — I beg you!
Cron jobs are built for that.
Because, genuinely, nothing says “competent sysadmin” like being fast asleep and taking credit for the work your scripts handle for you. It’s called “utilizing your resources.”
With cron jobs:
- Your boss thinks you’re dedicated.
- Your server knows you’re lazy.
- You have this beautiful symbiotic relationship called automation.
Today, you’re going to become a cron jobs pro.
First, What’s a Cron Job? (The Not-Boring Version)
A cron job is essentially a task scheduler built into Unix-like operating systems (Linux, macOS) that lets you run Linux commands automatically at specified times and dates.
Think of it like a to-do list for your server, but…this one actually gets completed.
Cron in Metaphors
If your server infrastructure were a restaurant:
- The cron daemon is the manager checking the daily schedule.
- The crontab is the staff assignment board.
- Each cron job is a task assigned to a specific staff member at a specific time.
- The command is the actual work being done.
When the clock hits the scheduled time, the manager taps the assigned employee on the shoulder and says, “It’s showtime!”
The employee then executes their task without question or complaint.
If only we humans were this reliable, the world would be a different place!
The Anatomy of a Cron Job
Every cron job consists of two main parts:
- When to run (the schedule)
- What to run (the command or script to execute)
The schedule uses a specific syntax that might look like some computer wizardry at first glance:
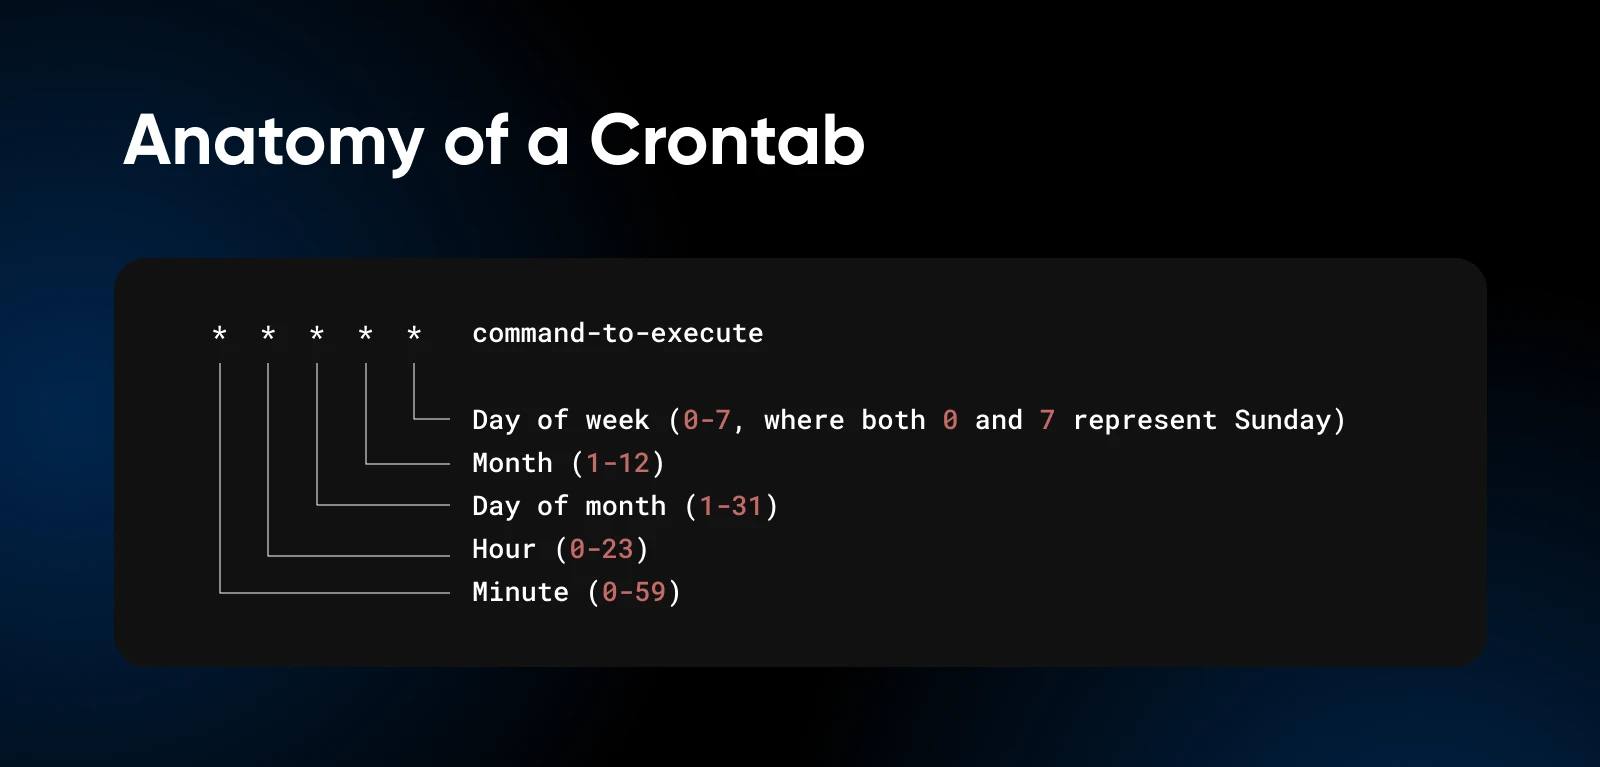
But take a closer look and it’ll start to make sense.
Each asterisk can be replaced with specific values, ranges, or intervals to create precisely the schedule you need.
Why Server Admins Love Cron Jobs
There’s a reason why server admins (even me) get misty-eyed when discussing cron jobs.
They turn server management into something that (at least remotely) resembles work-life balance.
1. They Save You Time
Remember time? That thing you never have enough of? Cron jobs give it back. You set them, you forget them, and you’re pretty much never looking at them.
(Well, until they break or you need to change the schedule.)
2. They Maintain Consistency
Humans are inconsistent. We forget things. We make typos. We get distracted by cat videos. Cron jobs perform the exact task, the exact same way, every single time — no exceptions.
3. Your Server Never Sleeps
With cron jobs, essential maintenance happens 24/7/365, whether you’re awake, asleep, or on a beach sipping margaritas.
4. Error Logs > Human Memory
When you manually perform tasks, can you remember exactly what you did and exactly when you did it? Probably not.
But cron jobs can be configured to log their activity, creating a paper trail of all automated actions for troubleshooting and verification.
5. They’re Built for Scalability
As your infrastructure grows, manually managing everything becomes exponentially more difficult. Cron jobs scale effortlessly.
Meaning, the same job can run across multiple servers without requiring additional time from you.
Setting Up Cron Jobs: A Step-by-Step Guide
Enough theory! You need to get your hands dirty with some practical cron job setup.
Step 1: Confirm Cron Is Installed
Most Unix-like systems have cron pre-installed. To check if it’s available for use, type the below command:
crontab -eDepending on the default editor, the command will open the crontab in your specific editor. If you have never used crontab before, it might ask you to set the default editor.
If the terminal responds with command not found, you’ll need to install cron with the below commands:
- On Ubuntu/Debian:
sudo apt update && sudo apt install cron - On CentOS/RHEL:
sudo yum install cronie
Once done, start and enable the cron service:
sudo systemctl start cron
sudo systemctl enable cron
With the start and enable commands, we’re starting the cron service to execute the cron jobs.
And with enable, we make sure that even if your server restarts, the cron service automatically restarts with it, and no cron jobs are missed.
Nerd Note: CentOS calls the cron service “crond”, so you will need to start and enable the crond service.
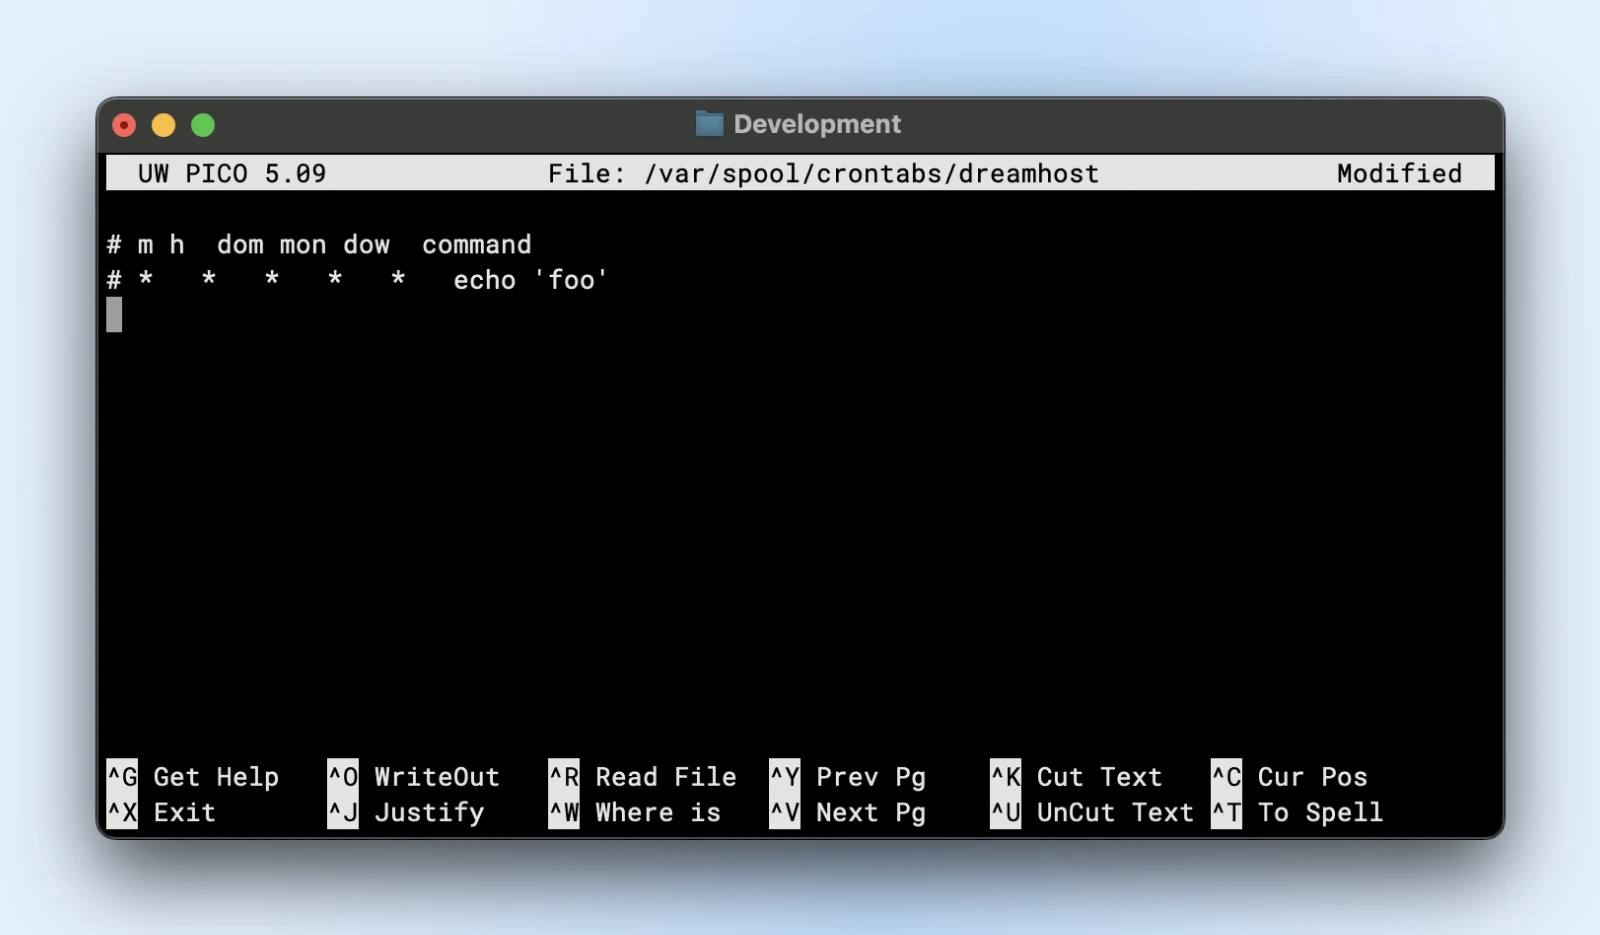
Step 2: Understanding the Crontab
Alright, open the crontab or the crontable to begin adding your scheduled jobs.
Each user on the system can have their own crontab file. Additionally, there is a system-wide crontab.
To edit your personal crontab:
crontab -eThis opens your crontab file in your default text editor. If this is your first time, choose the nano editor (option 1) as it’s the most beginner-friendly.
For system-wide crontabs, run the below command with sudo privileges:
sudo nano /etc/crontab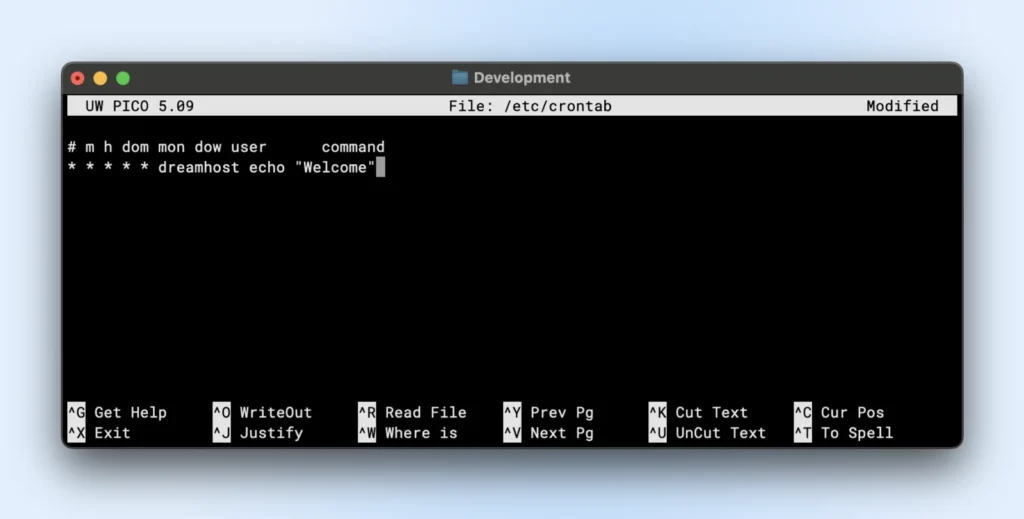
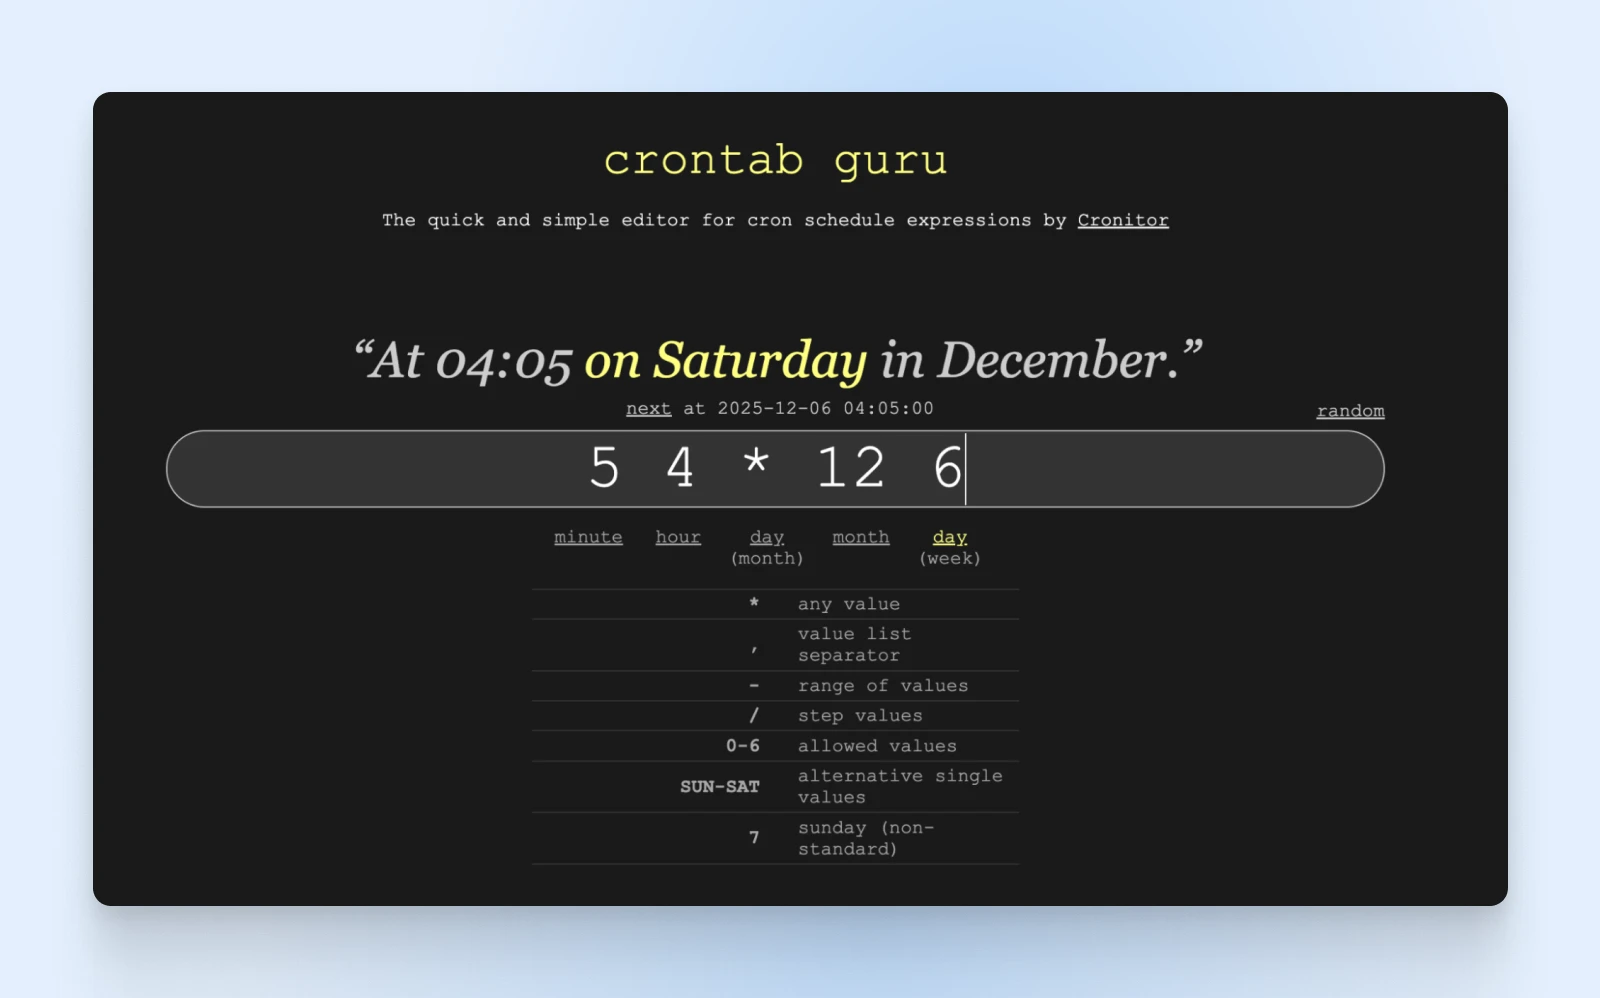
Step 3: Cron Job Syntax
We’ve already talked about the basic structure in the anatomy of cron jobs before.
But creating a cron job can be confusing sometimes. Crontab.guru helps you visualize the job schedules as you type them.
Now for the fun part — writing our first cron job. Let’s take a look at some common cron job schedules:
Every minute:
* * * * /path/to/command
Every hour at minute 0:
0 * * * * /path/to/command
Every day at midnight:
0 0 * * * /path/to/command
Every Monday at 3 a.m.:
0 3 * * 1 /path/to/command
Every 15 minutes:
*/15 * * * * /path/to/command
First day of every month at 6:30 a.m.:
30 6 1 * * /path/to/command
Step 4: Creating Your First Cron Job
Let’s move to creating a simple backup cron job for your server.
The task below creates a backup of your website every day at 2 a.m.
0 2 * * * tar -czf /path/to/backup/website-backup-$(date +%Y%m%d).tar.gz /path/to/your/website
It will output a compressed tar archive of your website directory with the current date as the filename.
Step 5: Save and Verify
Now, exit the editor. In nano, press Ctrl+X and then hit Y.
To view your current crontab and verify your job was added:
crontab -l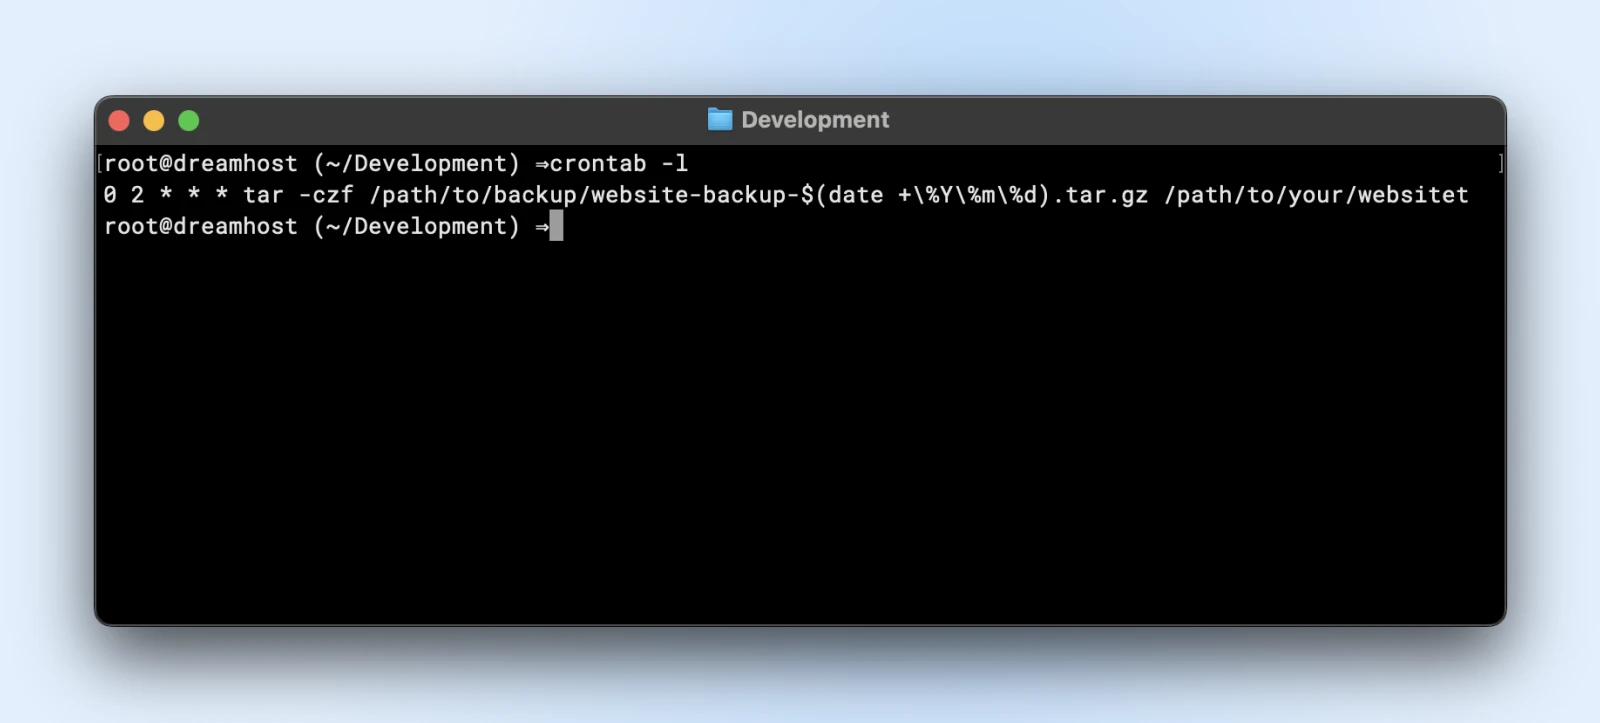
That’s it! Your first cron job is now set up and will run automatically at the scheduled time.
Practical Cron Job Examples for Website Managers
Now that you know the basics, let’s explore some practical cron jobs that can make your life as a website manager significantly easier.
Database Backups
MySQL database backup (daily at 1 a.m.):
0 1 * * * mysqldump -u username -p'password' database_name | gzip > /path/to/backups/db-backup-$(date +%Y%m%d).sql.gzLog Rotation and Cleanup
Clean logs older than 7 days (weekly on Sundays):
0 0 * * 0 find /path/to/logs -type f -name "*.log" -mtime +7 -deleteWebsite Performance Monitoring
Check website response time every 5 minutes:
*/5 * * * * curl -o /dev/null -s -w "%{http_code} %{time_total}sn" example.com >> /path/to/logs/website-performance.logContent Updates
Fetch and update dynamic content (every hour):
0 * * * * /path/to/content-update-script.shEmail Reports
Send a weekly traffic summary every Monday at 9 a.m.:
0 9 * * 1 /path/to/generate-and-email-report.shSecurity Scans
Run a security scan script every night at 3 a.m.:
0 3 * * * /path/to/security-scan.shCron Job Best Practices: Dos and Don’ts
To make sure your cron jobs run smoothly and don’t cause more problems than they solve, here are some important best practices.
The Dos
- Always use full paths to commands and files: Your cron environment doesn’t have the same PATH as your user shell, so
“/usr/bin/python”is better than just python. - Redirect output to prevent email spamming: By default, cron emails any output to the user. Add
>/dev/null 2>&1to suppress output or redirect to a log file instead. - Test your commands before scheduling them: Run your command manually to ensure it works as expected.
Add comments to explain each job — Future you will thank present you for documenting what each cron job does and why.
Daily database backup - Added by Jane on 2023-05-15
0 1 * * * /path/to/backup-script.sh
Consider using lockfiles for long-running jobs to prevent a new instance from starting if the previous one is still running.
0 * * * * flock -n /tmp/script.lock /path/to/your/script.shThe Don’ts
- Don’t schedule resource-intensive jobs during peak hours: Your backup doesn’t need to run at noon when your site is busiest.
- Don’t use relative paths:
“./script.sh”will almost certainly fail in cron. - Don’t forget environment variables: Cron doesn’t load your .bashrc or .profile. Set any required variables in the crontab or script.
- Don’t overlook logging: Without proper logging, debugging cron jobs can be a nightmare.
- Don’t overdo it: Too many frequent cron jobs can overload your server. Be strategic.
What To Do When Cron Jobs Go Wrong
The only time you have to look back at a cron job is when it breaks — and when it breaks, here’s how to diagnose and fix common issues.
Common Problem #1: Job Doesn’t Run
Symptoms: Your scheduled task doesn’t seem to be executing at all.
Potential fixes:
- Check cron daemon is running: The “systemctl” status cron
- Verify your crontab syntax: Use a tool like crontab.guru
- Ensure full paths to executables: Which command to find full paths
- Check file permissions: Scripts must be executable (chmod +x script.sh)
Common Problem #2: Job Runs But Fails
Symptoms: The job executes but doesn’t complete its task successfully.
Potential fixes:
- Redirect output to a log file to see errors:
* * * * /path/to/script.sh > /path/to/script.log 2>&1 - Test the command manually with the same environment
- Check for dependencies that might be missing in the cron environment
Common Problem #3: Email Flooding
Symptoms: Your inbox is flooded with cron output emails.
Potential fixes:
- Redirect output to null:
>/dev/null 2>&1 - Redirect to a log file:
>/path/to/logfile.log 2>&1
Only email on errors:
* * * * /path/to/script.sh >/dev/null || echo "Script failed" | mail -s "Cron failure" [email protected]Common Problem #4: Timing Issues
Symptoms: Jobs run at unexpected times or frequencies.
Potential fixes:
- Double-check your timezone settings — date vs. cron’s expectation
- Be aware of DST changes that might affect timing
- Use explicit time frames instead of relative ones when precision matters
Advanced Cron Job Writing Techniques
We’ve looked at the basics, and you are pretty much a pro with cron jobs by now. But this section will take you a step further.
Using Special Strings
You don’t always need to write cron jobs with those asterisk signs. There are some special strings that let you set up cron jobs quite easily.
- @yearly or @annually: Run once a year (0 0 1 1 *)
- @monthly: Run once a month (0 0 1 * *)
- @weekly: Run once a week (0 0 * * 0)
- @daily or @midnight: Run once a day (0 0 * * *)
- @hourly: Run once an hour (0 * * * *)
- @reboot: Run once at startup
For example, if you want something to run daily, just write the below command:
@daily /path/to/daily-backup.shEnvironment Variables in Crontab
To avoid repeating a string over and over again in your cron jobs (for example, a specific path, or your admin email), set up environment variables at the beginning of your crontab.
You can then reuse the variables as required within your scripts or commands.
SHELL=/bin/bash
PATH=/usr/local/sbin:/usr/local/bin:/usr/sbin:/usr/bin:/sbin:/bin
[email protected]

# This job will send errors to [email protected]
0 2 * * * /path/to/mailing_script.sh
If we use the environment variable MAILTO in our mailing_script.sh, the script will automatically send an email to the correct email address.
With this, changing the admin email will only require changing the value of the MAILTO variable, instead of making changes across all scripts.
Running Jobs As Different Users
If you have superuser access, you can edit another user’s crontab:
sudo crontab -u username -eUsing Anacron for Machines That Aren’t Always On
Unlike cron, anacron ensures jobs run even if the computer was off during the scheduled time:
sudo apt install anacronEdit /etc/anacrontab to add jobs that will run when the system comes back online.
Job Chaining for Complex Workflows
Run jobs in sequence:
0 1 * * * /path/to/first-script.sh && /path/to/second-script.shMonitoring Cron Jobs
For serious server management, consider tools like Cronitor that provide monitoring and alerts for your cron jobs.
0 * * * * cronitor exec check-12345 -- /path/to/your/script.shLet’s Talk Costs
Cron jobs can’t exist in isolation. They need a server and a service running on a server that you need to manage.
Now, if you’re reading this article, it’s highly likely that you have a server for your website or application.
In fact, if you’re hosting with DreamHost VPS or any Linux-based hosting provider, you’ve already got everything you need to get started with automating your server management tasks.
If not, a $10/month VPS is all you’d need, especially when starting out.
For those already running a DreamHost VPS, the process couldn’t be more straightforward:
- SSH into your server
- Run crontab -e to edit your personal cron table
- Add your scheduled tasks
- Save, and let the automation begin!
SSH
Secure Shell Protocol (SSH) is a cryptographic network protocol for running services securely through an unsecured network. It is mostly used for command-line executions and remote logins.
Read MoreThat’s it. The infrastructure you’re already paying for suddenly becomes more valuable, more efficient.
Your Server’s New Autopilot
Congratulations!
You’ve graduated from manual labor to automation wizardry. With cron jobs handling the routine maintenance, backups, and monitoring, you can focus on growing your website and business rather than babysitting the server.
And remember, it’s going to be a process. The automation will become more sophisticated as you add more and more tasks to it.
But for now, start with a few essential cron jobs, monitor how they perform, and gradually expand your automation as you grow more comfortable with the process.
Now go on and take that nap, because you just saved yourself a buttload of time.
The post Cron Jobs: For When Your Sleep Schedule Matters appeared first on DreamHost Blog.
]]>The post How To Fix the ERR_CONNECTION_CLOSED Error in Google Chrome appeared first on DreamHost Blog.
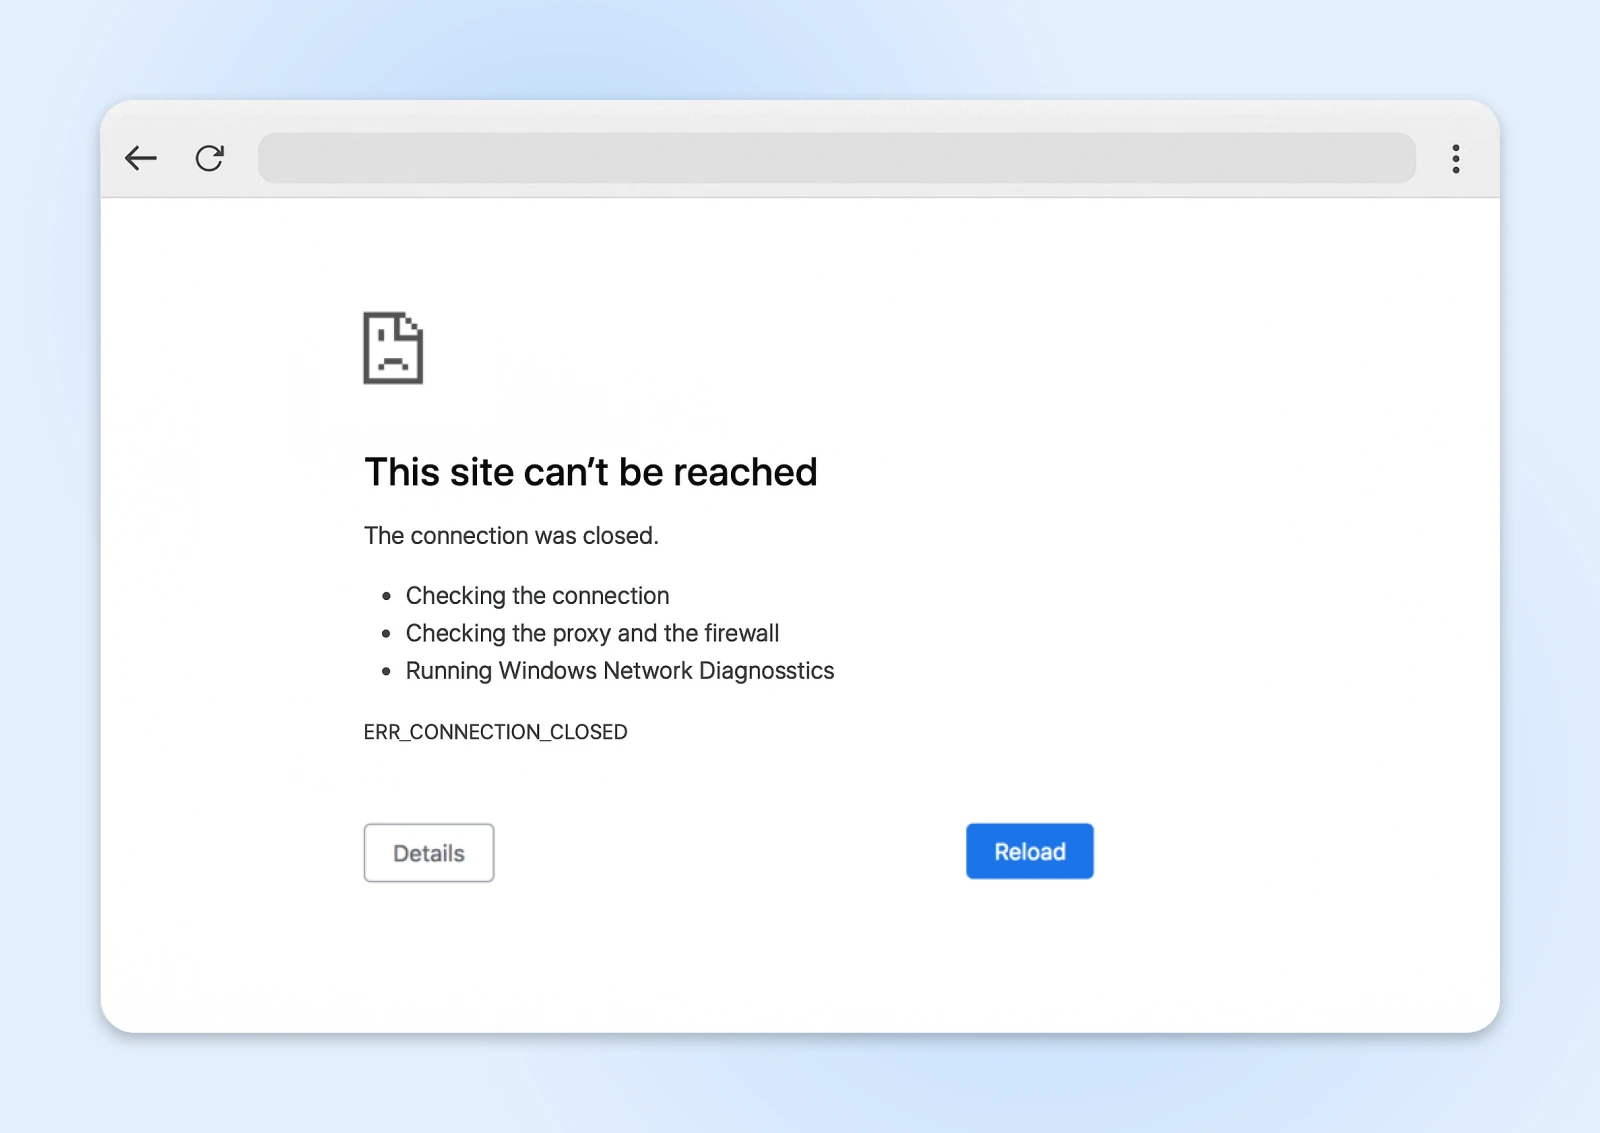
]]>You tried to load your website, but Chrome is throwing an error.
What in the world is ERR_CONNECTION_CLOSED supposed to mean?
The short answer: this error message says that your browser tried to contact the host server, but couldn’t get through.
There are several reasons why this could be happening — from a misbehaving VPN to host downtime. Most often, the cause can be found on your device or network.
Before you throw your laptop in the trash and curse the invention of the Internet, we have some words of reassurance; this error is usually pretty easy to fix.
Just follow the steps in this (surprisingly entertaining) troubleshooting guide, and we should get you back on track!
What Does ERR_CONNECTION_CLOSED Actually Mean?
When you tried to open that web page, Chrome (or your chosen browser) attempted to set up a connection with the hosting server.
That connection allows the server to send over the content you requested.
Except, this time, your browser couldn’t get through. That’s why you’re staring blankly at an ERR_CONNECTION_CLOSED error screen.
The possible causes for this problem can largely be grouped into three categories:
- Network issues: Your device simply can’t make contact with the host server.
- Browser gremlins: Either Chrome or a different extension is messing with your connectivity.
- Hosting problems: You could see an error if your site isn’t configured properly or you’ve run out of resources.
There’s a strong chance that your network or browser is to blame.
But if other people struggle to access your website, you might need to visit your hosting panel.
Diagnosing ERR_CONNECTION_CLOSED Problems
At this point, you could just scroll down to the possible fixes and start working through the list.
If you have 30 seconds to spare though, it’s worth running a quick test first.
Are you seeing the error on just one website?
If yes, the host server could be to blame.
But if every website you visit is showing the ERR_CONNECTION_CLOSED error, you almost certainly have a misbehaving network or browser on your hands.

Top sleuthing, Sherlock.
12 Quick Ways To Fix the ERR_CONNECTION_CLOSED Error
That’s enough homework. Time to fix the problem and forget it ever happened.
Here’s your troubleshooting checklist — starting with the most obvious facepalm-worthy solutions, and ending with issues you might not have considered.
1. Check Your Internet Connection
It feels stupid to even ask but…is your internet actually working?
You’d be surprised how often this is the root of the problem.
If your connection has dropped, Chrome won’t be able to reach any site — which is exactly what leads to that ERR_CONNECTION_CLOSED message.
Try visiting a reliable website like Google. Next, check your favorite app that needs the internet. Fire up Netflix or Spotify and see if you can stream content.
If these aren’t working, take a look at your Wi-Fi signal or ensure your ethernet cable is firmly plugged in.
It might only take a small nudge to put things right!
2. Reboot Your Router
The most successful IT remedy of all time? Turn it off and turn it back on.
You can use this tried-and-tested method to fix the ERR_CONNECTION_CLOSED issue. Simply unplug your modem or router for at least 30 seconds, and then restart the device.
This can clear out temporary glitches and reset the connection to your Internet Service Provider (ISP). Once your Internet is back online, you might just find that the error is gone.
3. Reset Your Device’s Network Settings
No luck? Let’s look under the hood.
Network settings can become corrupted faster than milk left out on a summer’s day. What started as a smooth connection can turn into a tangled mess of misconfigured protocols and confused network interfaces.
Resetting your network settings essentially flushes the system, and that can be enough to clear the error.
Resetting Network Settings on Windows
To complete this task, you’ll need to open Command Prompt. Don’t worry, it’s not as scary as it sounds.
1. Open the Start menu and search for “cmd.”
2. You should see “Command Prompt” as the top result. Right-click on the program and choose Run as administrator.
3. Now, we need to run some commands. To reset your TCP/IP settings, paste this and hit Enter:
netsh int ip reset4. To reset your Windows Sockets interface (Winsock), follow the same drill with this command:
netsh winsock reset5. Finish up by restarting your device.
Resetting Network Settings on macOS
Mac users have it slightly easier. It just requires a few clicks in your “System Settings” – We even have pictures!
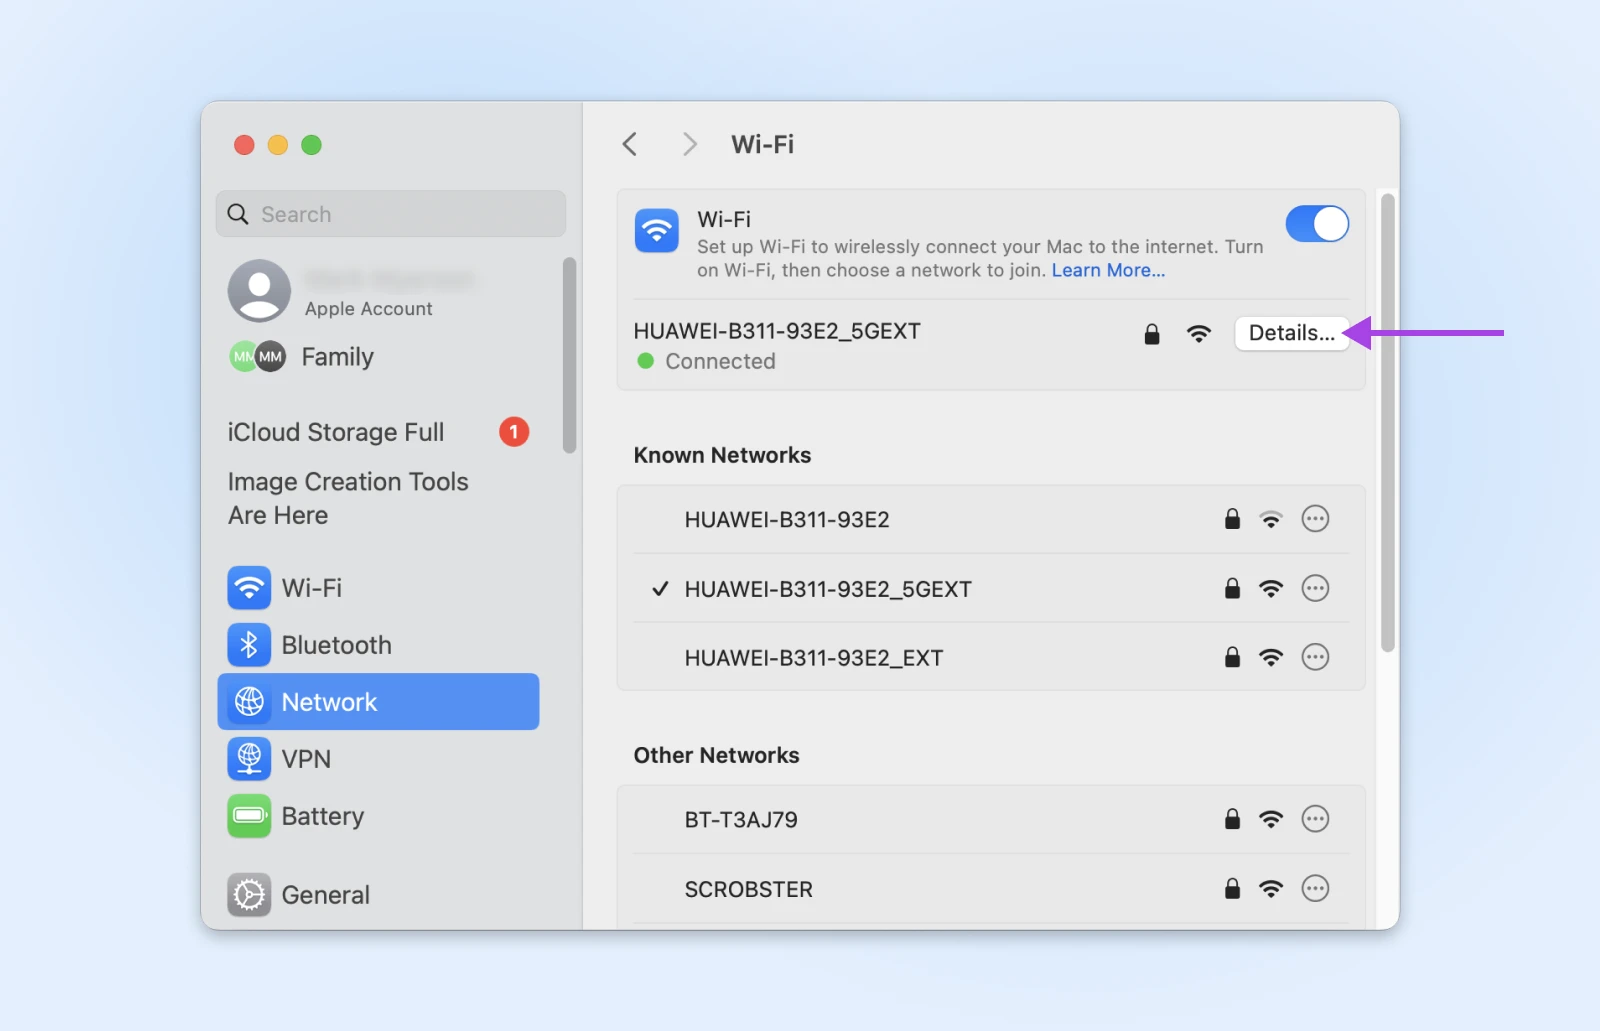
From the sidebar menu, select Network.

Next, choose your active Internet interface (e.g. Wi-Fi, Ethernet, etc).
Click Details next to your active network.
Choose TCP/IP on the left.
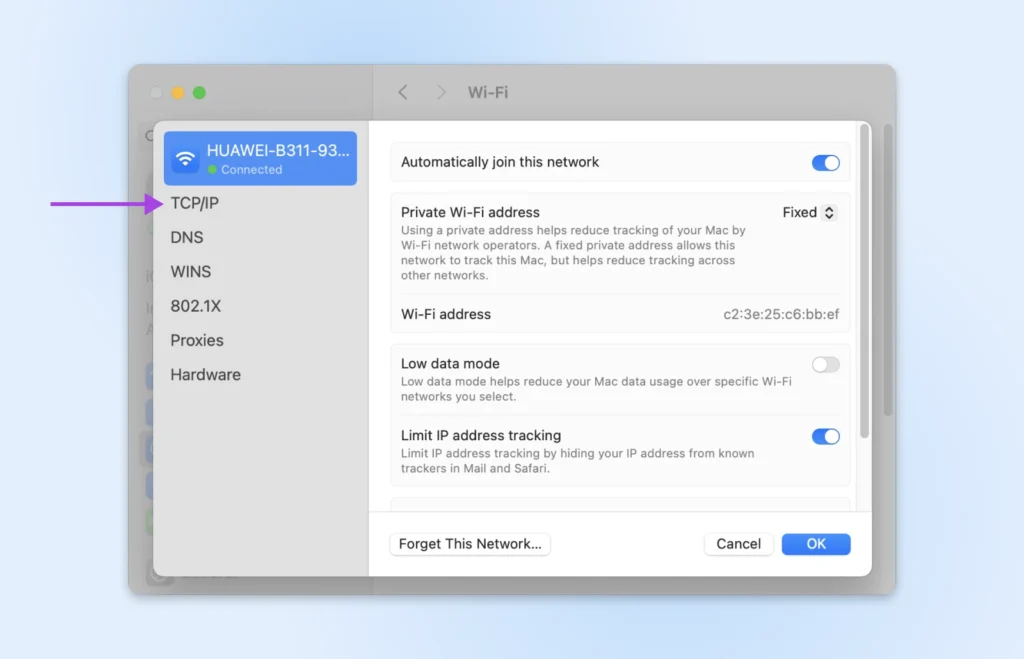
Then hit the Renew DHCP Lease in the right-hand panel.
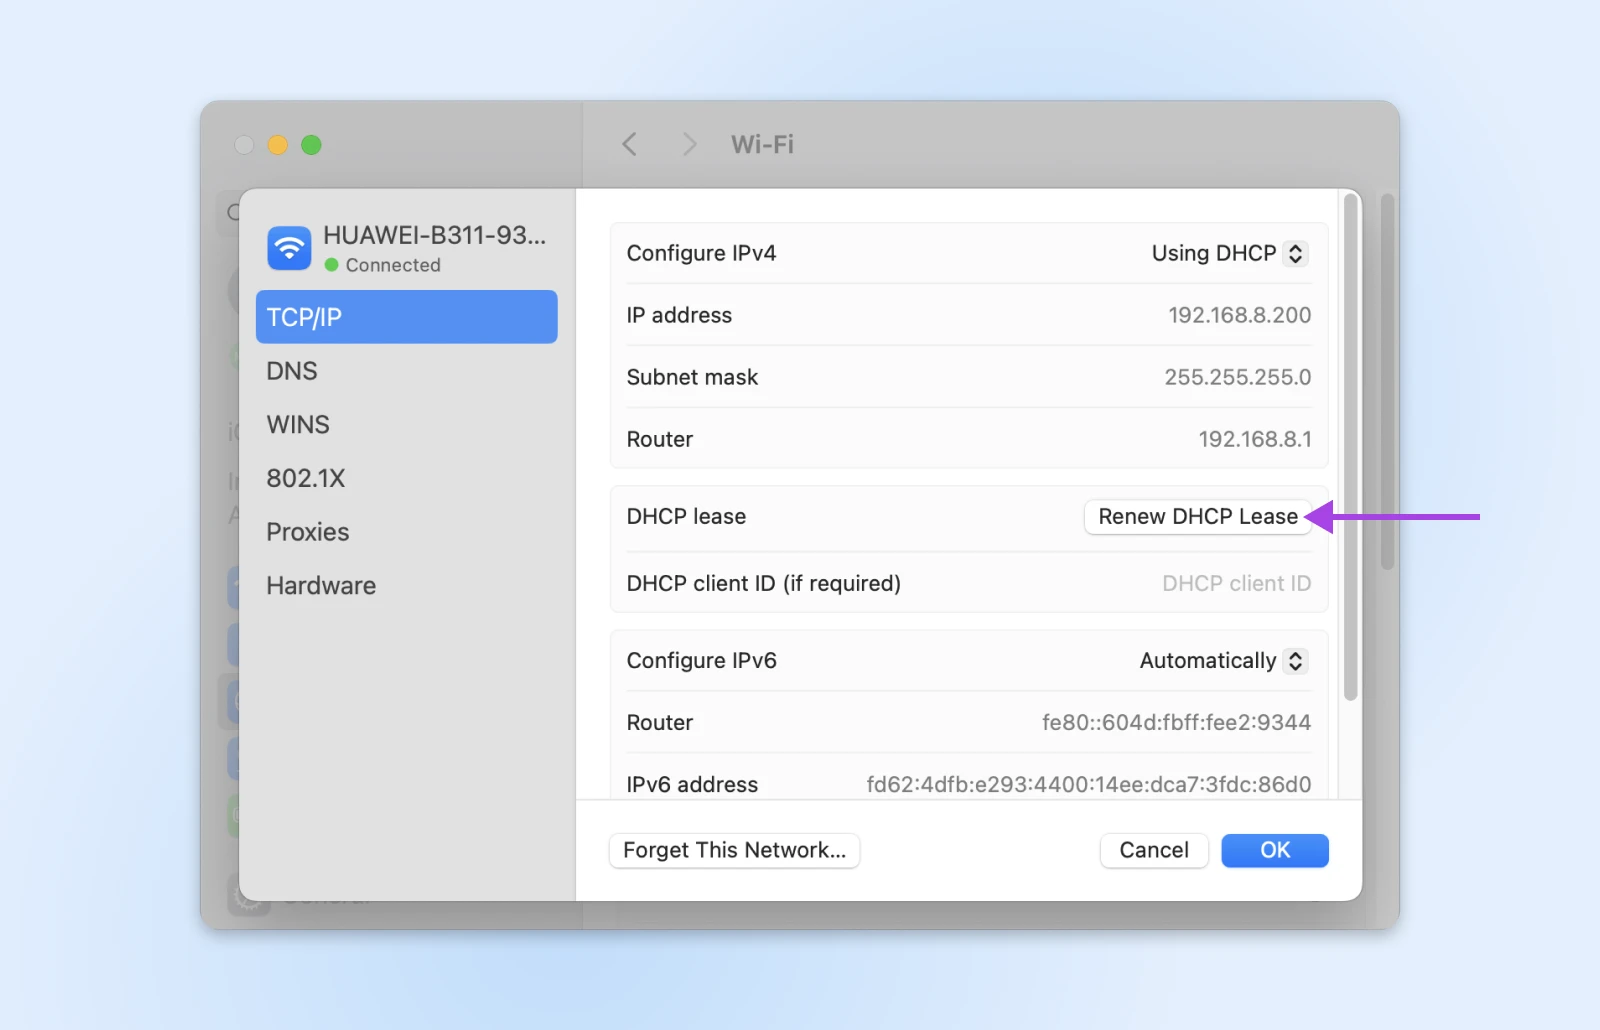
Finish by clicking OK and restarting your Mac.
With any luck, that might solve the headache!
4. Check Your Firewall and Antivirus
Using security tools to protect your device is highly recommended.
The only problem is, antivirus software and firewalls can sometimes be a little too protective.
Instead of only blocking unwanted attention, they interfere with genuine website traffic.
To test whether this is your problem, you will need to temporarily disable your security tools.
- On Windows: You probably have Windows Defender Firewall running. Search for “Windows Security” via the Start menu. Open the program, and navigate to Virus & threat protection > Manage settings and toggle real-time protection to off.
- On macOS: You can control the built-in macOS firewall via System Settings > Network > Firewall.
If you have third-party antivirus software (like Norton, McAfee, Avast, etc.), you’ll need to open that specific application and turn off real-time protection.
Once you’ve lowered your guard, check Chrome to see if the error has cleared. Make sure to re-enable the protections ASAP!
5. Play Around With Your VPN
In some cases, the ERR_CONNECTION_CLOSED error can be tied to how your Internet traffic is being routed.
Depending on your situation, either using a Virtual Private Network (VPN) or disabling VPN and proxy settings could resolve the issue.
Sounds like a contradiction, we know. Allow us to explain.
When To Use a VPN
If you’re struggling to access specific sites, it could be because your ISP is blocking access. Using a VPN should allow you to bypass these restrictions.
If you don’t currently use a VPN, try a free service like ProtonVPN to run the test.
When To Disable Your VPN
Ironically, the very same app that helps you to bypass restrictions can also interfere with your connection, triggering errors like ERR_CONNECTION_CLOSED.
If you’re having issues with most websites, try temporarily disabling your VPN or proxy settings. It might just clear the error.
6. Clear Your Browser Cache
Your browser’s cache is essentially a short-term memory for websites. It saves bits and pieces of sites you visit (like images and files), so they load faster the next time you go there.
Just occasionally, that saved data becomes outdated or corrupted. This can interfere with loading the current version of a site — potentially causing errors like ERR_CONNECTION_CLOSED.
The fix is to clear the cache.
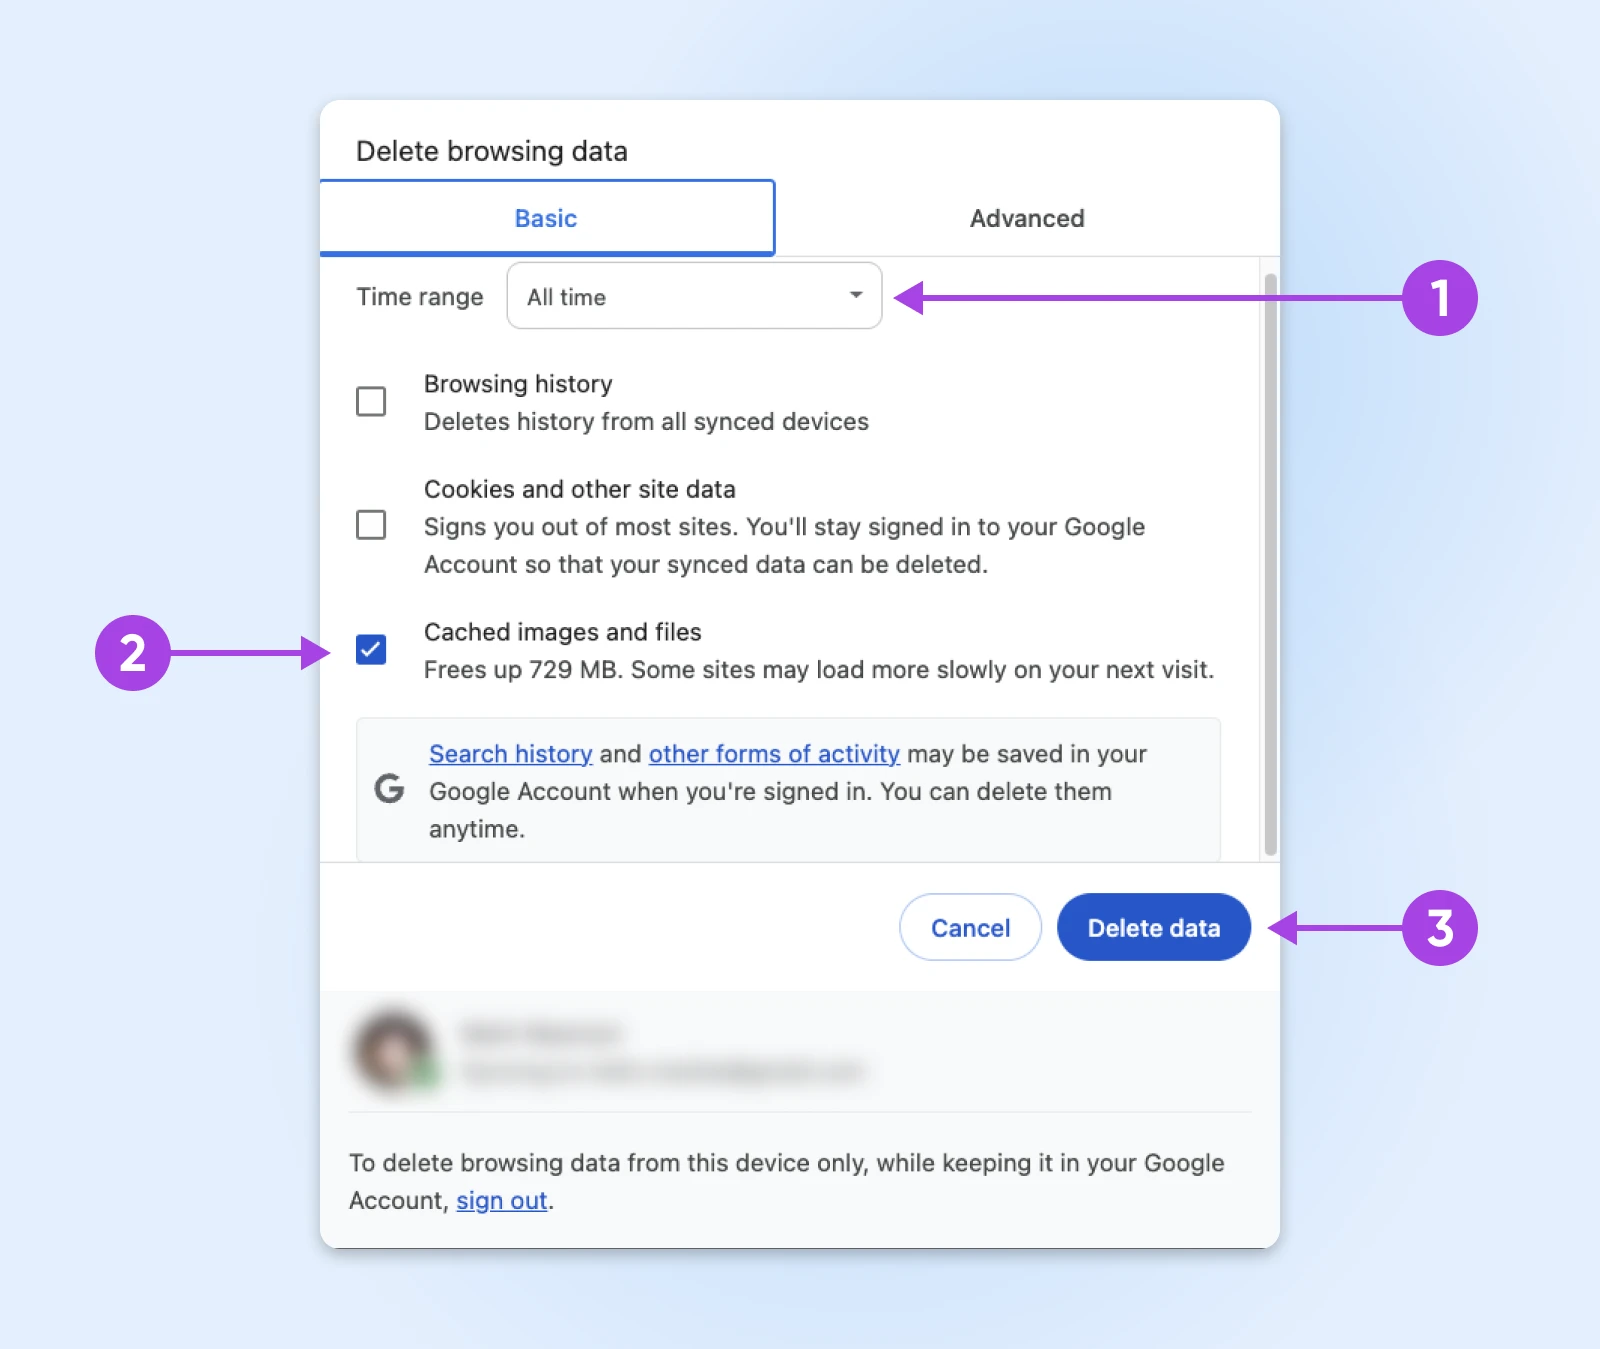
Here’s how to do it with Chrome:Click the three-dot menu in the top-right corner of any window, and select Delete browsing data….
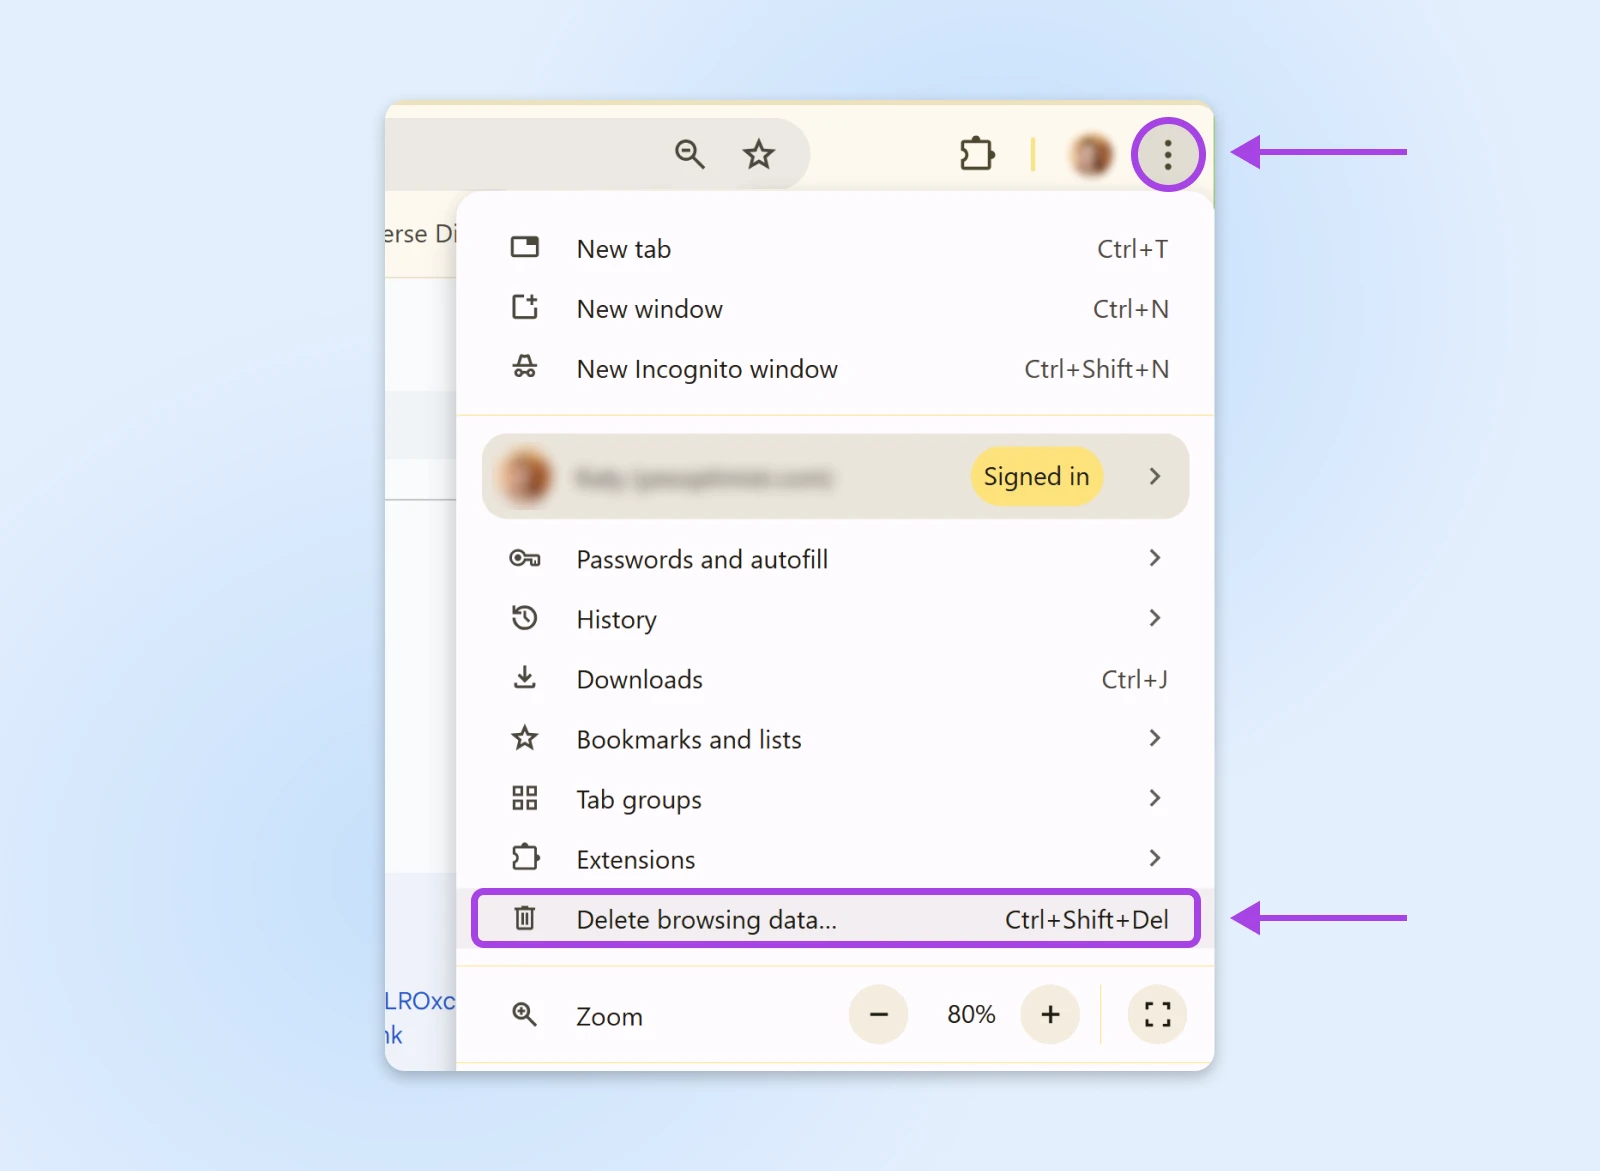
In the pop-up panel, set the “Time range” to All time.
Then, check the box labeled Cached images and files.
Finish by hitting Delete data.
7. Flush Your DNS Cache
Just as your browser cache stores website files for quick access, your DNS cache remembers the locations of websites you have visited.
If those records ever become corrupted, the DNS cache could send your browser to completely the wrong part of Internet town.
Here’s how to start again with a clean slate.
Chrome’s Internal DNS Cache
- Type chrome://net-internals/#dns in your address bar and hit Enter.
- Look for the “Clear host cache” button and click it. Chrome will immediately start building a fresh cache — no need to restart your device.
Windows DNS
- Press the Windows key and type “cmd”.
- Right-click on Command Prompt and select Run as administrator.
- Type the following command and hit Enter:
ipconfig /flushdns - Look for the “Successfully flushed the DNS Resolver Cache” message.
- Restart your device and cross your fingers that it worked.
MacOS DNS
- Navigate to Applications > Utilities and open Terminal.
- Paste in this command and smash Enter:
sudo dscacheutil -flushcache; sudo killall -HUP mDNSResponder - Provide your password when prompted (don’t worry, it’s legit!)
- Once the process is complete, restart your Mac and retest for an error.
8. Disable Your Chrome Extensions
Chrome extensions are usually very helpful. But they can go rogue, interfering with how websites load or communicate with your browser.
You can test whether one of your extensions is causing the ERR_CONNECTION_CLOSED error like this:
- Type chrome://extensions/ in the address bar and hit Enter.
- Switch off your extensions one by one, using the little toggle switch next to each tool.
- After disabling each extension, reload the website you were trying to access originally. If the error suddenly clears, the extension you most recently deactivated could be to blame!
9. Update or Reinstall Chrome
Google couldn’t be to blame, surely?
Well, it’s just possible that the Chrome browser on your device is having an off day.
To rule out this potential issue, make sure you have the latest version of Chrome. You can check this by visiting chrome://settings/help.
You can also try uninstalling Chrome, and then grabbing a fresh download from the official website. Can’t hurt to try!
10. Reset Chrome’s Settings
Another possibility is that your Chrome browser settings are messing with your connection.
The fix here is to reset Chrome to default settings:
Let’s hit that three-dot menu in the top-right corner again. Then, select Settings.
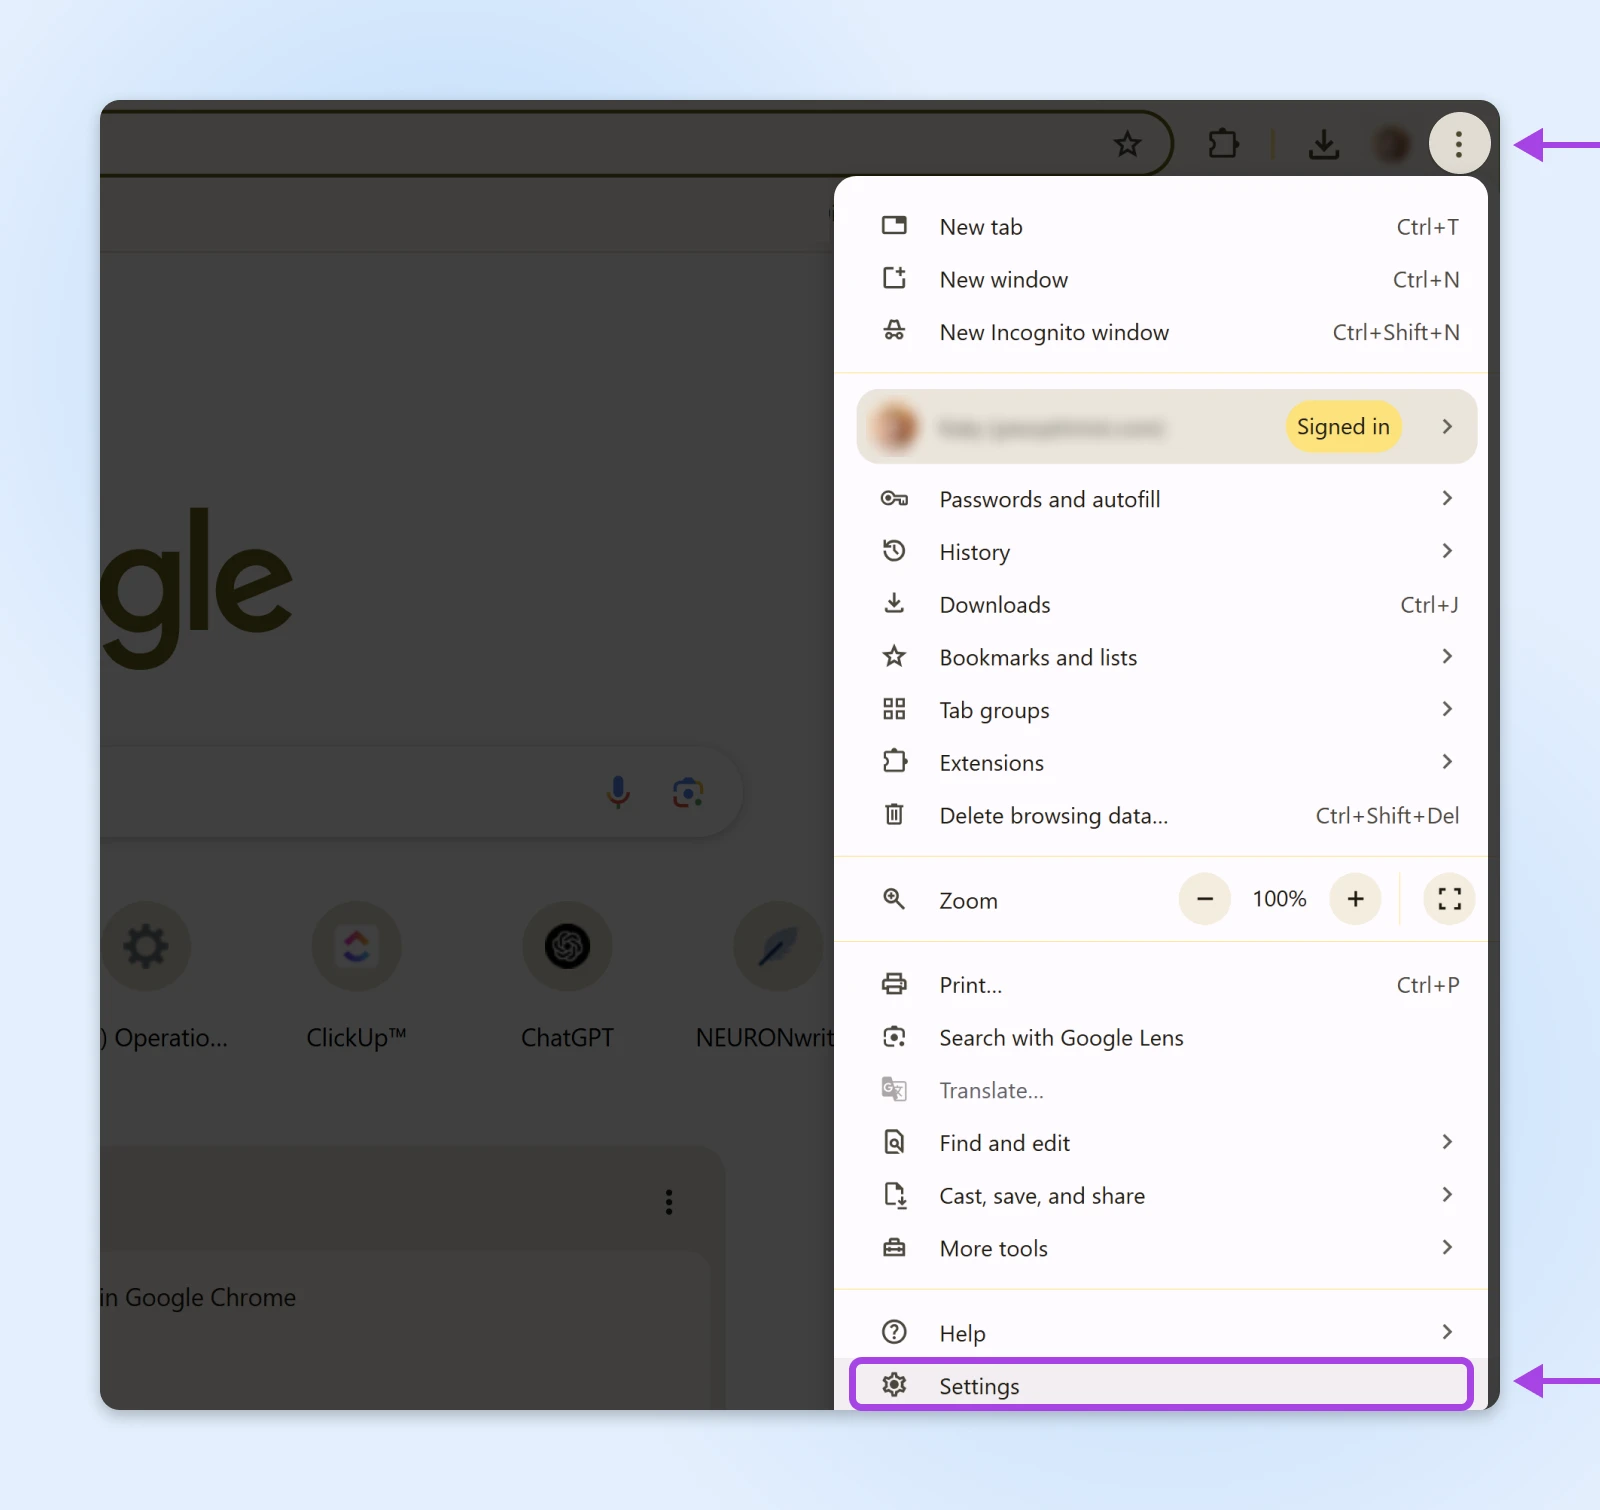
From the left sidebar, click on Reset settings > Restore settings to their original defaults.

Complete the process by hitting Reset settings.

11. Switch Your DNS Provider
We talked about your DNS cache earlier. That’s basically your computer’s local address book.
Your computer gets those addresses from a larger DNS server, usually provided automatically by your Internet Service Provider (ISP).
If your ISP’s servers have temporary problems, you might stumble upon connection issues.
You can work around this problem by switching to a different DNS provider:
- Cloudflare: 1.1.1.1 and 1.0.0.1
- Google Public DNS: 8.8.8.8 and 8.8.4.4
💡Pro Tip: Cloudflare has great step-by-step instructions on how to install new DNS servers on pretty much any device.
12. Run a Malware Scan
It’s not a nice thought, but there’s a small chance your connection troubles could be caused by malware.
Just to be on the safe side, we recommend using a trusted program like Malwarebytes (free version available) to run a quick scan. It might resolve the error!
How To Fix ERR_CONNECTION_CLOSED on Your Website
So, you’ve worked through the whole checklist and you’re still seeing the ERR_CONNECTION_CLOSED error on your website.
Bad luck, webmaster. Looks like an issue with your site.
We can fix it, though. Just a few more troubleshooting steps to work through!
Check Your Hosting IP Address
The ERR_CONNECTION_CLOSED error can rear its ugly head when the hosting server of your website is unreachable for some reason. It might be down, for example.
To test this, head over to DNSChecker and type in your website URL. This tool will quickly give you the server IP address.
Next, paste your IP address into the Ping tool on the same site. This will reveal whether the server is accepting incoming data.
Check Your Hosting Plan
Every hosting plan has certain limits on things like storage and traffic.
If you go over these limits, it’s possible you’ll just see an error.
You can check this via your hosting panel. At DreamHost, we offer unlimited traffic on all of our shared hosting plans, so this shouldn’t really be an issue.
Just sayin’.
Contact Your Host
If all else fails, get in touch with your hosting provider. They should be able to figure out what’s going on.
Not to brag, but DreamHost offers 24/7 live support to help you get issues sorted ASAP.
Give Your Site the Gift of Reliable Hosting
As we’ve discovered in this guide, there are many possible reasons why you could see an ERR_CONNECTION_CLOSED error on your site — from messed up firewall settings to VPN service issues.
Luckily, you don’t have to get too technical to find the fix. Make sure to bookmark this page for the next time you need to troubleshoot!
If you want to banish errors from your website for good, you could also think about switching to DreamHost.
Our plans come with unlimited bandwidth, 100% uptime, and 24/7 support. In other words, everything you need for a rock-solid website.
Sign up today to unlock the upgrades!
The post How To Fix the ERR_CONNECTION_CLOSED Error in Google Chrome appeared first on DreamHost Blog.
]]>The post Turn Long Meetings Into Actionable Summaries With Otter.ai appeared first on DreamHost Blog.
]]>Your hand aches from writing, and your notebook tells the story — scattered arrows, half-finished thoughts, action items that no longer make sense, and the occasional doodle from when someone had technical difficulties…
While you focused on capturing words, you missed the subtle nods, the concerns, and other moments where real connections happen.
You’re not alone in this. Every day, 11 million meetings are hosted in the US. Teams spend five hours weekly in these sessions, yet 71% produce no meaningful outcomes.
The majority of the surveyed employees state that most meetings could have been an email.
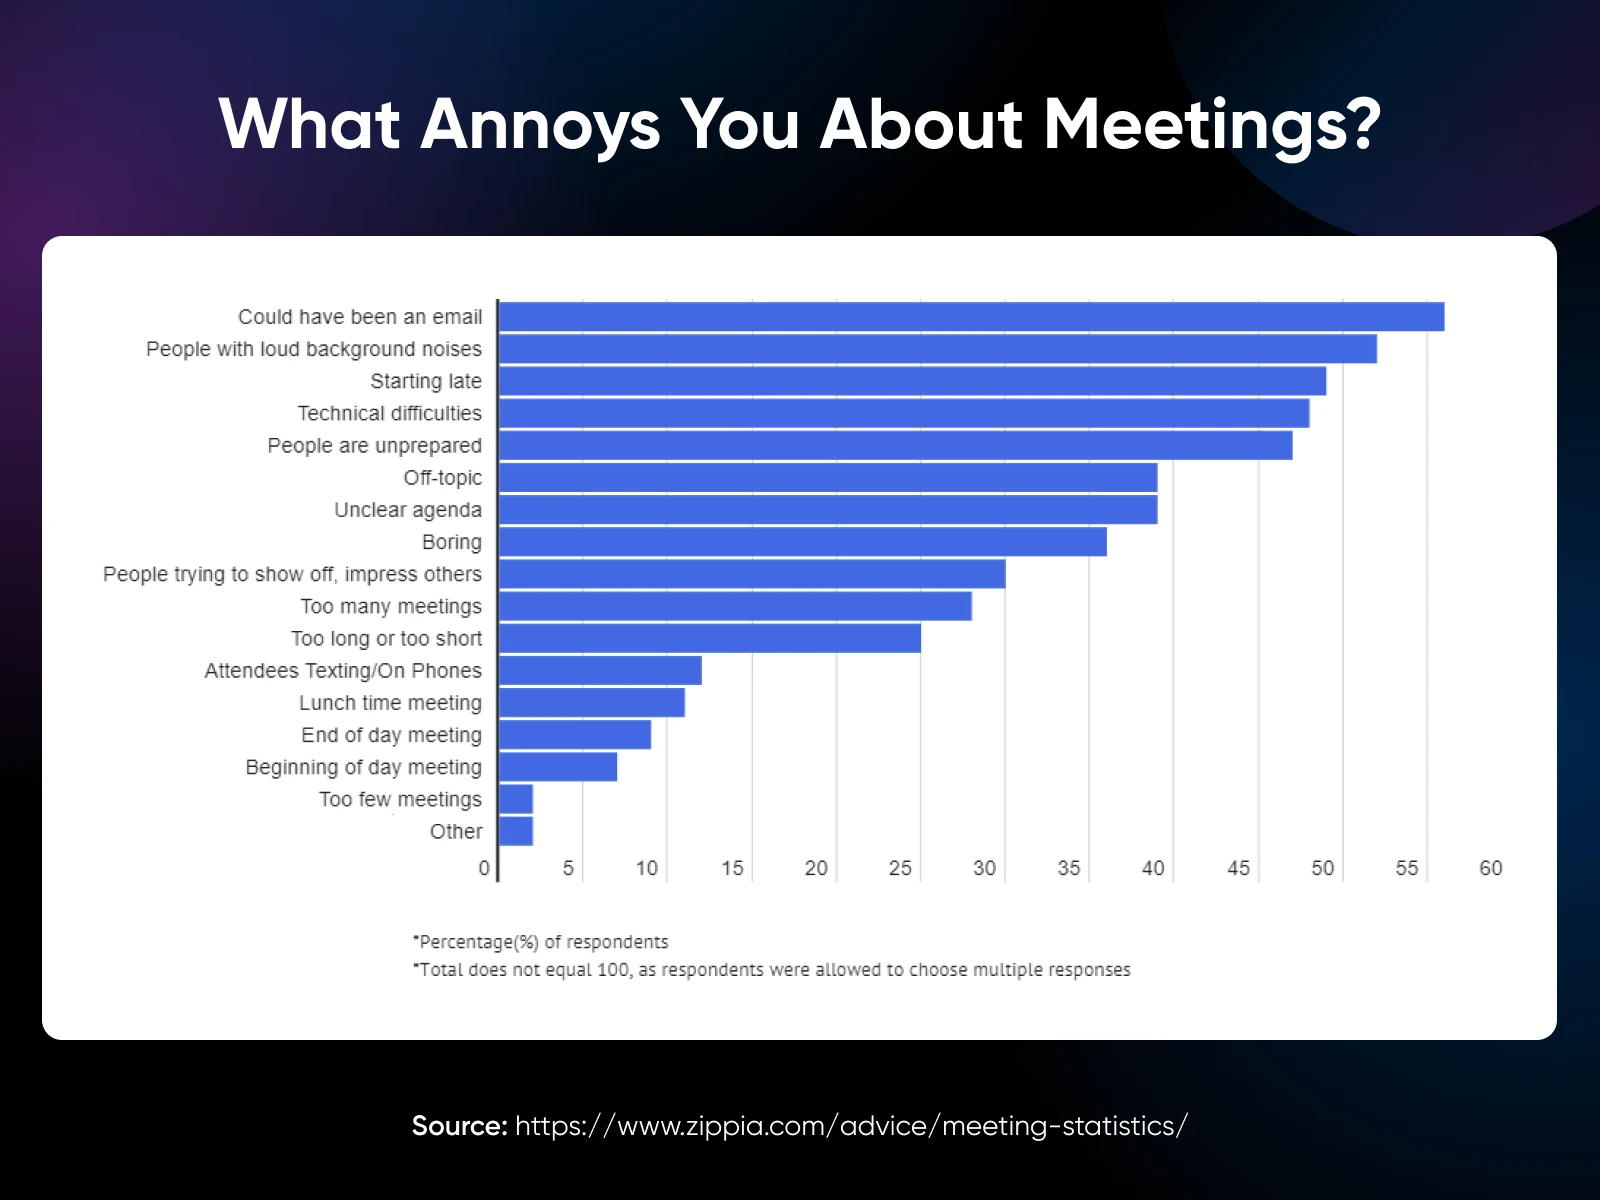
And the cost? $37 billion in lost productivity annually.
For small business owners, the math doesn’t work. Every minute spent scribbling notes is a minute not spent building relationships, making strategic decisions, or growing your business.
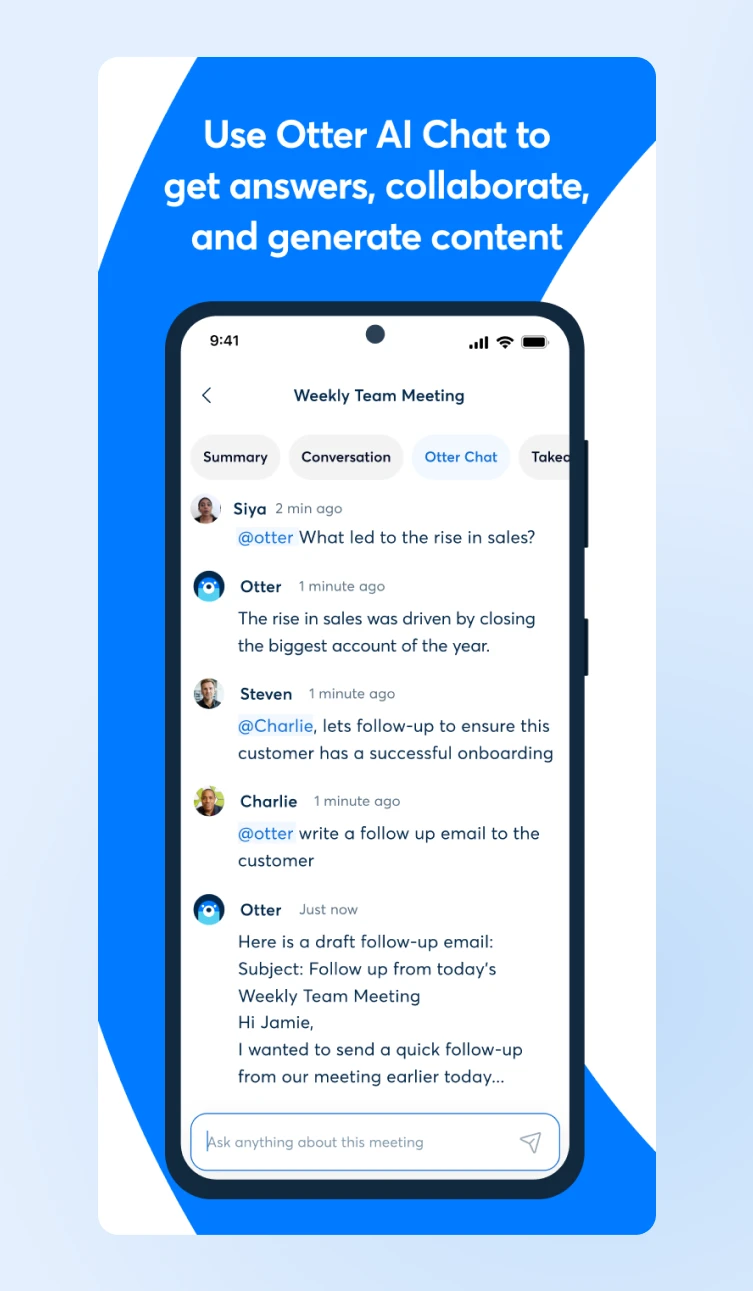
That’s where AI can help. Tools like Otter.ai capture every word, generate clear summaries, and track action items automatically. And you can stay focused on what humans do best: leading conversations, building trust, and making informed decisions.
Let’s understand meeting summaries and how you can make the most of your meetings with tools like Otter.
First, Do You Really Need AI Meeting Summaries?
Let’s think of meeting notes and summaries like raw footage versus a movie trailer.
Notes capture everything: from everything Kate said about her trip to LA, a random comment someone made, side conversations, and off-track thoughts said out loud. It’s a transcription of the entire meeting, but the thing is, you’ll rarely use meeting notes after the meeting is done.
Summaries, on the other hand, distill what matters — the decisions made, tasks assigned, and next steps planned — to save you a lot of time.
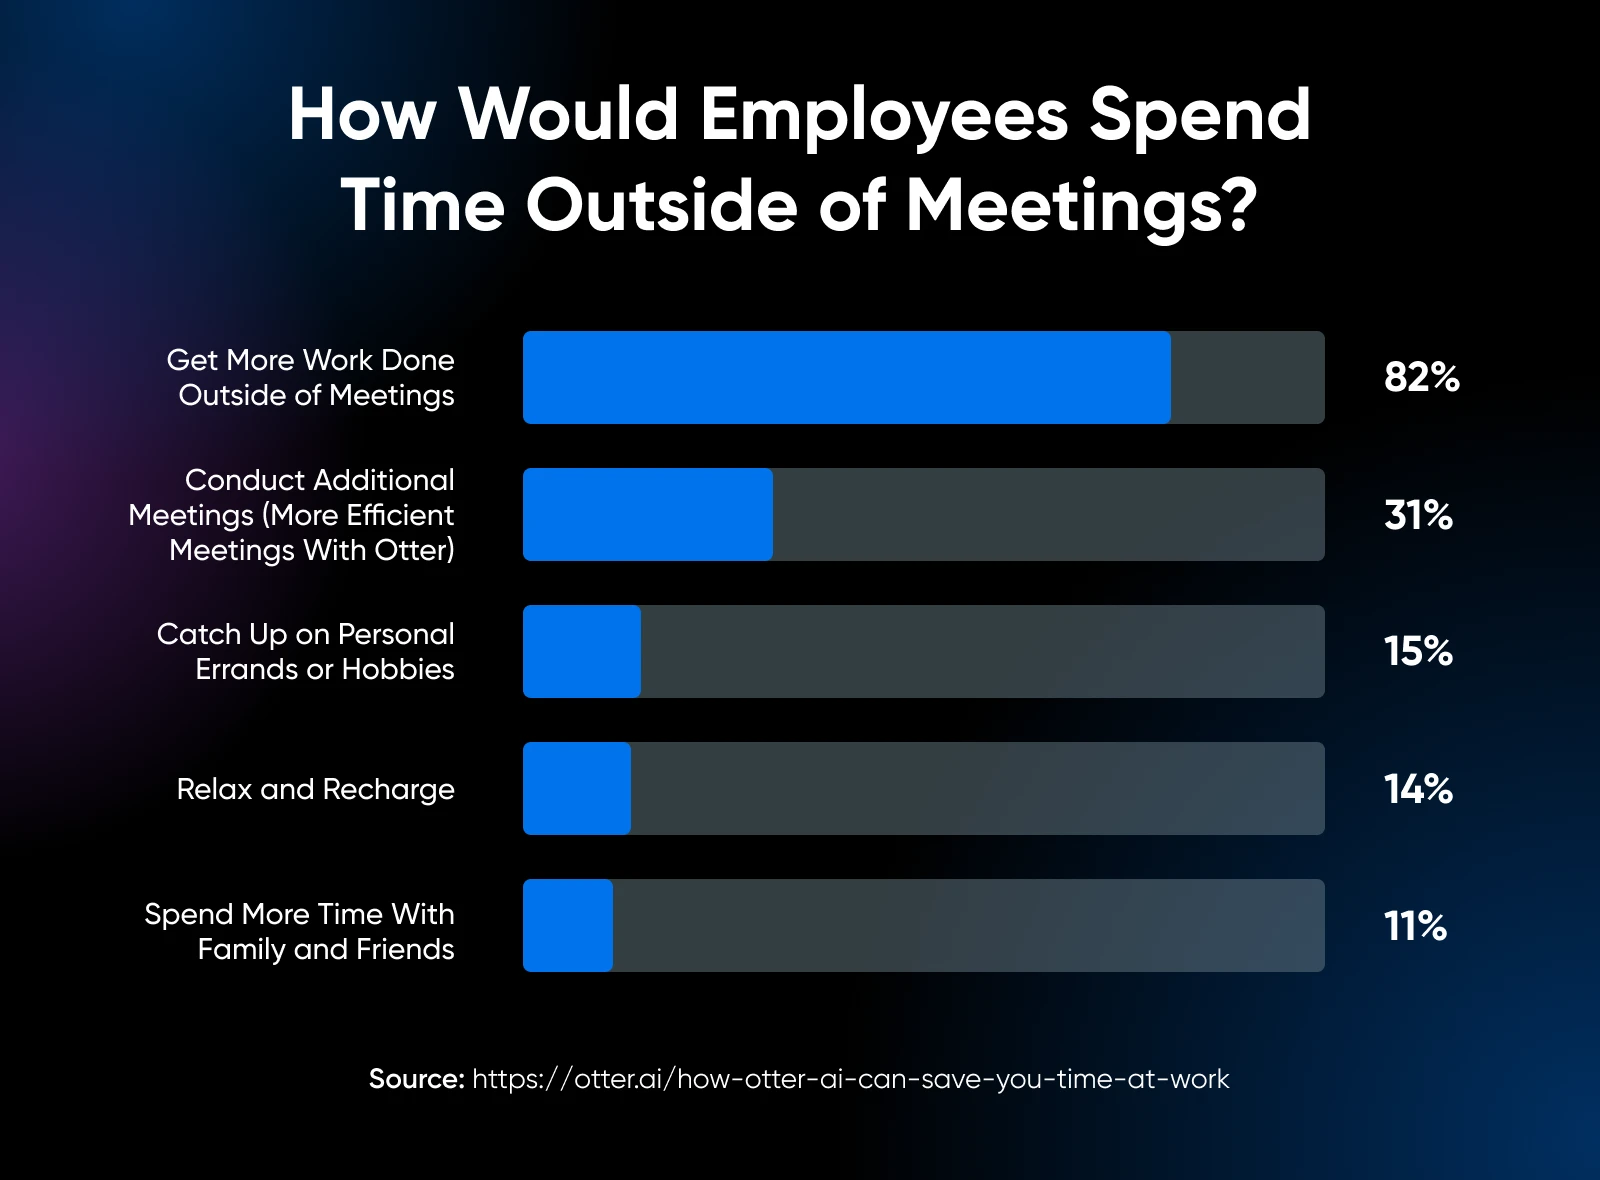
82% of Otter users say they’d use the time saved to get more work done outside of meetings.
Small business owners who are still taking notes in the traditional way face a trade-off in every meeting: either be present and engaged or take accurate notes. I’ve rarely met someone who can handle both.
AI meeting summary tools like Otter.ai help you skip the manual note-taking and fully engage.
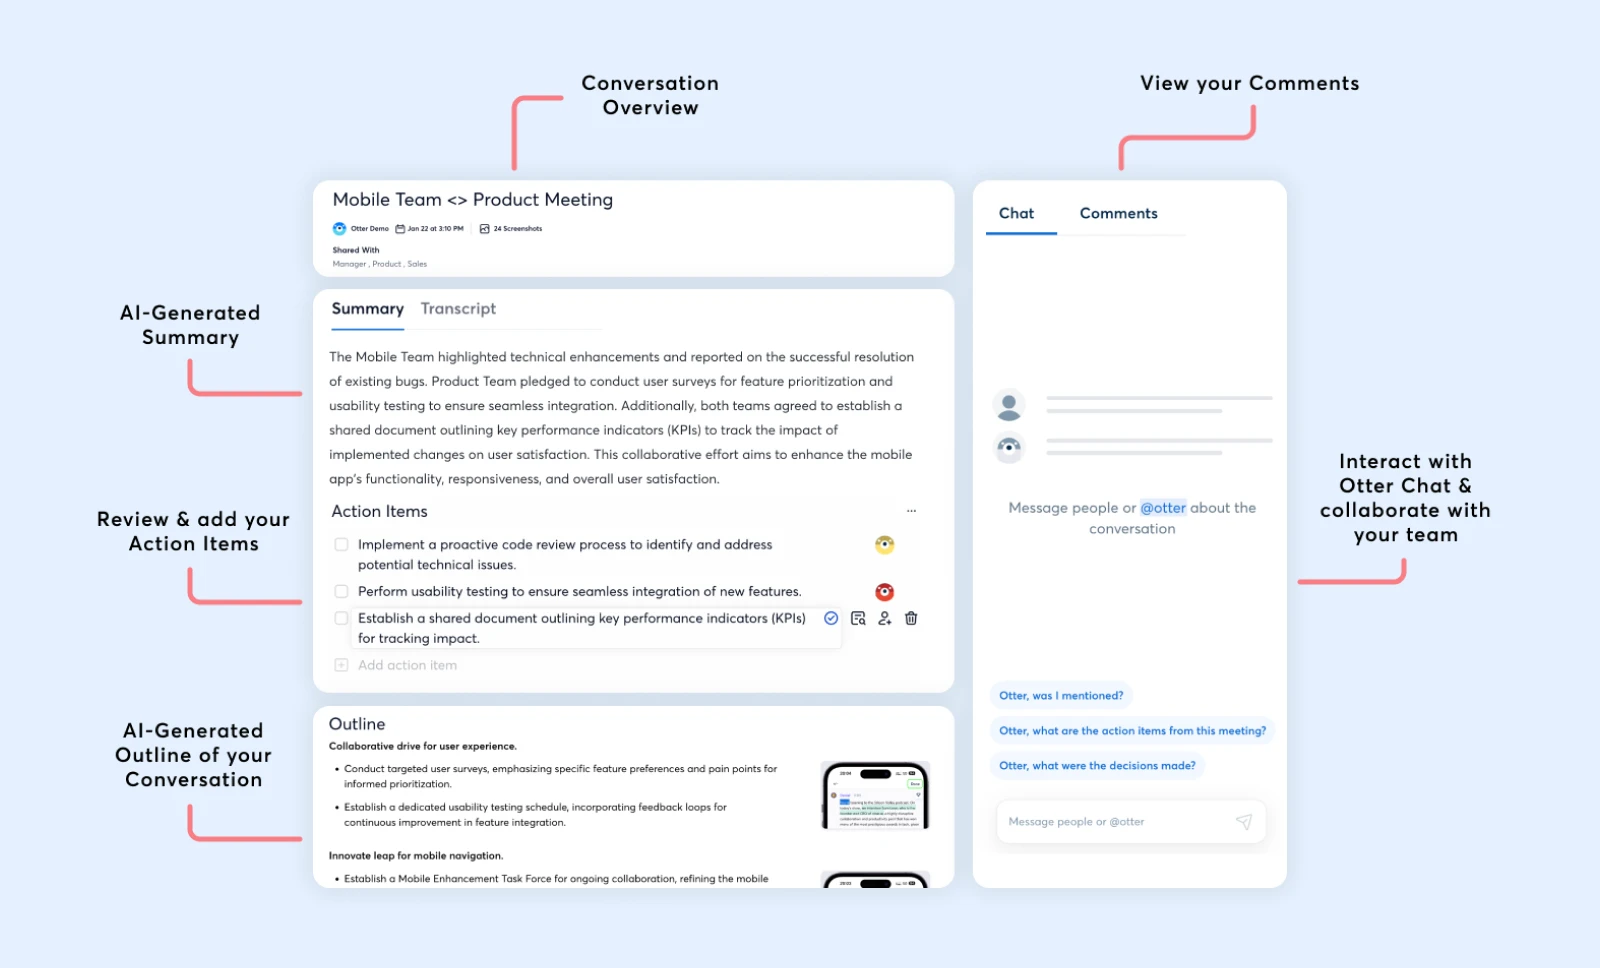
Otter captures everything and creates a good meeting summary, including these four essential things:
- What did we decide?
- Who’s doing what by when?
- What problems did we solve?
- What happens next?
These summaries also help team members stay aligned and accountable. No more “I thought you were handling that!” moments.
Meeting summaries help keep it simple, clear, and, most importantly, actionable for everyone involved.
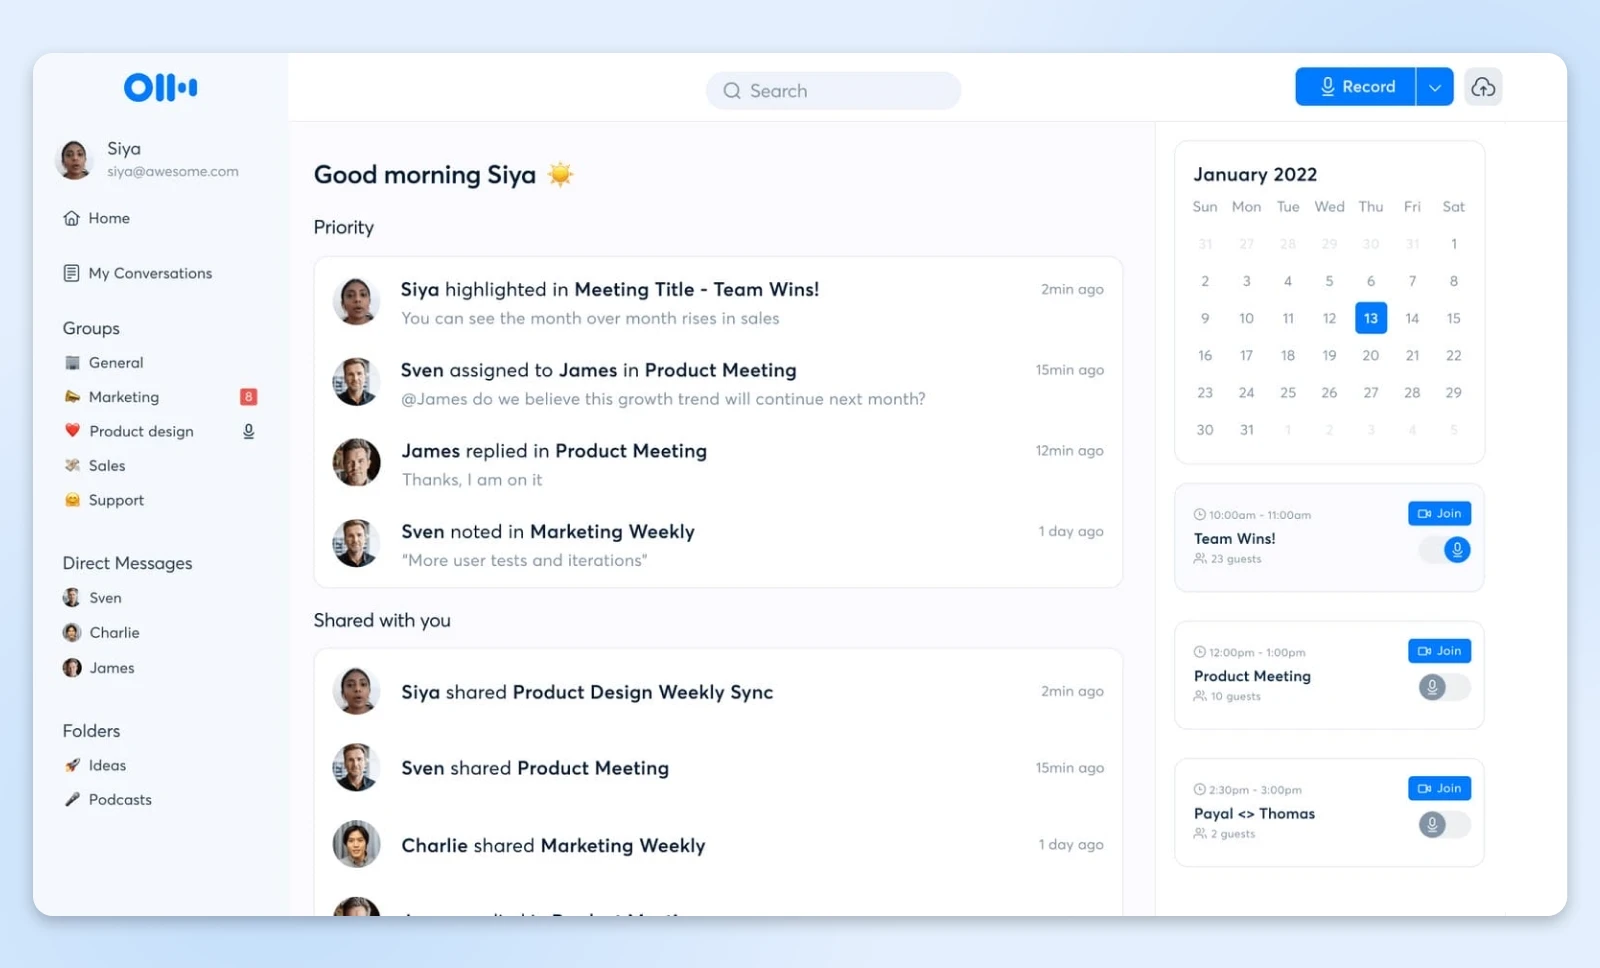
Getting Started With Otter.ai: Building Your Meeting Intelligence System
The journey from scattered notes to streamlined meetings begins with a single step. Let me walk you through transforming how you capture, process, and activate meeting intelligence.
Setting Up Your AI Assistant in 5 Simple Steps
Changing how you handle meetings begins with a simple setup process. Here’s how to get started:
Step 1: Create Your Account
Sign up to Otter.ai with your email — preferably your work email — to access workspace features like collaboration and analytics.
Once registered, confirm your email to activate your account. If the confirmation email doesn’t appear, check your spam folder and add Otter.ai as a contact.
Step 2: Connect Your Calendar
Link Otter to your calendar to streamline meeting management.
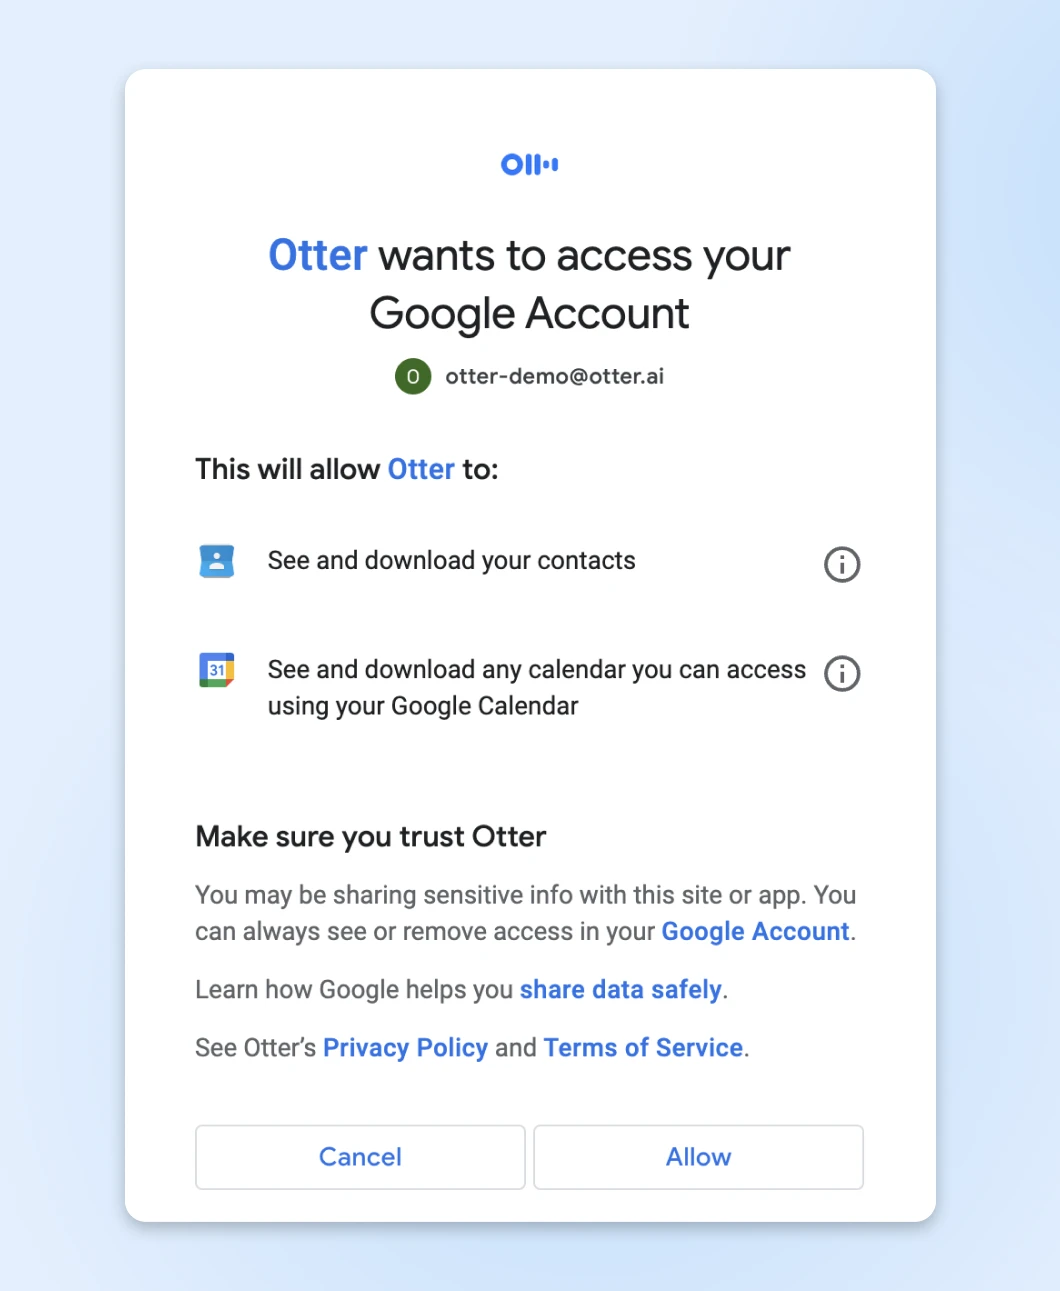
Once connected, Otter will automatically join scheduled meetings, record conversations, and generate summaries without manual intervention.
Step 3: Download the Mobile App
Additionally, you can download the Otter mobile app. It syncs across devices, letting you record, transcribe, and access conversations wherever you are.
Step 4: Train Otter for Tagging and Vocabulary
Teach Otter to recognize speakers by tagging voices and adding custom vocabulary. For teams, you can also add shared vocabulary to boost transcription accuracy for specialized terms and names.
Step 5: Integrate Tools You Already Use
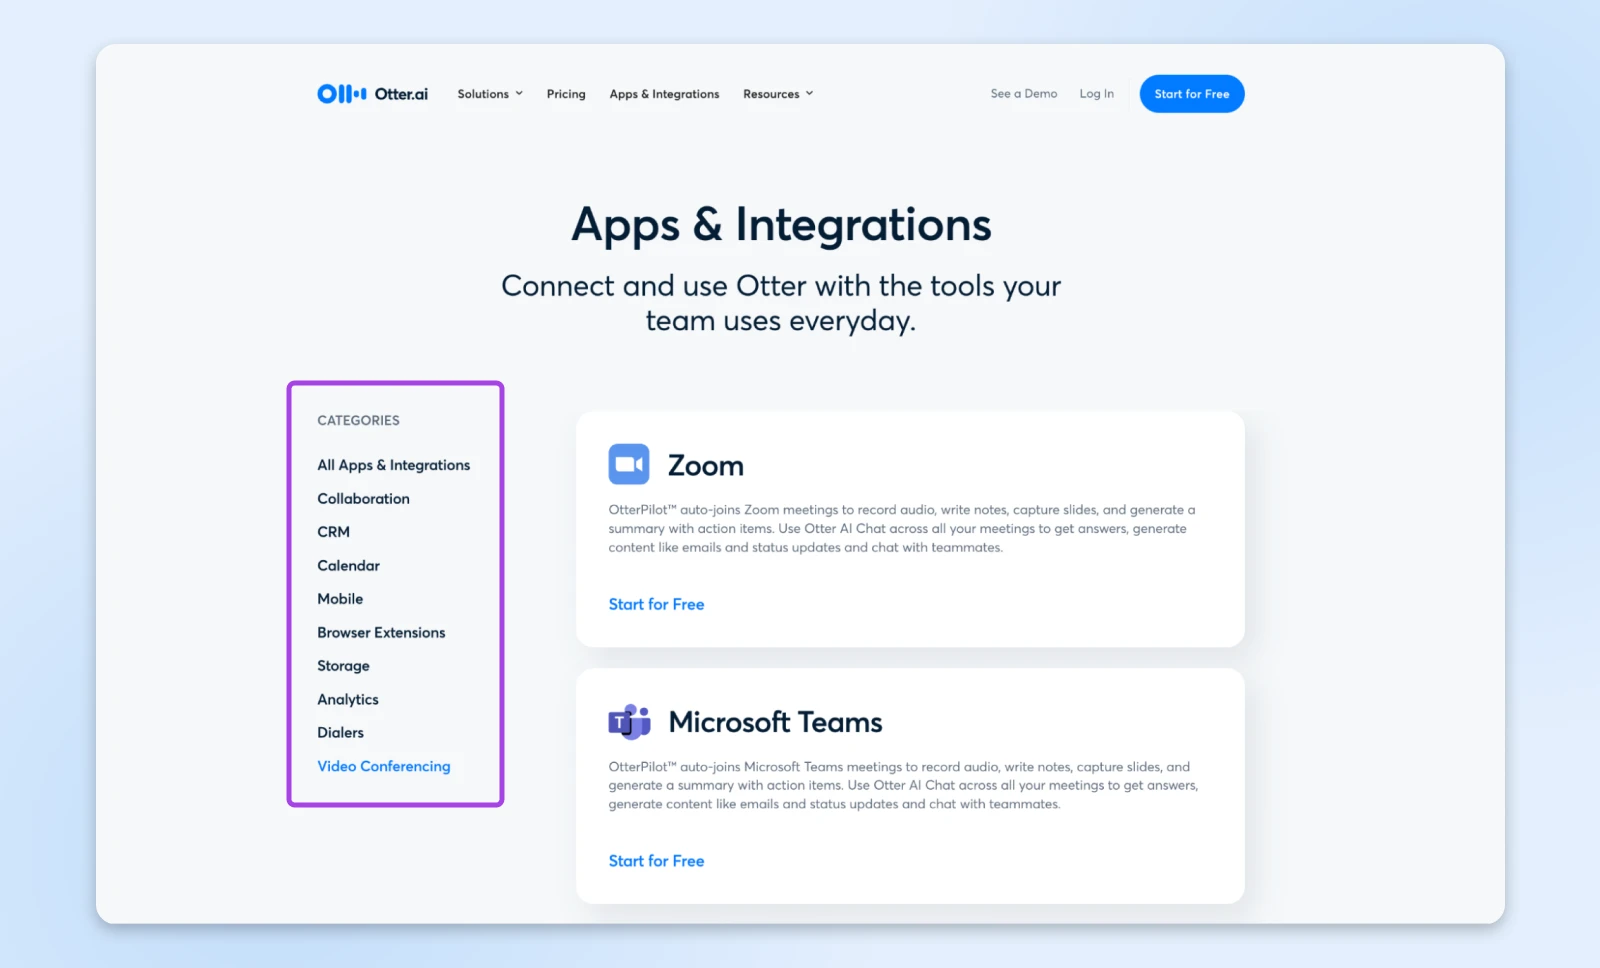
Otter integrates with a wide range of tools that you may already use. You can boost productivity by connecting it to apps like Zoom, Microsoft Teams, Google Meet, Dropbox, and your favorite calendars.
These integrations simplify workflows and improve collaboration.
Core Features for Online Meetings
Think of Otter as a skilled executive assistant, but one that never misses a beat.
Here are some core features we absolutely love:
- Live transcription: This one is the most important considering we need (almost) every word to be captured accurately. Otter captures every word with 98% accuracy, identifying speakers automatically and marking key moments as they happen.
- Automated summaries: After each meeting, Otter distills discussions into clear, actionable highlights. It creates a summary and a checklist of action items that you can pass on to your team members.
- Collaborative intelligence: AI doesn’t have the context of your company, so your team members can go back to the transcript and highlight additional key moments, add comments, and build on ideas — turning static transcripts into living documents that evolve with your projects.
That’s pretty much all you need from meeting transcription software. Now, the question is, is it worth investing in this tool?
Is Otter Worth the Investment?
The answer depends on how meetings fit into your workflow. Otter.ai is, however, well worth it if you regularly attend meetings.
It automates tasks that consume time and focus, such as taking notes and summarizing discussions. The time you save within just a few meetings pays for the tool itself.
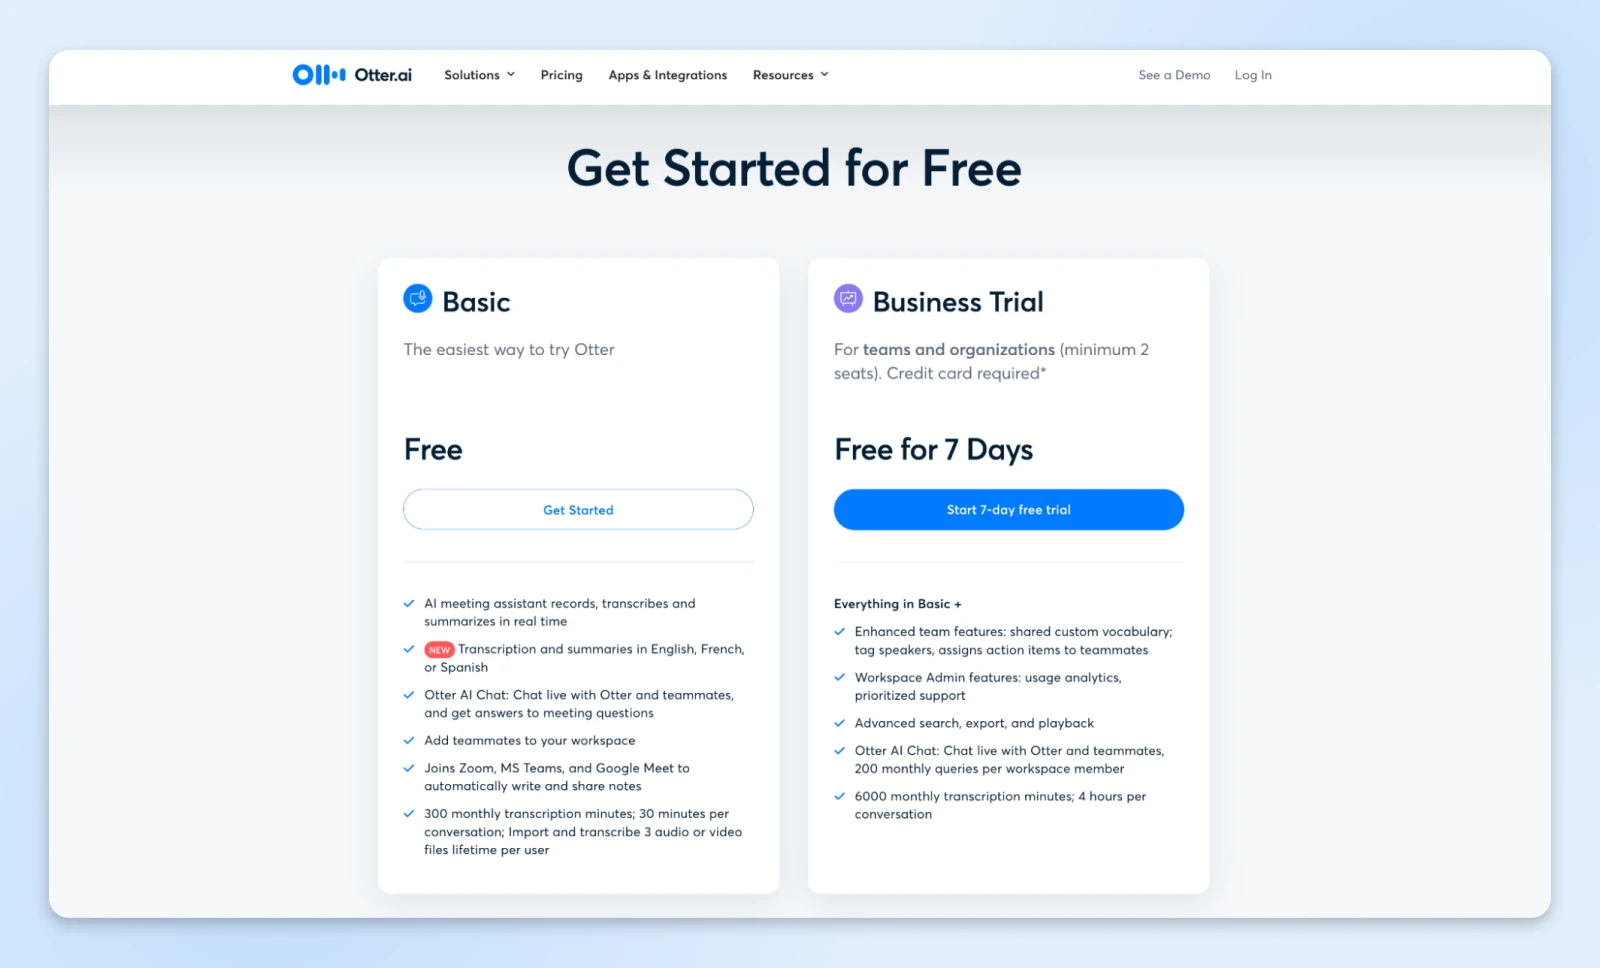
Here’s what the pricing plans look like:
For those just starting, the Free plan is an excellent way to explore what Otter.ai can offer.
It includes 300 transcription minutes per month, live meeting summaries, and real-time collaboration features. For individuals attending a few meetings, this plan already adds significant value — capturing discussions, summarizing decisions, and helping you stay focused.
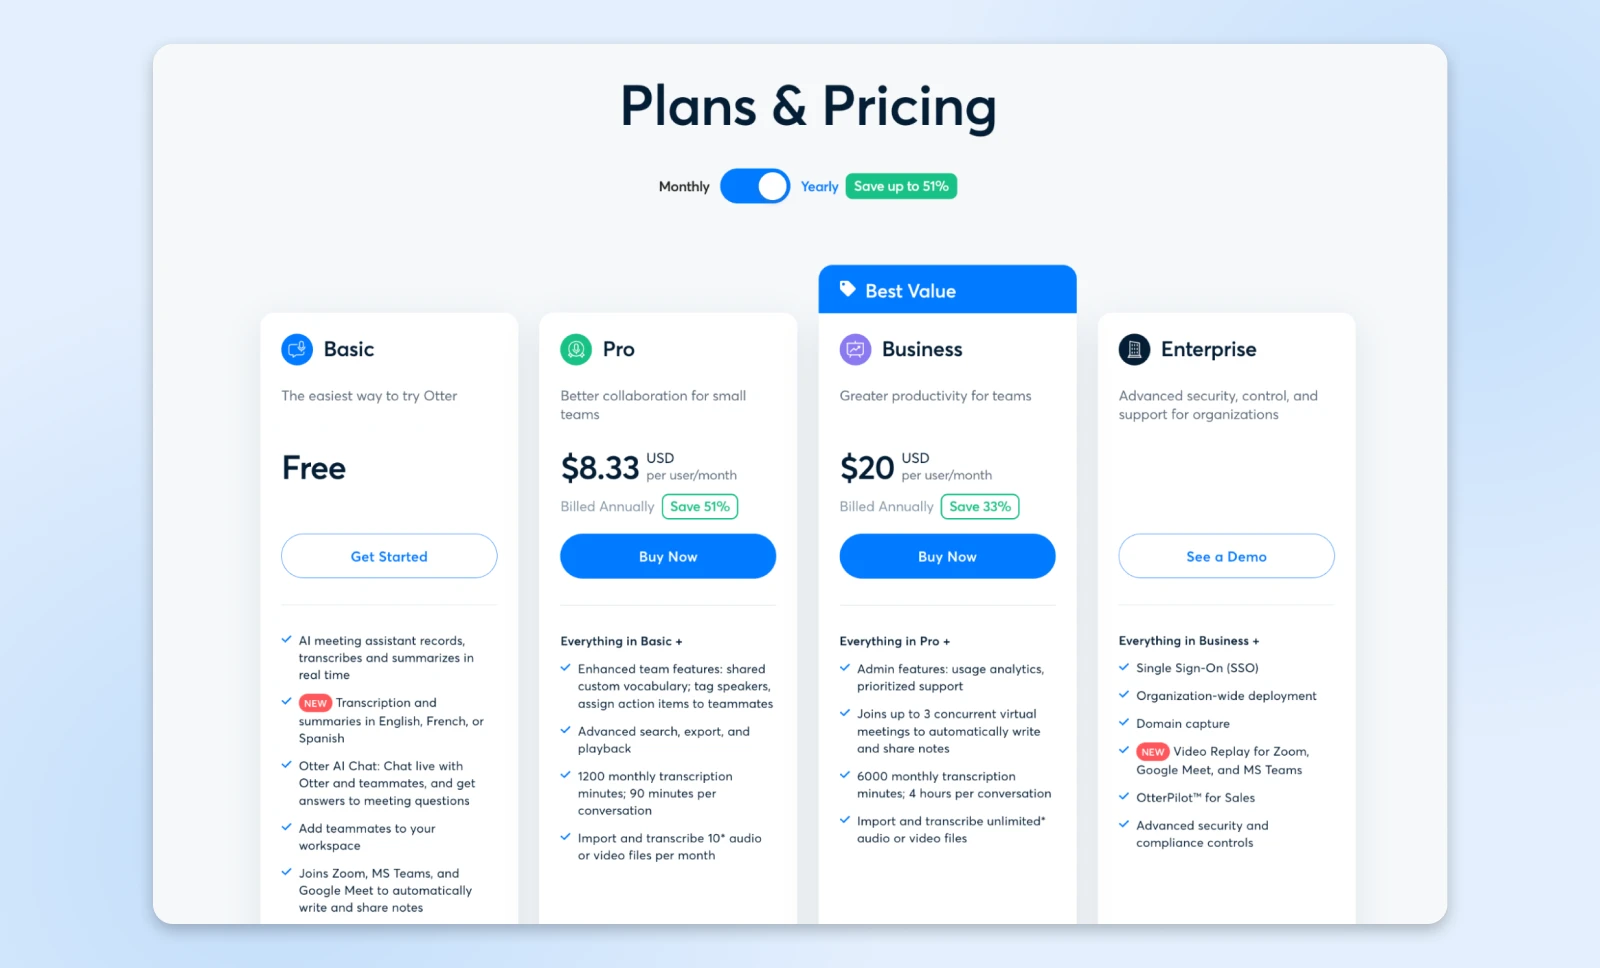
If your needs grow, the Pro plan at $8.33/user per month (billed annually) offers unlimited meetings and AI summaries. Just one hour saved each month covers more than the cost!
The Business plan at $20/user per month (billed annually) is great for teams.
You get:
- Enterprise-grade security.
- Custom vocabulary training to add.
- Advanced team management.
- Priority support.
Small businesses often find this plan redirects hundreds of hours annually to high-impact work.
Beyond Basic Meeting Recording
Otter.ai is ready to impress, by doing so much more than just notes.
For example:
- Automatically generates action items.
- Creates searchable archives of institutional knowledge.
- Enables async collaboration through shared annotations.
- Tracks meeting patterns and participation metrics.
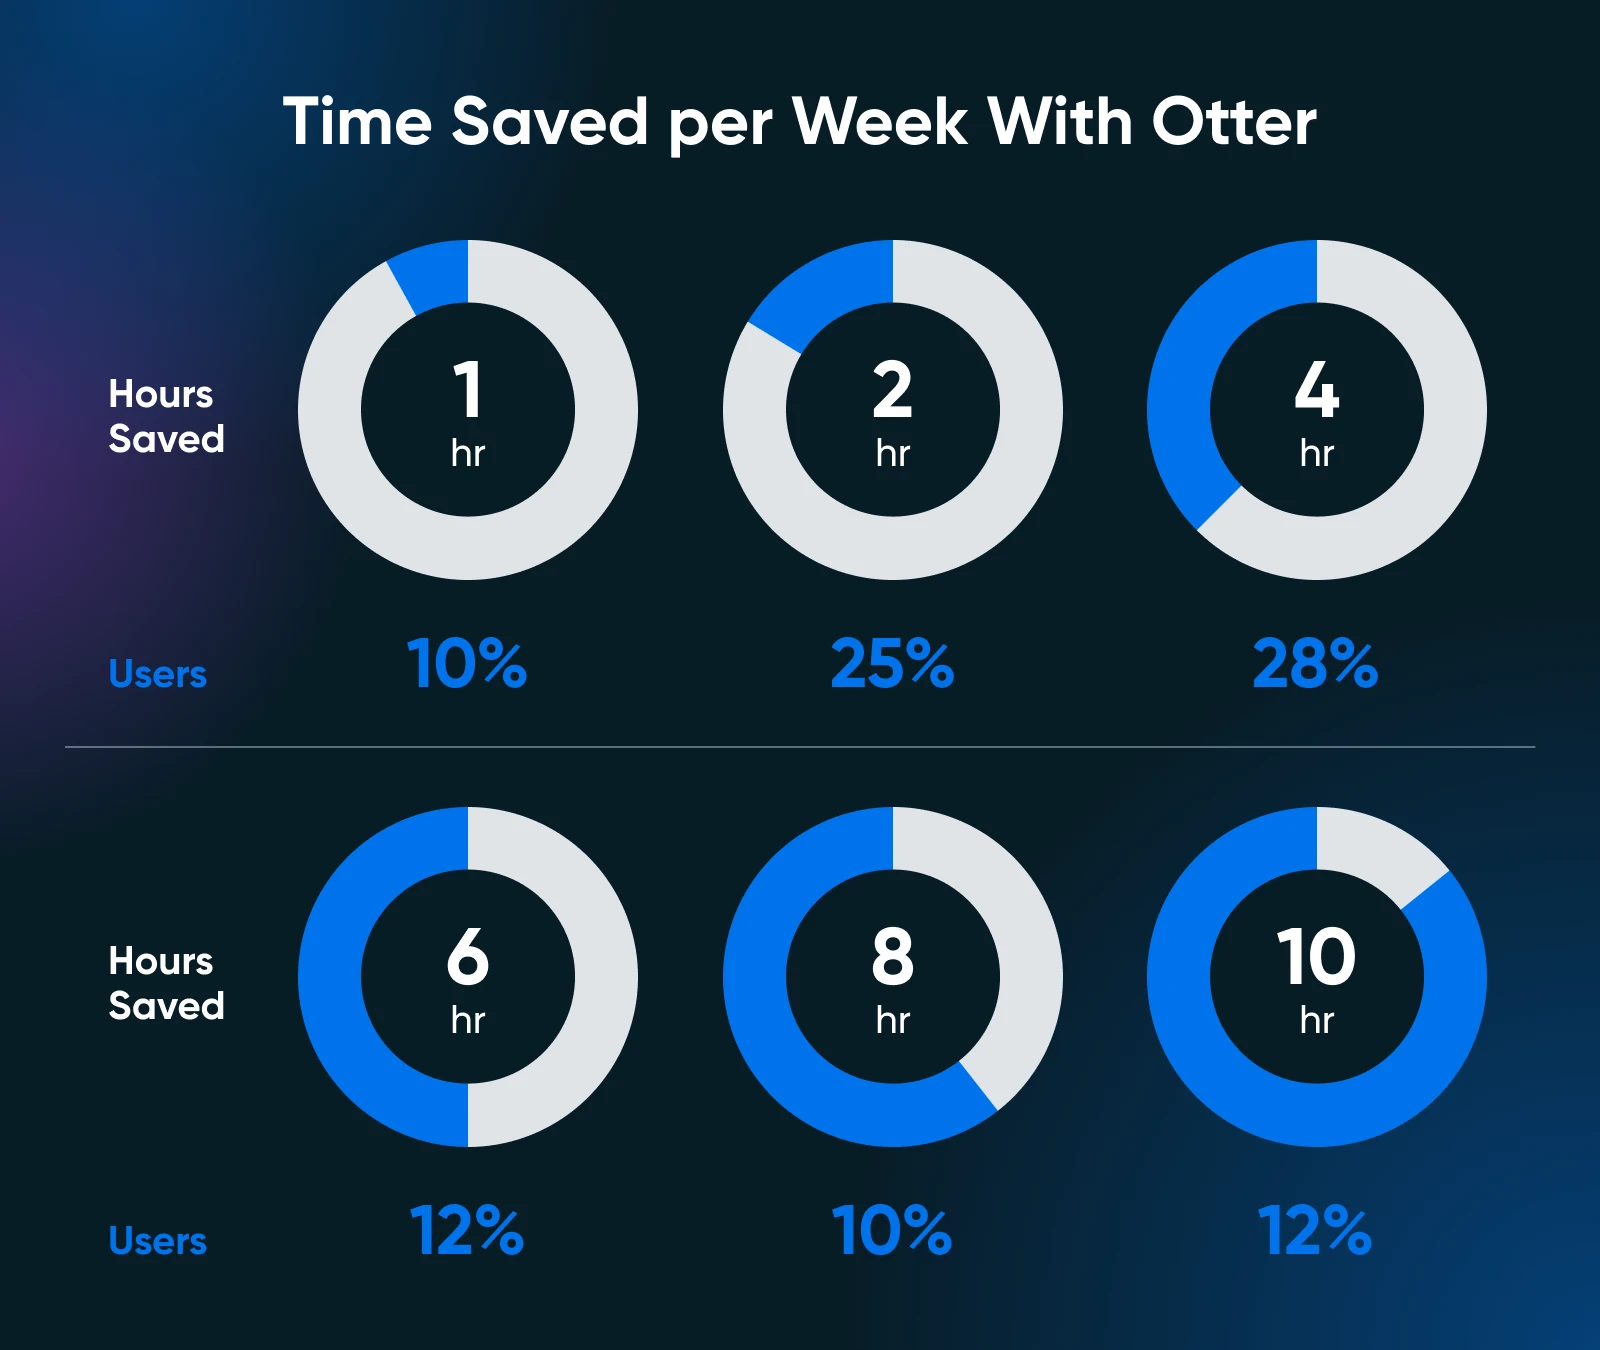
62% of Otter users report saving at least 4 hours weekly.
Make the Best of Otter.ai for Business Growth
Efficient use of Otter.ai can do more than just simplify your meetings; it can help your business grow by saving time, improving collaboration, and driving actionable outcomes.
Here’s how to make the most of its features:
Improve Meeting Transcripts
Start every meeting prepared. Make sure your microphone captures audio clearly and place it centrally if you’re in a room.
When joining virtual meetings, configure Otter.ai to auto-join and begin transcription. This hands-off approach lets you focus entirely on the discussion without worrying about missed details.
Encourage participants to speak clearly and identify themselves during conversations. Otter’s speaker identification feature works best when voices are distinct. For recurring meetings, leverage the platform’s ability to refine speaker tags over time for better accuracy.
Customize and Edit Summaries
Otter’s AI-generated summaries are highly accurate, but every business has nuances. It makes sense to review your summaries after meetings to make sure they align with your goals.
Re-check the key decisions, edit action items, and make sure deadlines are clear immediately after the meeting has ended.
Use custom tags for speakers, projects, or tasks. For instance, tagging a “Client Proposal” action item makes sure it shows up when you search for this meeting later.
Personalizing summaries in this way makes follow-ups easier and keeps everyone accountable.
Use Collaboration Features
Otter lets you edit meeting notes like shared living documents. Team members can annotate transcripts, add comments, and highlight moments that matter most.
Generally, businesses can use these tools to refine ideas, assign tasks, and clarify responsibilities together in an async fashion.
Collaborative editing also helps align teams across the board.
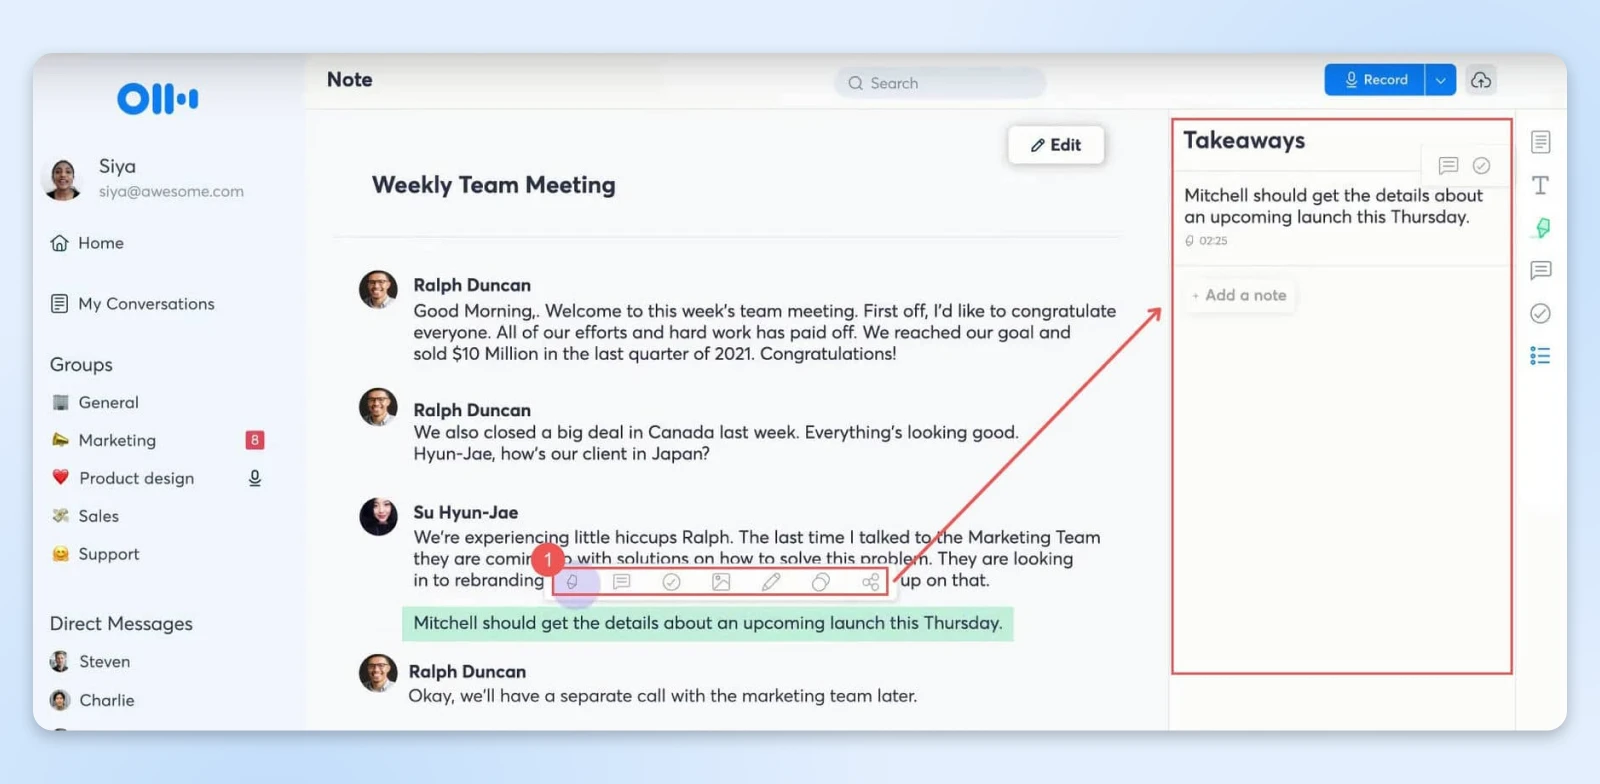
For example, after a product launch discussion, you can highlight customer feedback and assign specific follow-ups to your marketing and product teams within the transcript itself.
The team has the full context of the comment as it’s now attached to a specific timestamp in the meeting transcript.
Share Notes and Follow-Ups Automatically
Share transcripts and summaries immediately after meetings to ensure everyone is in agreement.
Otter.ai allows you to share private links with relevant team members or export notes in formats like PDF or doc.x for external stakeholders.
You can also set Otter to automatically send an email with the summary and transcript link to all those who were part of the meeting.
This helps everyone on the team (those who attended and those who didn’t) know:
- What was covered
- What was the gist of the outcome of the meeting
- The action items
Other Time-Saving Tools To Enhance Meeting Workflows
Integrating Otter.ai with complementary tools can further enhance your productivity and meeting efficiency. Here are some solutions:
- Krisp: Background noise disrupts meetings and can affect transcription accuracy. Krisp’s AI-powered noise cancellation ensures clear communication during virtual meetings. This free tool can be paired with Otter.ai to enhance the quality of your recordings, resulting in more precise transcriptions.
- Calendly: Simplify scheduling with Calendly. This tool syncs your availability with invitees, ensuring seamless booking. When linked with Otter.ai, your meetings are automatically prepared for transcription, saving you the hassle of manual setup.
- Zapier: Automate repetitive tasks by connecting Otter.ai with Zapier. For instance, set up workflows where Otter.ai transcripts are automatically saved to a designated Google Drive folder or emailed to team members after every meeting.
- Trello: After generating action items with Otter.ai, use Trello to organize them into project boards. Assign tasks, set deadlines, and track progress to ensure that every action item from your meetings is addressed efficiently.
- Grammarly: For polished meeting summaries, Grammarly can be used to further refine Otter.ai’s transcriptions and notes. It also helps your follow-up emails and shared documents maintain a professional tone, improving communication with clients and stakeholders.
With the workflows now set up, let’s look at a few simple templates you can use to share the meeting notes and summaries with your team so they can be efficiently actioned.
Simple Templates for Meeting Notes and Summaries
How you communicate outcomes can make the difference between a great meeting and great results.
Here are some meeting summary templates that you can share with the team after every meeting. And honestly, you’re welcome. ?
Executive Summary Template
Subject: Meeting Summary: [Project Name] Discussion – [Date]
Hey team,
Here’s a focused recap of our discussion on [Project]:
Key Decisions:
- [Major decision 1] – Impact: [Brief description]
- [Major decision 2] – Impact: [Brief description]
Action Items:
- [Task] – Owner: [@Name] – Due: [Date]
- [Task] – Owner: [@Name] – Due: [Date]
Next Steps: [Brief paragraph about immediate priorities]
Full meeting notes: [Otter.ai Link]
Project Update Format Template
[Project Status: Green/Yellow/Red]
Progress Update:
- What we’ve accomplished
- Where we stand now
- Immediate priorities
Blockers & Solutions:
- [Blocker 1] → [Solution/Next Step]
- [Blocker 2] → [Solution/Next Step]
Client Meeting Follow-Up Template
Dear [Client Name],
Thank you for our productive discussion today. To ensure we’re aligned:
Your Goals:
- [Primary objective]
- [Secondary objective(s)]
Our Commitments:
- [Deliverable 1] by [Date]
- [Deliverable 2] by [Date]
Timeline: [Week 1]: [Milestone] [Week 2]: [Milestone]
Next meeting: [Date/Time]
Get Your Time Back with Otter.ai
Every meeting has the potential to create clarity, spark ideas, and drive meaningful action — only if the details don’t get lost in the shuffle.
Otter.ai makes sure you never miss a moment, turning your discussions into summaries and actionable plans.
With less stress and more focus, you can approach your next meeting knowing that the important work of capturing, summarizing, and sharing is already taken care of.
Otter.ai makes meetings smarter, simpler, and significantly more productive for everyone involved.
The post Turn Long Meetings Into Actionable Summaries With Otter.ai appeared first on DreamHost Blog.
]]>The post What To Do (& What Not To Do) When Google Releases an Algorithm Update appeared first on DreamHost Blog.
]]>The good news? An algorithm update isn’t a guaranteed headache —and it certainly doesn’t have to spell doom for your business. In fact, it can be a good opportunity to refine your content, improve your user experience, and make sure the people who need what you offer can find you.
So what do you do now?

Before you start rewriting every piece of content on your site or pay for sketchy quick-win SEO “fixes,” take a deep breath. You’re not alone, and you certainly aren’t helpless. Below, we’ll explain exactly what these updates are and what they mean for small businesses like yours. We’ll show you what you should do — and what you definitely shouldn’t —to navigate a Google algorithm update with confidence.
What Is a Google Algorithm Update?
A Google algorithm update is a change to the complex formula Google uses to determine which websites rank where in search results.
The idea behind these updates is pretty simple: Google wants to provide the best possible answers to users’ queries, surfacing the most helpful, trustworthy information at the top.
That might mean putting more emphasis on authoritative content (so that health advice comes from doctors, not random strangers) or making sure that mobile-friendly sites rank higher on smartphone searches. Some updates are small and almost imperceptible, while others, known as core updates, can shake up entire industries.
Many people treat the Google algorithm as a mysterious enigma, shrouded in secrecy. But via its Google Search Central resource, Google actually provides quite a lot of information about how the algorithm works and what you need to do to get your site to rank. It notes that it’s regularly making changes, some big, some small, to “surface more relevant and useful results.”
In fact, Google has publicly stated that its primary mission is to help users find the highest quality content. As the search giant explains in its guidance on core updates, they’re “designed to ensure that, overall, we are delivering on our mission to present relevant and authoritative content to users.”
This isn’t about punishing good sites or randomly shuffling the deck; it’s about continuous improvement. Google’s own documentation highlights the importance of aligning your content with user expectations and maintaining E-E-A-T (Experience, Expertise, Authoritativeness, Trustworthiness). Sites that consistently deliver value, clarity, and trust stand a better chance of weathering algorithmic shifts.

In other words, Google’s core philosophy isn’t a secret: Create useful content, present it well, keep your audience front-and-center, and you’ll do just fine in the long run.
How Often Does Google Update Its Algorithm?
Google is tinkering with its algorithm all the time. Hundreds (even thousands) of small changes might roll out each year. However, the big, headline-grabbing core updates happen less frequently. Typically a few times a year, at most.
Think of it like the difference between rearranging a few books on your shelf each day versus deciding to renovate your entire living room. Most days, Google is just shuffling a few titles around (minor tweaks), but every now and then, it knocks down a whole wall — i.e., a core update. It’s important to know (and be able to spot) the differences, so you can approach algorithmic changes calmly and without jumping to conclusions every time you see a slight change in your traffic.
Big Updates With Big Implications
Over the past several years, Google has rolled out core updates that have dramatically affected search results. Some focused on content quality, others on-page experience, and some on overall trust and authority.
Recently, there have been a few major updates announced close together that have had the SEO world buzzing:
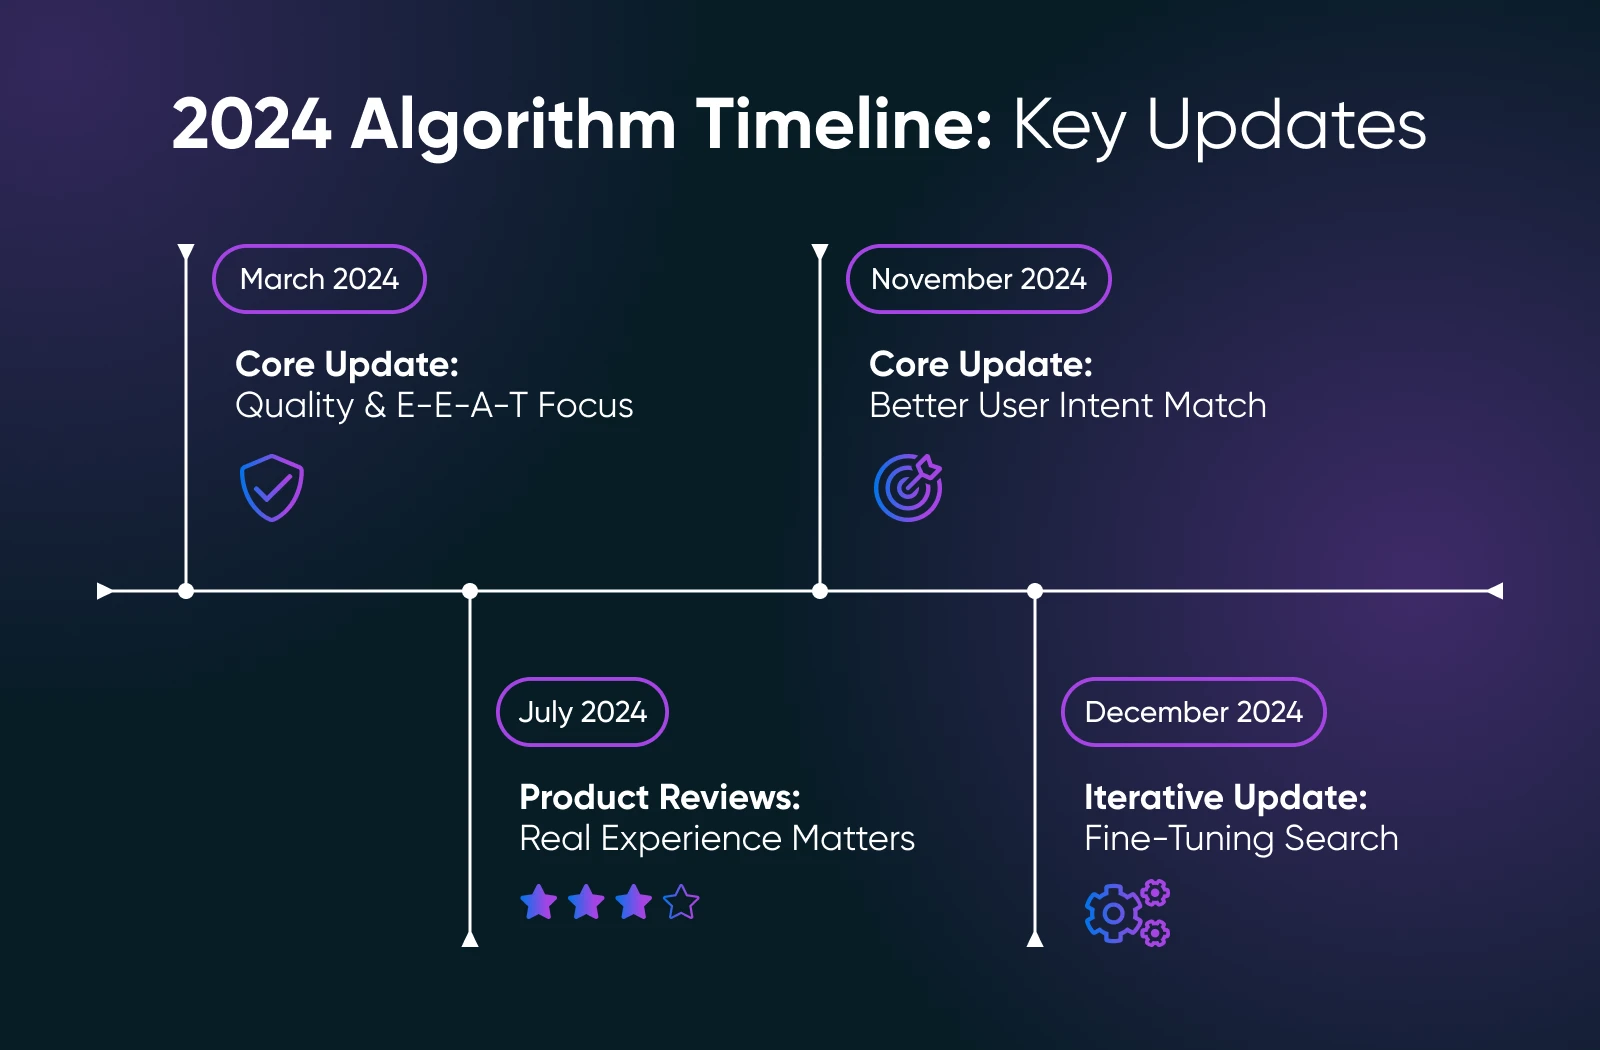
- December 2024 Iterative Update: Just a few weeks after its prior core update, Google introduced another wave of refinements. While not as dramatic as November’s shift, changes in search results occurred just days after the announcement, according to Search Engine Journal. The impact of this update is still being tracked and monitored.
- November 2024 Core Update: Rolled out to improve the way Google understands and ranks content that matches user intent. According to Search Engine Journal’s coverage, this update continued “Google’s refinement of search systems to enhance the quality of results” and caused modest changes for most sites after its rollout was completed on 5th December 2024.
- July 2024 Product Reviews Update: Mid-year, Google refined how it evaluates product review content. Historically, product review updates have placed greater weight on first-hand experience, transparent pros and cons, and demonstrably authentic insights. The July 2024 iteration continued this trend, making it harder for shallow, affiliate-driven reviews to rank well. Detailed product comparisons, hands-on testing, and authentic imagery helped standout reviewers rise.
- March 2024 Core Update: The first core update of 2024 landed in March and set the tone for the rest of the year. This update honed in on what Google often emphasizes: quality and relevance. Sites that had invested in thorough, well-structured content — especially those demonstrating strong E-E-A-T principles — maintained or even improved their rankings. Meanwhile, web pages with outdated or thin content often slipped.
If we look further back, earlier core and iterative updates show a pattern: Google repeatedly pushes toward highlighting genuinely helpful content and filtering out low-value pages.
Each time, the takeaway remains consistent: Your best bet is to keep improving quality, trust, and relevance.
When another big update lands, it’s helpful to look at how your site fared in previous rollouts and draw lessons. Patterns often emerge, and if you’ve been proactive, the changes might feel more like gentle course corrections than shockwaves.
How Google Algorithm Updates Impact Small Businesses
For entrepreneurs and small-to-medium-sized businesses (SMBs), organic search traffic can be a make-or-break success metric. It’s a constant stream of potential customers finding you naturally, with no need for expensive ads or promotions. That’s why it’s so important to understand algorithm updates. If you’re not prepared, a sudden drop in rankings can feel like someone suddenly closed up shop at your business without giving you a heads-up.
At the same time, it’s important to keep in mind that Google’s updates aren’t out to get you. In fact, they’re an opportunity. If your content is already authentic, helpful, and authoritative, you stand to gain visibility when competitors who rely on outdated practices lose ground. If your traffic dips, it might be a signal that certain areas of your site need improvement: from page load speeds to more in-depth, trustworthy information.
How To Distinguish Temporary Fluctuations From Long-Term Trends
Not every change in traffic after an algorithm update is permanent. Sometimes, rankings “settle” after a few days or weeks as Google finishes rolling out updates and recalibrating search results.
So, even if you see changes to your traffic or rankings after a core update, don’t hit the panic button just yet. Give it a little time. Check your traffic patterns over a few weeks, not just a single day.
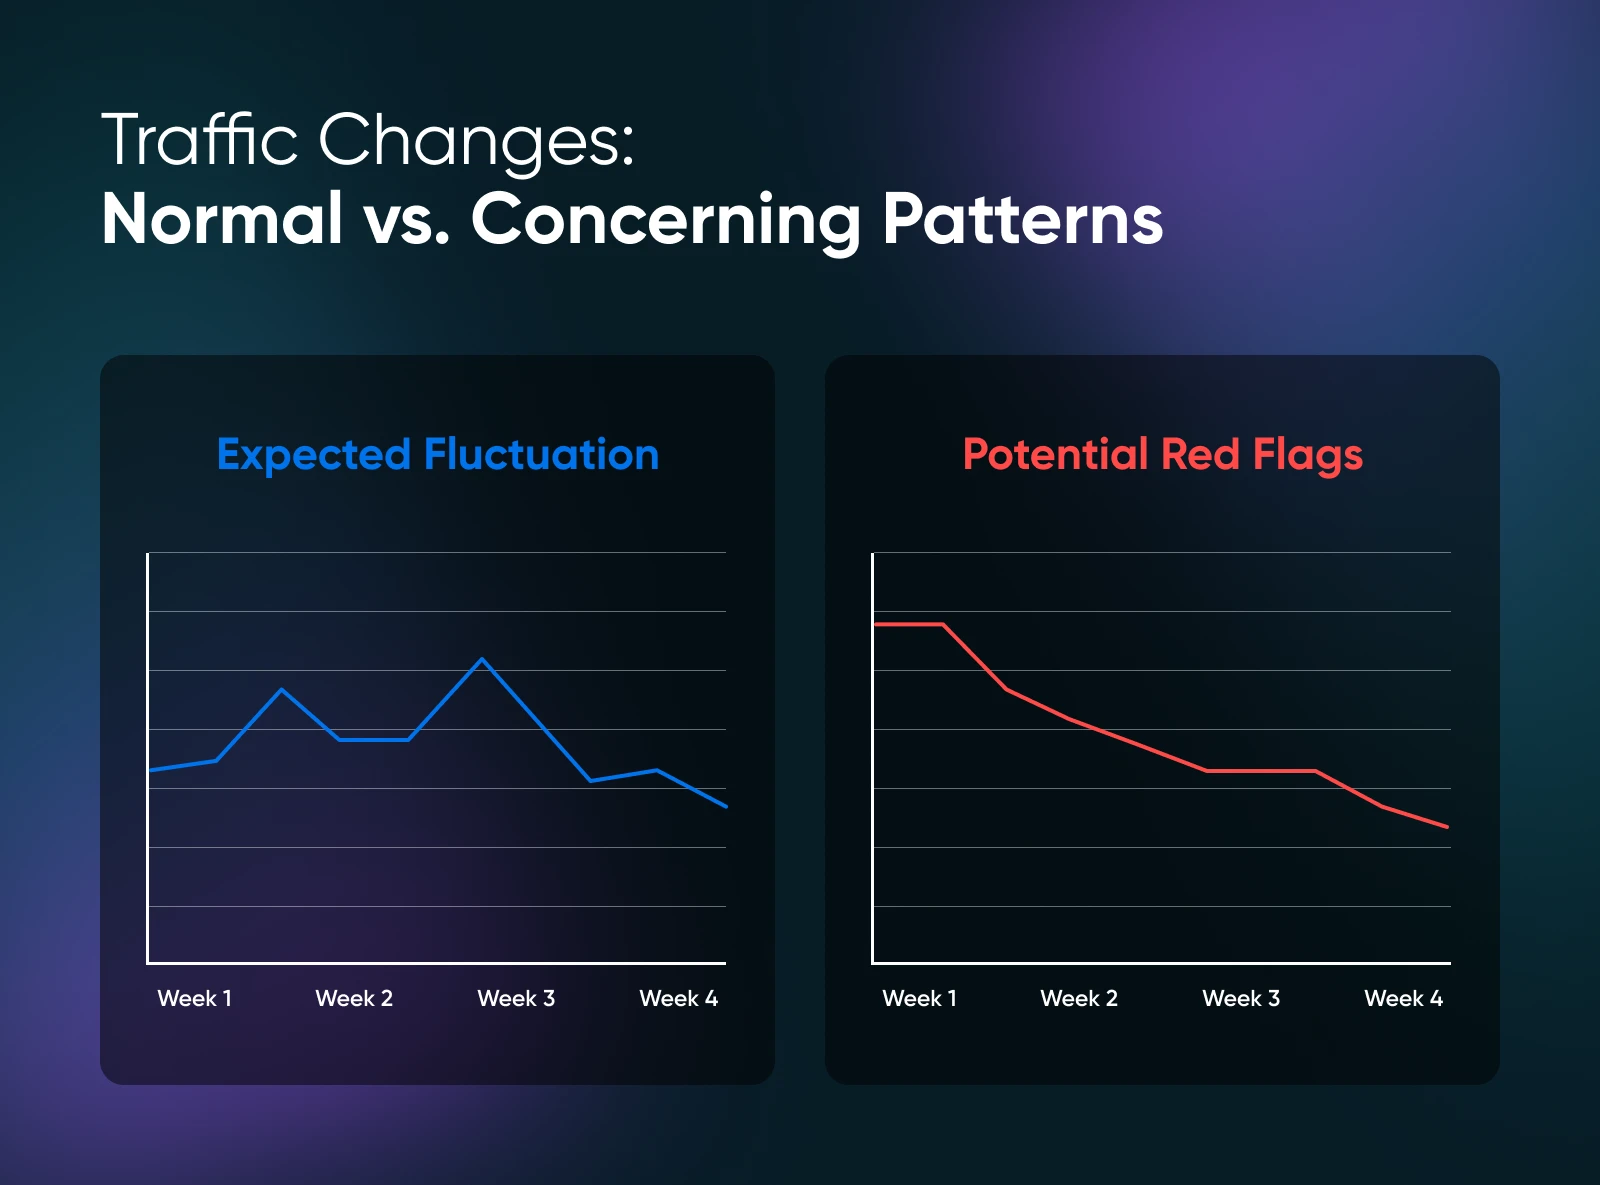
For example, if you see a small dip right after an announced update, don’t immediately yank all your content. Track your metrics over a month. Is the downward trend continuing, or was it just a two-day blip? Understanding normal fluctuations can prevent hasty decisions that might harm your site more than help it.
What To Do When Google Updates the Algorithm
So what’s your move when Google announces (or quietly rolls out) a big change? The best approach is equal parts patience, observation, and proactive improvement. Here’s how to stay ahead and keep your website in top shape to ride out algorithm updates with minimal impact.
1. Start by Taking Stock
Don’t scramble to change everything overnight. First, take a deep breath. And then, try to understand what’s happening.
Review your analytics over a few days or weeks, not just a single snapshot. Are you seeing a site-wide dip, or are certain pages being hit harder than others? Identifying patterns can help you apply targeted, meaningful fixes rather than mass overhauls that waste time and effort.
2. Revisit E-E-A-T Principles
Google values websites that demonstrate Experience, Expertise, Authoritativeness, and Trustworthiness (E-E-A-T). Quality content that truly helps readers and comes from a credible source is more likely to rank well.
If your rankings took a hit, ask yourself: Can I provide more authoritative references? Can I showcase my credentials more clearly? Can I add fresh examples, case studies, or testimonials that prove I really know what I’m talking about?
Review your content with a critical eye:
- Is your content helpful? Make sure it directly answers users’ queries.
- Are you demonstrating expertise? Cite credible sources, use examples, and draw on your real-world experience.
- Is your site structured to be accessible and make it easy for visitors to navigate? Improve your user experience with clear menus, descriptive headings, and fast loading times.
- Are you trustworthy? Include author bios, references, and transparent contact information. Engage readers, and show them who’s behind the business.
By implementing these quality standards and constantly elevating them over time, you’ll be better positioned no matter what changes Google makes down the line.
3. Update and Improve Your Content
Give your existing content some love. Tighten up your headlines, break up long paragraphs, and make sure your main points are front and center.
If you wrote an article two years ago, consider refreshing it with more recent, up-to-date data or insights. If your product descriptions feel generic, add more detail about quality, materials, or user experience.
And remember, doing this isn’t just about making search engines happy — it’s about delivering genuine value to the people who visit your site. Win-win.
4. Enhance Your User Experience (UX)
Google’s algorithm isn’t just about keywords anymore (which is why Wild-West tactics from the early days of SEO, like keyword stuffing, don’t work; and can even harm your site’s rankings).
Now, part of what helps your pages rank is how comfortable and satisfied users are when they land on your site. If your page loads slowly or your navigation is confusing, people will bounce — and Google’s signals may reflect that.
So, if you’re seeing negative changes after an algorithm update, it’s a good time to revisit your UX and see if you can improve your page speed, use clear menus, and make sure your site works smoothly on mobile devices. Think of your website like a storefront: It needs to be clean, welcoming, and easy to browse.

5. Track Changes Over Time
After making these tweaks to your site, set benchmarks and watch how your adjustments influence traffic, conversion rates, and user engagement. Are visitors spending more time on the pages you’ve improved? Are your bounce rates going down? Use these insights to double down on what works and refine what doesn’t.
Here are some good metrics to keep track of over time:
- Organic traffic: This gives you a baseline so you’ll know if you’re getting fewer visits from Google after the algorithm changes.
- Click-through rates (CTR): If you know your historical CTR, you can see if people are still clicking through to your pages after the algorithm update.
- Conversion rates: Once visitors land on your site, are they still signing up, buying, or reaching out at the same rates they were before the algorithm changed?
Create a system to track these metrics consistently. Even a simple spreadsheet can do the job. By knowing what “normal” looks like, you can spot true anomalies and decide if action is needed. Over time, you’ll develop a data-driven strategy that can help you weather any update Google throws your way.
6. Keep Yourself Informed
Don’t just react after an update hits. Keep a pulse on the industry by reading reputable SEO news, setting Google Alerts for algorithm updates, and attending webinars or community meetups. The more you know, the less surprised you’ll be when the next big shake-up happens.
Use tools that track “algorithm weather” to get a sense of search volatility. There are many of these types of resources. Check out the ones from authoritative SEO sites to keep tabs on data that show whether the search landscape is unusually turbulent:
Stay informed by setting up Google Alerts for terms like “Google algorithm update” or subscribing to industry-leading publications such as Search Engine Land and Moz. You can even set up an RSS feed so you’re always up-to-date.
7. Consider Professional Input When Needed
If you feel out of your depth, consult an SEO professional or agency. A reputable expert can help you interpret what’s happening, suggest meaningful improvements, and guide you through tough transitions. While this may be an additional investment, consider the potential long-term value of protecting your visibility in search results.
What Not To Do When Google Updates the Algorithm
When the ground shifts beneath your feet, it’s natural to want to do something. And in times of uncertainty, it’s easy to make rash decisions. But knee-jerk reactions can do more harm than good. If you take the wrong approach, you risk digging yourself into a deeper hole.
Here’s what to avoid doing after an algorithm update:
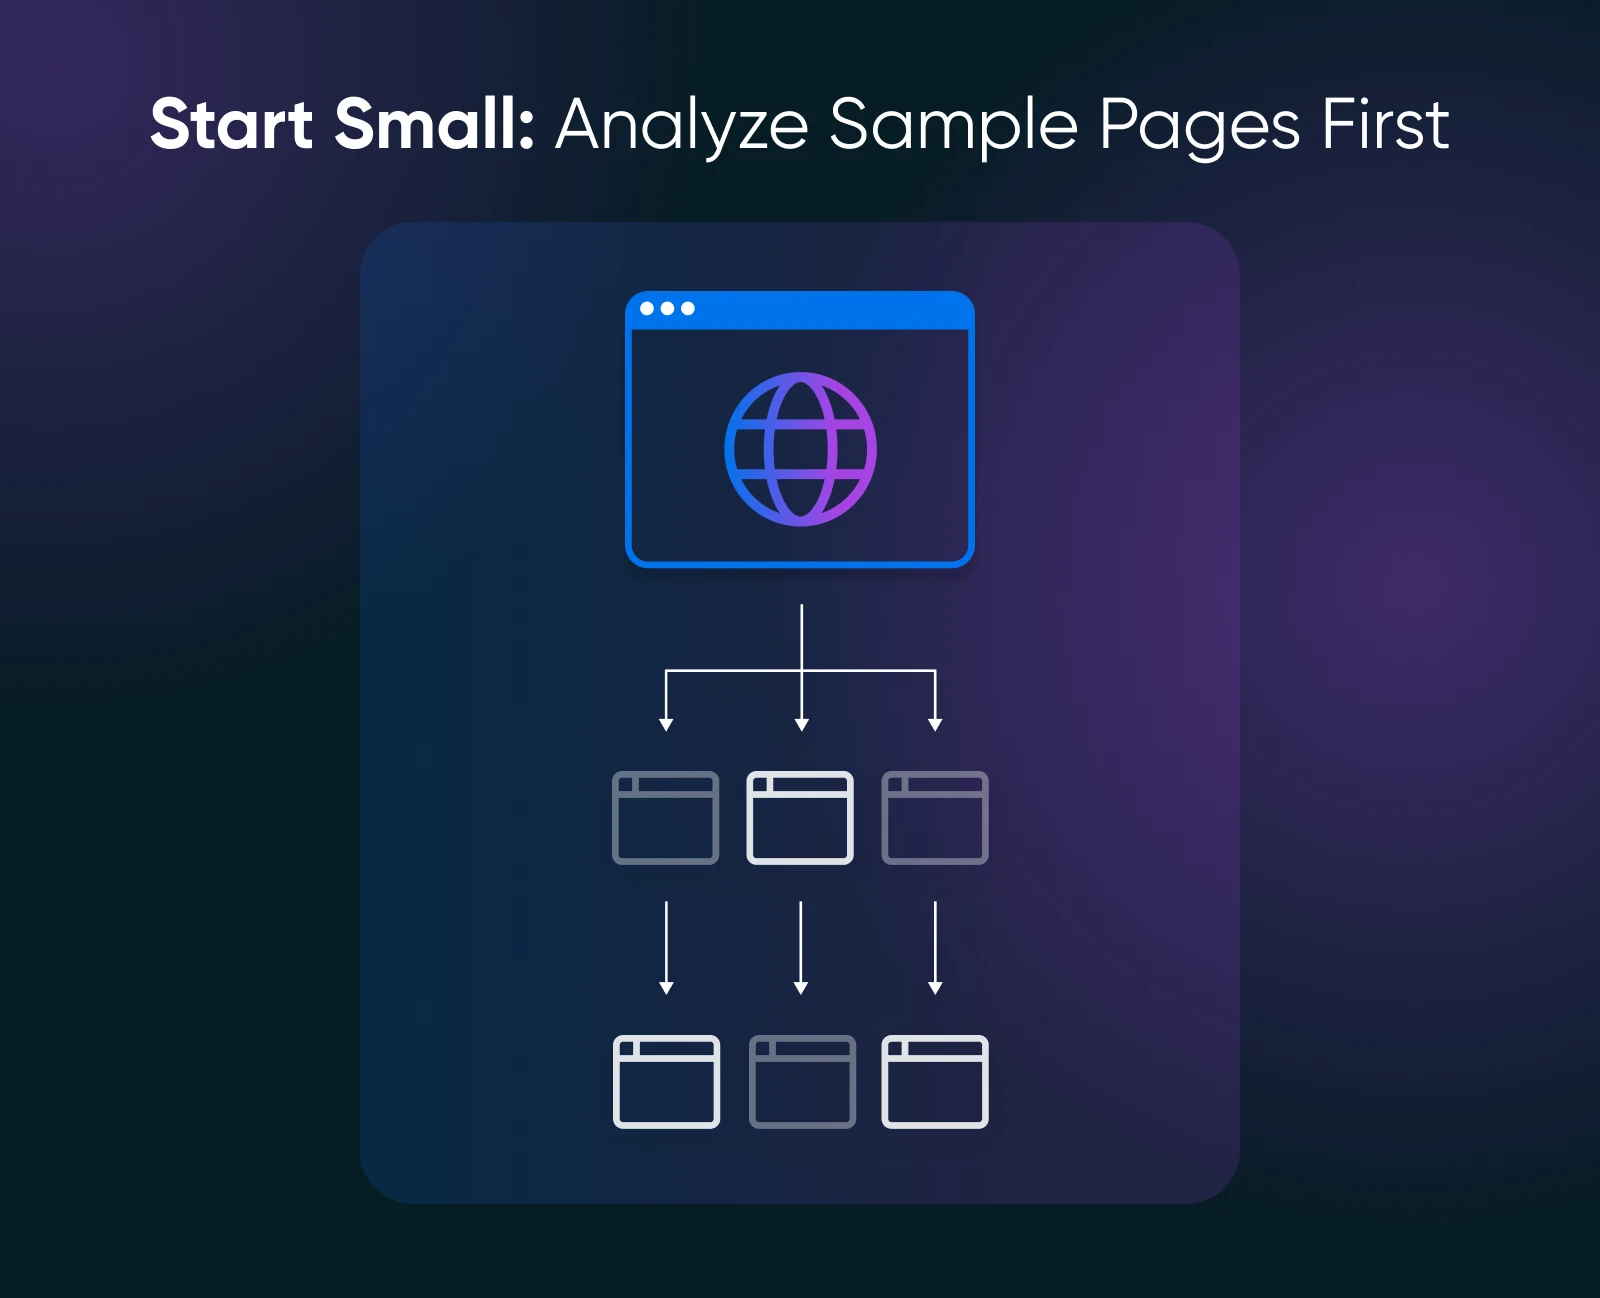
1. Don’t Panic and Gut Your Entire Site
Yes, your traffic may have dipped. But an overhaul of every product page, blog post, and landing page could cause more confusion, so resist the urge to rewrite every product description or toss your content strategy out the window.
Instead, pick a few representative pages to analyze deeply. If you see patterns, like a particular type of page falling off, for example, you’ll know where to focus your improvements instead of making sweeping changes that might harm perfectly good content. Or, if you find recurring issues (like thin content or outdated information), you can start improving those areas strategically.
A scalpel, not a chainsaw, is the tool you need here.
2. Avoid Shady SEO Tactics
Don’t be tempted by so-called “quick fixes” that promise a fast return to your previous ranking. Steering clear of spammy link schemes, keyword stuffing, or other black-hat SEO tricks may seem like a shortcut, but they often violate Google’s guidelines. These types of short-lived “solutions” often backfire and will probably get you penalized in the long run.
If you’re doing something naughty, they could de-list, and de-index your website if it has too many toxic backlinks pointing at it.
If your rankings took a hit, the fix isn’t to game the system. It’s to align with Google’s goal of connecting users with valuable content. If you think your link profile is weak, focus on building genuine, high-quality links through guest posting, partnerships, and community involvement, not buying a batch of suspicious links.
Google’s algorithm rewards quality and authenticity. Taking shortcuts now could mean an even bigger drop later.
3. Resist the Urge To Check Stats Every Hour
It’s natural to feel anxious when the numbers dip, but constantly hitting refresh on your analytics dashboard won’t change anything. Give it time. Rankings can fluctuate for weeks after a major update, and sometimes, they settle after a week or two.
Use that waiting period to brainstorm improvements, review customer feedback, or update your brand messaging. Patience isn’t just a virtue, it’s a practical necessity in SEO. If you’ve done your due diligence (improved content, strengthened user experience, built a solid backlink profile organically), patience often pays off.
4. Don’t Ignore Your Community
Sometimes, changes in traffic are signals that your audience’s needs are shifting. If user behavior is evolving, try talking with customers directly. Send out surveys, watch what they’re asking in comment sections or support channels, and adapt accordingly. Ignoring user feedback because you’re too focused on Google’s algorithm is like neglecting the people standing right in front of you. Make improvements that serve real people, and over time, Google will reward those efforts.
5. Don’t Write Off Best Practices
When under pressure, some site owners toss established best practices out the window, thinking a secret hack is a better path. That’s a mistake. Following Google’s guidelines, focusing on E-E-A-T, and providing authentic value is a long game. It may not yield immediate wins, but it sets you up for sustainable growth. Shortcuts that ignore best practices almost always lead to disappointment (and potential penalties) later.
By steering clear of knee-jerk reactions and shady tactics, and instead, acting thoughtfully and ethically, you’ll set the stage for long-term success.
Where To Learn More
You don’t have to face algorithm updates alone. Keep learning and exploring resources that can help you stay informed and prepared:
- 37 of the Best SEO Tools for Small Businesses
- Improve Your Rankings Using These 20 SEO Techniques
- Everything You Need To Know About Speeding Up WordPress
- 5 Things You Must Know Before Planning Your 2025 Content Strategy
Algorithm Updates Are Opportunities
Yes, algorithm updates can shake up your traffic and test your nerves. But they can also be a catalyst for genuine growth. By understanding what algorithm updates are, why they matter, and how to respond to them, you’ll transform anxiety into action. Instead of panicking, you’ll be ready: ready to track metrics, ready to improve content, and ready to adapt as Google fine-tunes its search experience.
Don’t dread the next algorithm update. Prepare for it, learn from it, and use it to make your site better than ever. The payoff? Long-term search visibility that benefits both you and the customers who are looking for exactly what you offer.
Get More Website Traffic
We take the guesswork (and actual work) out of growing your website traffic with SEO.
Learn MoreThe post What To Do (& What Not To Do) When Google Releases an Algorithm Update appeared first on DreamHost Blog.
]]>The post Is Your Website’s XML Sitemap (or Lack Thereof) Holding Your Site Back? appeared first on DreamHost Blog.
]]>If only it were that simple. XML sitemaps are some of the most misunderstood tools in website optimization.
Yet their proper implementation can dramatically influence how search engines perceive and crawl your site.
What Is an XML Sitemap?
An XML sitemap acts as your website’s directory for search engines.
While regular sitemaps help human visitors navigate your website, XML sitemaps help search engines understand your website’s structure and content.
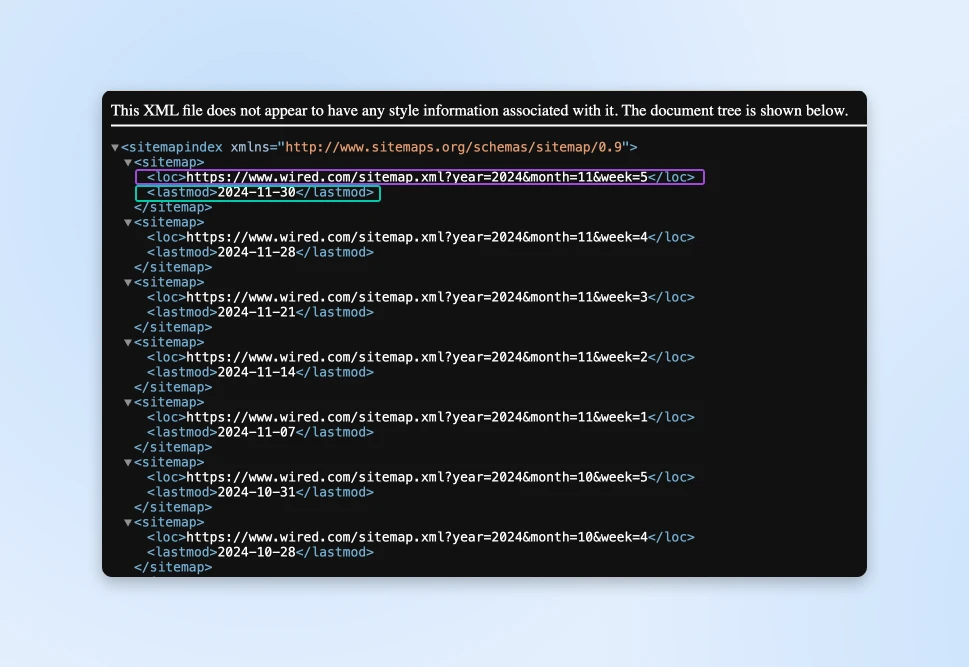
Here’s what a sitemap looks like:
When you add a new product page, publish a blog post, or update your service offerings, you need Google (and other engines) to find and index that content as quickly as possible.
Index
An index is a computer-generated list of every page on a website that can be accessed by a search engine. It is created by web crawlers and used by search engines to find pages when users type in queries.
Read MoreWhat Does a Sitemap Include?
Your XML sitemap tells Google four important things about every page.
1. Location (loc)
This is the URL of the page, and this needs to be the full URL.
<loc>https://www.dreamhost.com/products/blue-widget</loc>2. Last Modified Date (lastmod)
A timestamp showing when content was updated.
Microsoft’s Bing team emphasizes that including the lastmod tag is “crucial” for effective crawling.
Google specifically looks for meaningful updates.
According to their documentation, “Google uses the <lastmod> value if it’s consistently and verifiably (for example, by comparing to the last modification of the page) accurate.”
<lastmod>2024-11-30T14:30:00+00:00</lastmod>Google also explains how to view lastmod dates for page updates:
“The value should reflect the date and time of the last significant update to the page. For example, an update to the main content, the structured data, or links on the page is generally considered significant; however, an update to the copyright date is not.”
3. Change Frequency (changefreq)
How often the content typically updates. Here are some example values:
- For your homepage: “daily” or “always”
- For product pages: “weekly”
- For blog posts: “monthly”
- For about pages: “yearly”
- Misc pages: “never”
<changefreq>weekly</changefreq>4. Priority (priority)
The relative importance compared to other pages. This value can range from 0 to 1:
- Homepage: 1.0
- Main category pages: 0.8
- Product pages: 0.6
- Blog posts: 0.4
- Archive pages: 0.2
<priority>0.8</priority>Does Your Website Need an XML Sitemap?
We’d highly recommend you create a sitemap for your website. While most people would suggest having a sitemap only if you have:
- “A really large website”
- “Websites with a large archive”
- “A new website with just a few links pointing to it”
- “A website which uses rich media content”
Google maintains that with proper internal linking, their crawlers should find your content naturally.
The reality? Most websites don’t achieve perfect internal linking structures. Every modern website benefits from having an XML sitemap.
Here’s why:
The internet grows more complex each day, making proper site indexing increasingly challenging. You should try to provide search engines with every possible detail to help them find your content.
XML sitemaps don’t just help with discovery; they make the entire crawling process more efficient and help make optimum use of the crawl budget.
What Pages Should You Add to the Sitemap?
Your website contains two distinct types of pages.
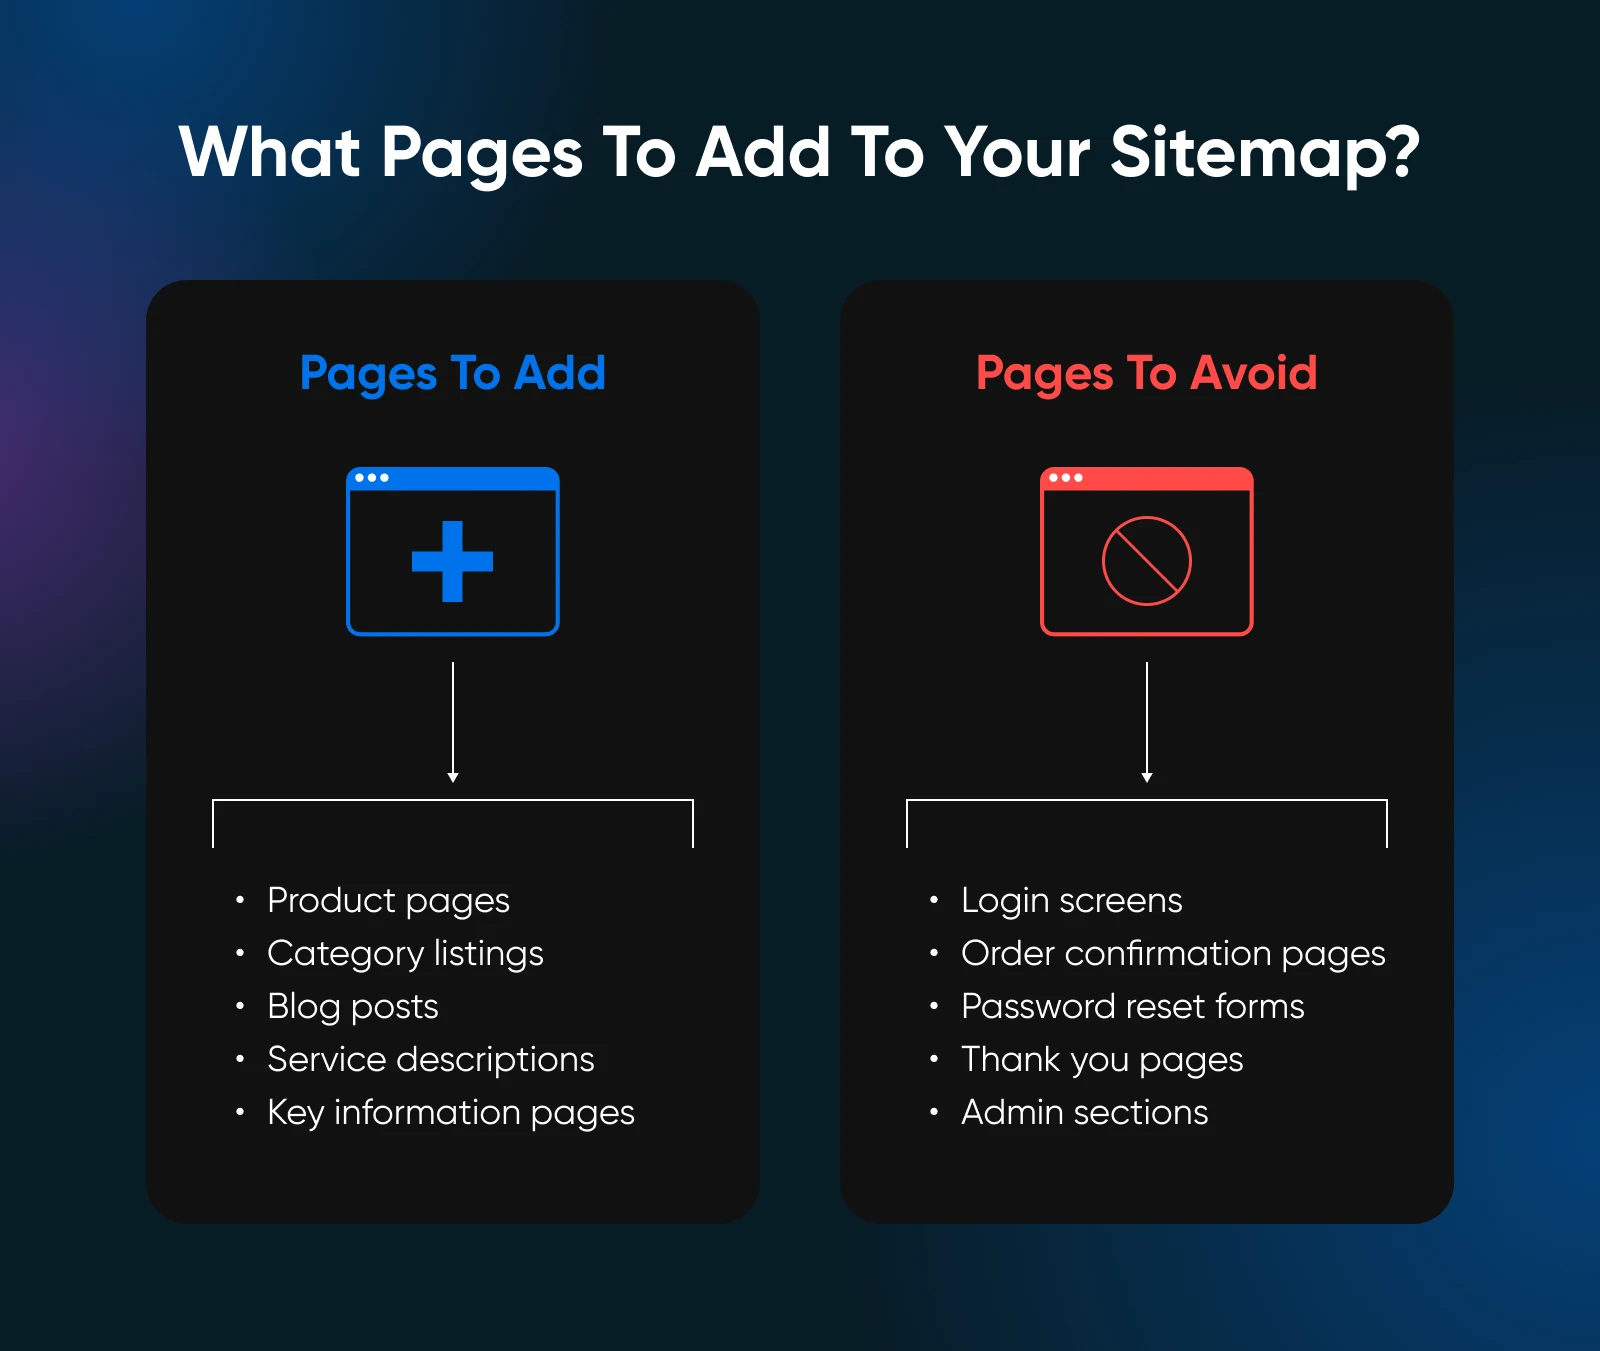
1. Search landing pages
Pages users should find through search:
- Product pages
- Category listings
- Blog posts
- Service descriptions
- Key information pages
2. Utility pages
Pages that serve a function but shouldn’t appear in search:
- Login screens
- Order confirmation pages
- Password reset forms
- Thank you pages
- Admin sections
Your XML sitemap should only include the search landing pages. Including utility pages dilutes your site’s perceived quality and wastes valuable crawl resources of the search engine.
How To Create XML Sitemaps?
You have several options for creating XML sitemaps, ranging from manual creation to automated solutions.
Let’s start with the simplest approaches and move to more advanced methods.
Manually Creating a Sitemap
For small static websites, you can manually create your XML sitemap using any text editor.
Create a new file called “sitemap.xml” and use this basic structure:
<?xml version="1.0" encoding="UTF-8"?>
<urlset xmlns="http://www.sitemaps.org/schemas/sitemap/0.9">
   <url>
      <loc>https://www.yourwebsite.com</loc>
      <lastmod>2024-01-01</lastmod>
   </url>
</urlset>
Add a new <url> block for each page you want to include. While this method works for small sites, it becomes impractical as your website grows.
Automated Solutions for WordPress Sites
If you run a WordPress website, you already have several powerful SEO tools:
- All in One SEO: Offers comprehensive sitemap features, including custom post type support and automatic priority calculation based on content age and type. Access your sitemap at “yourdomain.com/sitemap.xml.”
- Yoast SEO: The most popular choice for WordPress sitemap generation. After installation, your sitemap is generated automatically at “yourdomain.com/sitemap_index.xml.” You can control which content types appear in your sitemap through the plugin’s settings.
- Rank Math: Offers similar functionality to Yoast but includes additional features like Google News sitemaps and video sitemaps. Your sitemap will be available at “yourdomain.com/sitemap.xml.”
- WordPress Core: Since version 5.5, WordPress includes basic sitemap functionality. However, most SEO professionals prefer dedicated plugins for their additional control and features.
Solutions for Non-WordPress Websites
If you used another platform to build your website, they likely have a built-in solution for creating these sitemaps.
If you don’t use a platform and have built a fully custom website, you’ll need to rely on an external sitemap generator and upload the auto-generated sitemap to your web server at regular intervals.
Here are a few good sitemap generators:
- XML-Sitemaps.com: Upload your site structure or let it crawl your website to generate a sitemap.
- Screaming Frog: Crawls your website and creates a sitemap based on your specifications.
- Sitebulb Website Crawler: Streamlines XML sitemap creation with powerful insights to optimize site structure.
How To Submit Your Sitemap to Google
Generating your sitemap marks only the beginning of the process. You need to tell Google where to find it.
While Google might eventually discover your sitemap through your robots.txt file, direct submission through Google Search Console speeds up the process significantly.
Before You Submit
First, ensure your sitemap actually works. A broken sitemap wastes Google’s time and yours. Visit “yourdomain.com/sitemap.xml” in your browser. You should see a properly formatted XML file, not an error page.
Pro Tip: If you see garbled text, don’t worry — that’s normal. XML files often look messy in browsers. The important part is that you can see your URLs listed.
Submitting Through Google Search Console
- Log into Google Search Console.
- Select your website property.
- Navigate to the Sitemaps section from the left sidebar.
- Enter your sitemap URL in the “Add a new sitemap” field and click SUBMIT.
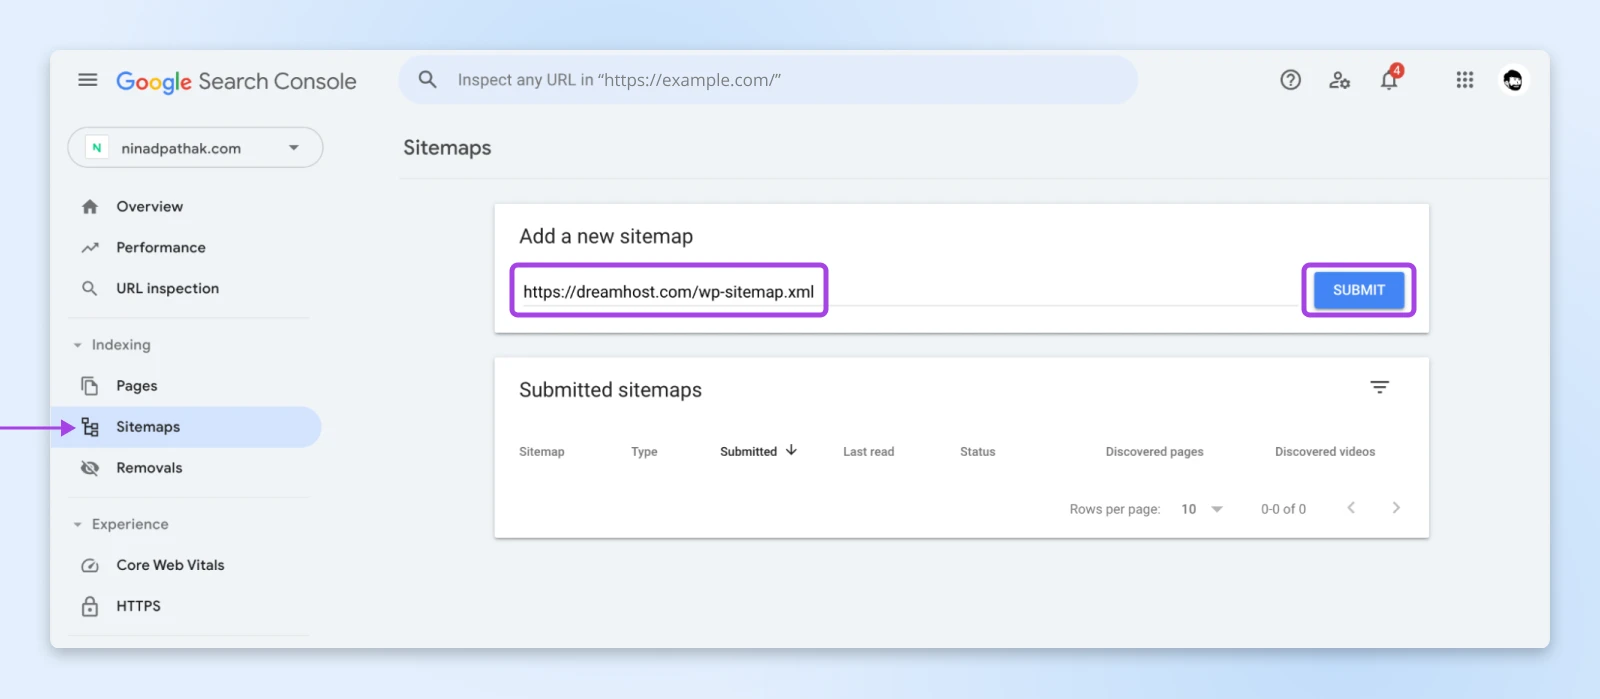
Depending on if you have a domain property or URL prefix, you’ll either need to enter the full URL or just the part after your domain.
For instance, in the above image, you see that we entered the full URL since it’s a domain property.
Here’s what it looks like for a URL prefix property — here, you only need to enter the part after the domain name:

You’ll typically store the XML sitemap as “https://yourdomain.com/sitemap.xml” or “sitemap_index.xml.”
Google will immediately check your sitemap for basic errors. You’ll see one of these status indicators:
- Success: Google can read your sitemap correctly.
- Couldn’t fetch: Google couldn’t access your sitemap.
- Couldn’t read: Google found your sitemap but couldn’t process it.
Understanding the Sitemap Report
Once submitted, Google Search Console shows you:
- How many URLs you’ve submitted.
- How many URLs Google has actually indexed.
- The last time Google read your sitemap.
Important: Don’t panic if the number of indexed URLs differs from submitted URLs! Google doesn’t index pages just because they’re in your sitemap — remember, it’s a suggestion, not a command.
Multiple Sitemaps
For larger websites, you might have several sitemaps:
- Product sitemap
- Blog post sitemap
- Category sitemap
- Image sitemap
Submit each one separately to help Google understand your site structure better and to make tracking indexation issues easier.
Submitting Your Sitemap to Bing
While Google dominates the search landscape, smart SEO professionals know the value of diversifying their search engine presence. Bing captures a significant portion of search traffic, especially in certain demographics and regions. Plus, their webmaster tools often provide unique insights you won’t find elsewhere.
You’ll notice that when you click on “Add new site”, it gives you two choices – “Import your sites from GSC,” or “Add your site manually.”
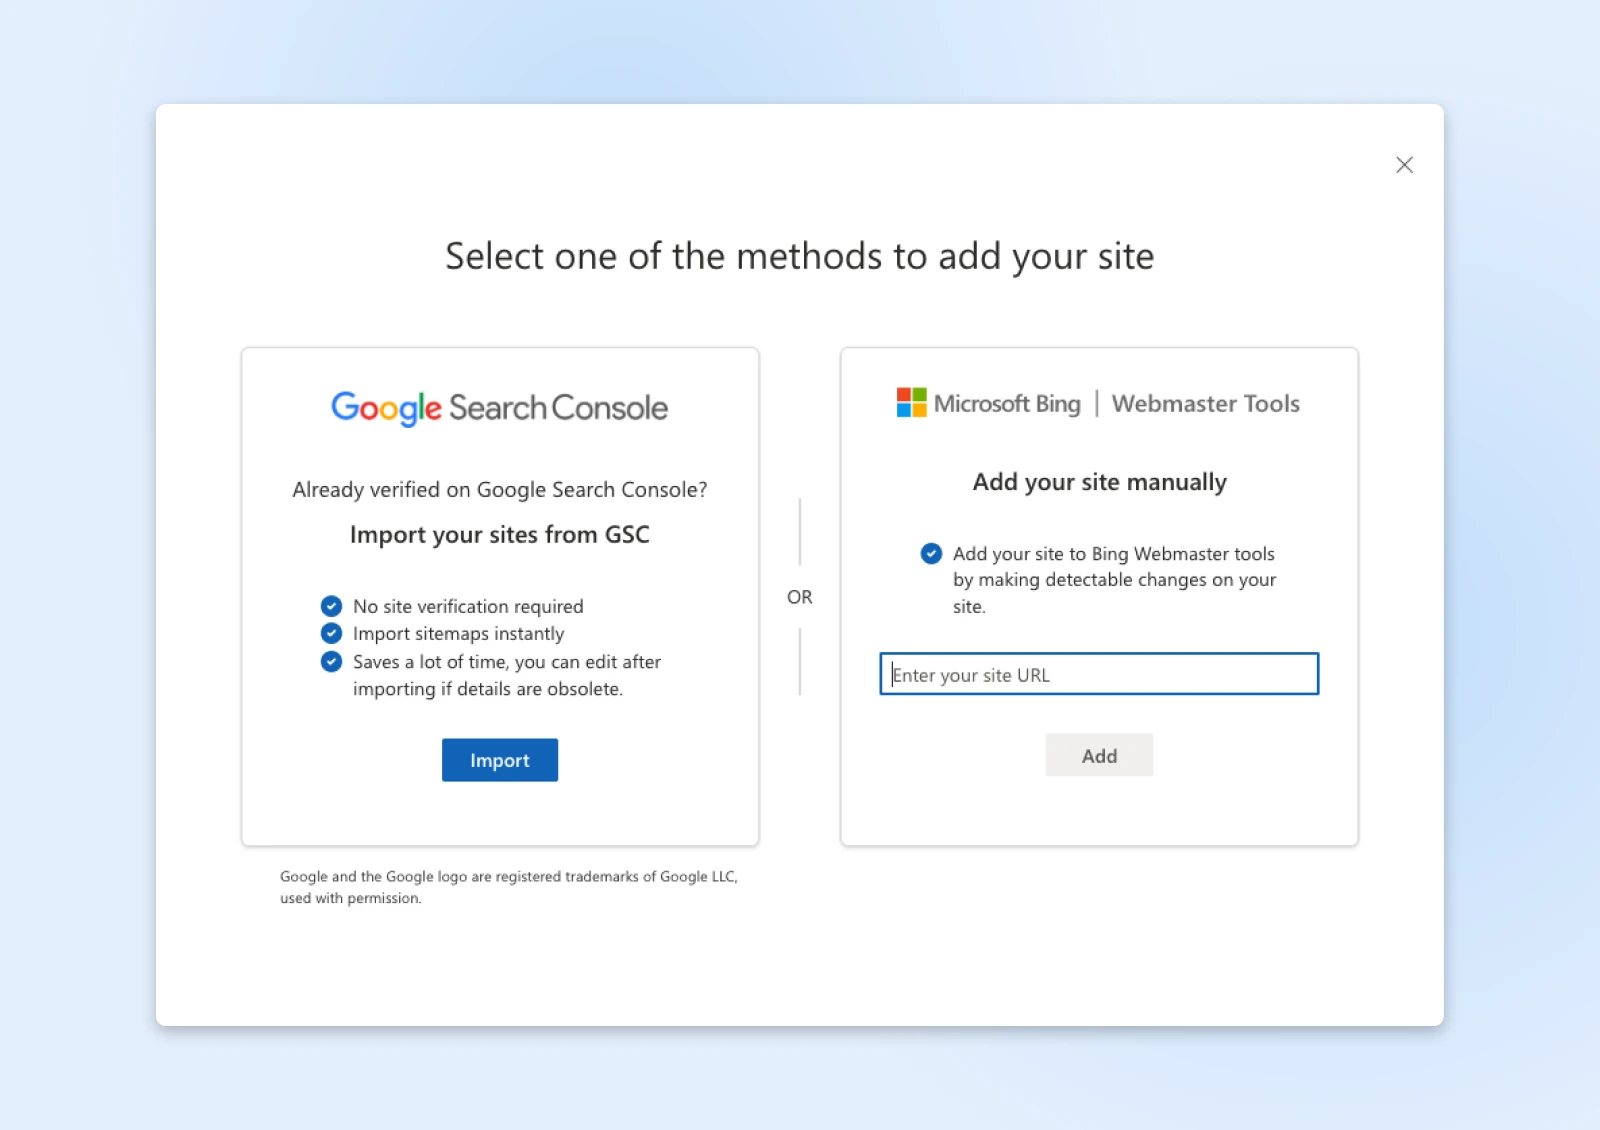
Importing Websites From Google Search Console
Already verified your site in Google Search Console? You’re in luck! Bing offers a streamlined import process that can save you valuable setup time.
- Head to Bing Webmaster Tools.
- Click Import from Google Search Console.
- Follow the authentication steps.
- Watch as your site details, including sitemaps, transfer automatically!
Manual Site and Sitemap Submission
For those starting fresh or preferring manual control, Bing’s direct submission process proves straightforward:
- Navigate to Bing Webmaster Tools.
- Choose Add your site manually.
- Enter your site’s URL.
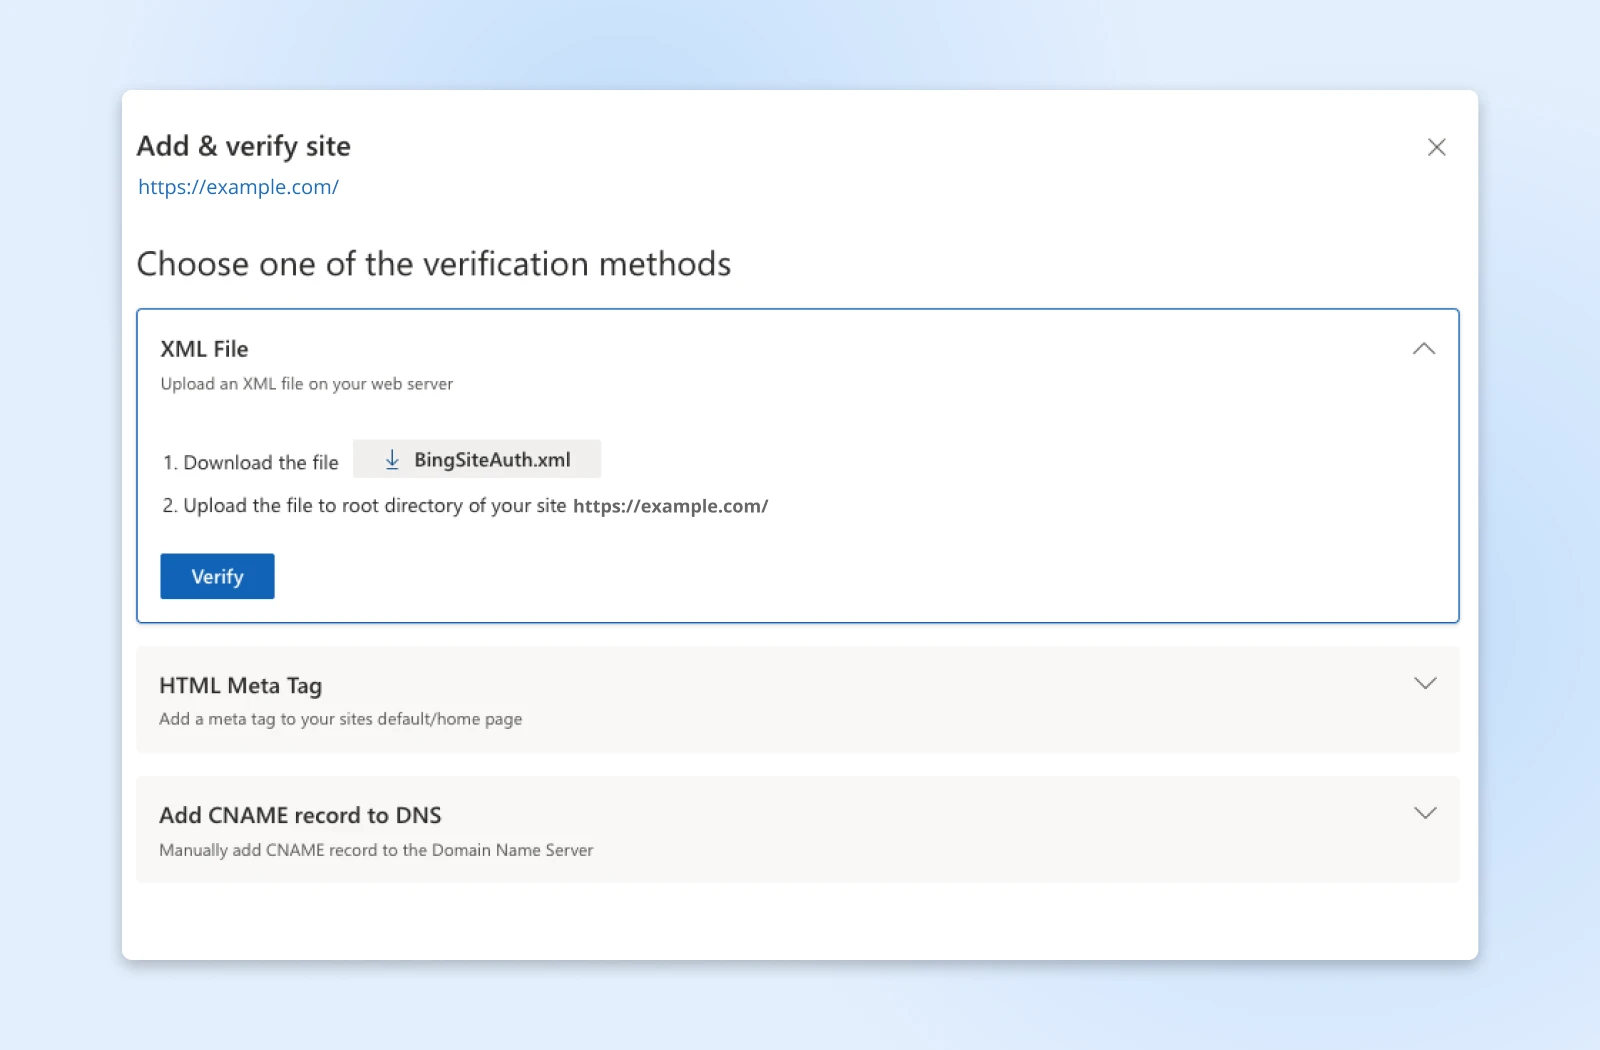
- Verify ownership through your preferred method:
- Upload an XML file.
- Add a meta tag.
- Add a CNAME record.
Head to Sitemaps from the left sidebar and then click Submit sitemap.
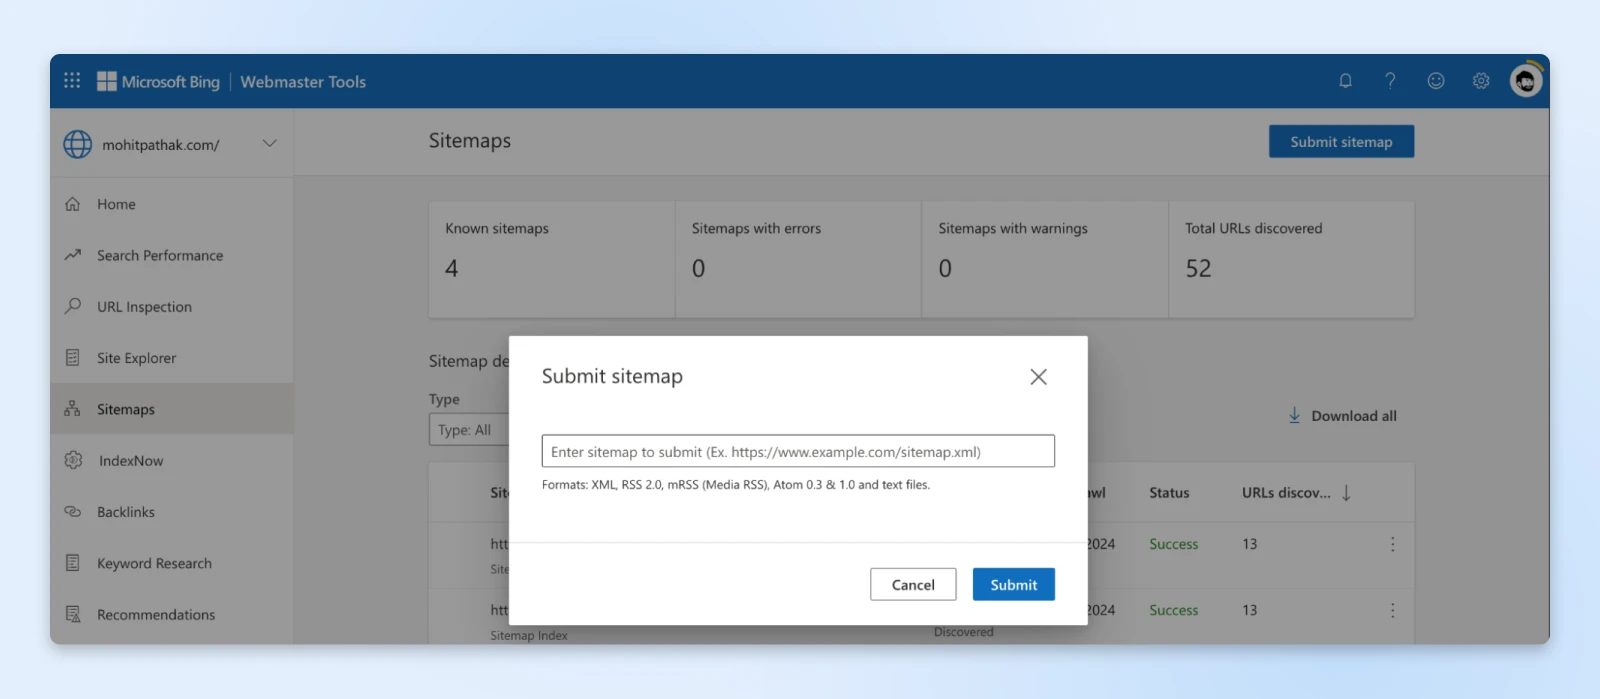
Finally, add the full sitemap XML and click Submit.
Common Submission Errors
For Bing Webmaster tools, you just see the word “Error” or “Success,” and clicking on the row will give you more details about the error.
For Google Search Console, however, you’ll see errors right there.
If you get “Couldn’t fetch,” check whether:
- Your sitemap URL is correct.
- Your website is accessible.
- Your robots.txt file isn’t blocking the sitemap.
If you get “Couldn’t read,” verify that:
- Your XML syntax is valid.
- You’re using the correct XML schema.
- The file isn’t compressed or corrupted.
After Submission
Monitor your sitemap status regularly. Pay attention to:
- Sharp drops in indexed pages.
- Growing gaps between submitted and indexed URLs.
- Warning messages in the sitemap report.
Remember: Submitting your sitemap to Google represents an ongoing process, not a one-time task. Keep monitoring and updating as your website grows and changes.
Common Myths About XML Sitemaps
Let’s clear up some persistent misconceptions about XML sitemaps and their role in search engine optimization.
Myth 1: Sitemaps Ensure Indexing on Google
Many website owners believe submitting a sitemap means automatic indexing. But adding pages to your sitemap doesn’t guarantee Google will include them in search results.
Google’s algorithm decides what to index based on many factors, including page quality, uniqueness, and overall value to users. Your sitemap only serves as a gentle suggestion to Google saying, “Hey, these pages are worth your attention.”
Much like adding a page to your main navigation menu, it’s one of many signals Google uses to understand your site’s structure and content hierarchy.
Myth 2: Every Page Should Be in Your Sitemap
Often, website owners add their entire site structure into their sitemap, thinking more is better.
Your sitemap should only include pages you genuinely want users to find through search. Try to maintain its size under 50,000 URLs and keep file sizes below 50MB uncompressed.
UTF-8 encoding also helps search engines read your sitemap correctly, while proper XML formatting prevents parsing errors that could derail your efforts.
The thing is, if you start including login pages, thank you pages, or duplicate content; it indicates to Google that you don’t understand what content actually matters to users.
Think of your sitemap like a restaurant menu. You wouldn’t list the kitchen, storage room, or staff bathroom — you only show what customers could order.
Myth 3: Update Frequency Doesn’t Matter
Sitemaps are living documents.
Even if manually updating them seems like a chore, you need to use some form of automation to auto-update the sitemap with any newly published pages that matter to you.
Outdated sitemaps containing deleted pages or missing new content can actually harm your site’s crawling efficiency. Google’s crawlers waste valuable time checking non-existent pages while potentially missing your fresh content.
Your sitemap should reflect your website’s current state, just like a map needs to show current roads and landmarks to be useful.
Myth 4: All XML Tags Are Equally Important
Many spend time perfecting their changefreq and priority values, thinking they significantly influence Google’s behavior.
The URL location (loc) and last modified date (lastmod) are the only two required elements of your XML sitemap. The other tags provide context but don’t directly impact crawling or indexing decisions.
So, focus your energy on maintaining accurate URLs and last-modified dates, and you can completely skip worrying about priority and change frequency.
Final Thoughts
Your XML sitemap tells a story about your website’s organization and priorities. So, make it worth the search engine’s time to read and process it.
And here’s one thing to take away: quality beats quantity here. A focused sitemap of your best pages outperforms a cluttered directory of everything you own.
Want to nail the technical foundation of your website?
Dreamhost’s managed WordPress hosting handles the complexities while you focus on what matters — creating content your audience loves.
This page contains affiliate links. This means we may earn a commission if you purchase services through our link without any extra cost to you.
The post Is Your Website’s XML Sitemap (or Lack Thereof) Holding Your Site Back? appeared first on DreamHost Blog.
]]>The post Disconnected Again? How To Fix the ERR_INTERNET_DISCONNECTED Error and Get Back Online appeared first on DreamHost Blog.
]]>You just completed a critical update that needed to go live before midnight. You’re amazing, brilliant, you did it!
You hit Publish with relief.
And then…disaster strikes.
Your browser serves up the Chrome dinosaur game — and suddenly that midnight deadline feels very, very close.
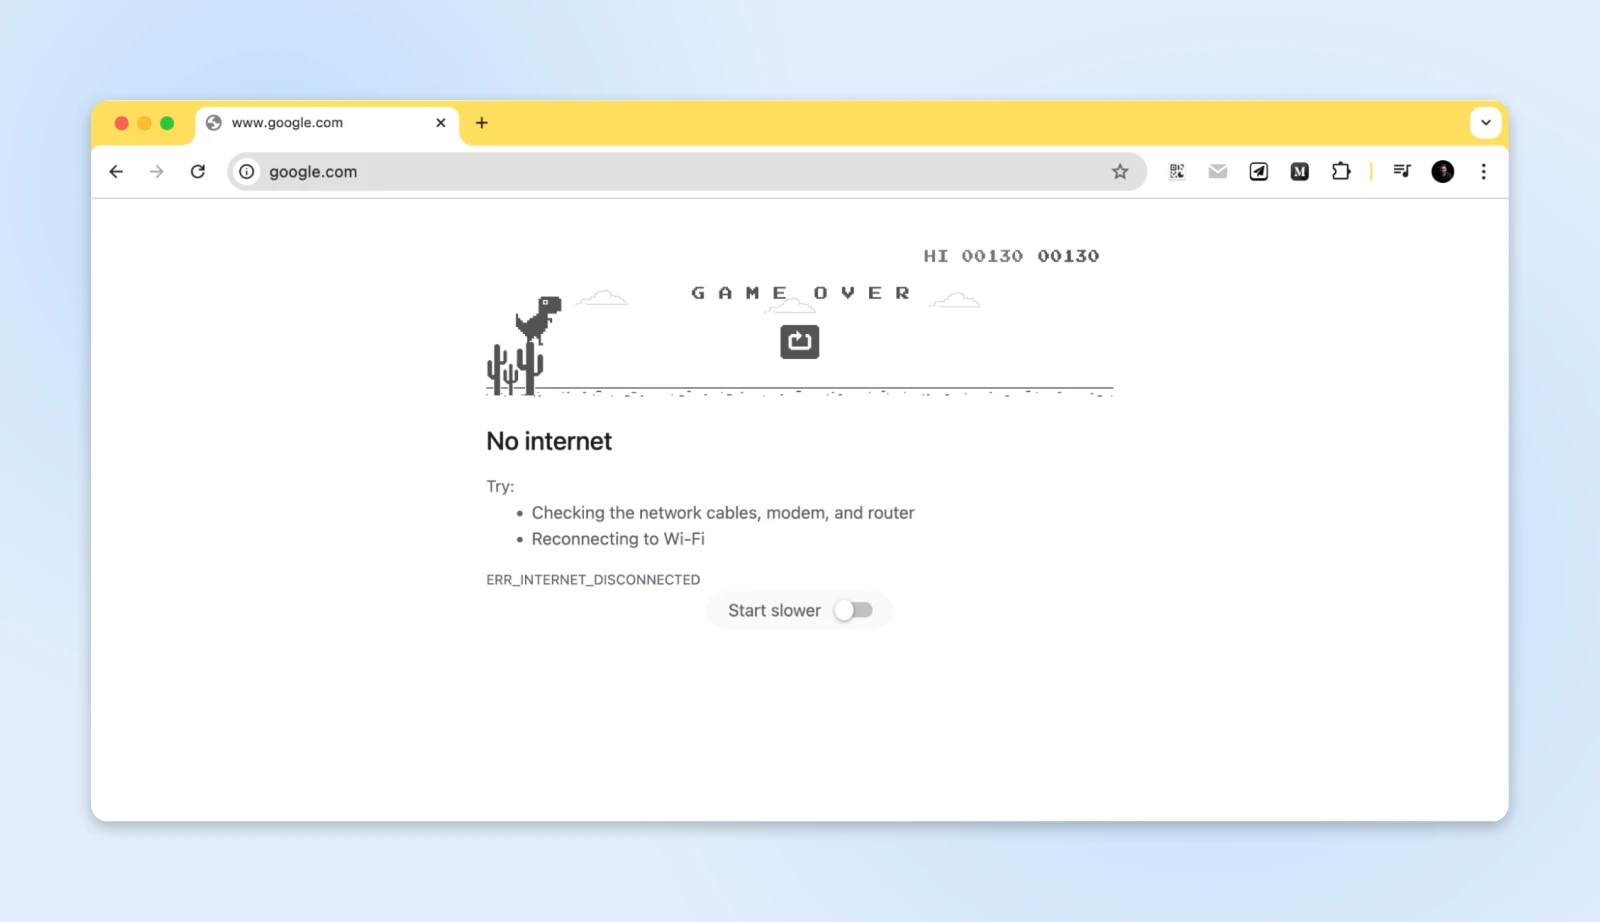
While jumping over internet cacti can be fun, the ERR_INTERNET_DISCONNECTED error when you need internet access feels like getting betrayed by the a constant presence in your life — your internet provider.
Don’t worry though; you’re not alone.
Almost everyone has had these moments, and the good news is that this is easily fixable.
Let’s get you back online!
First, What Is ERR_INTERNET_DISCONNECTED?
If you already know what’s happening, skip right to “How do you get back online?”
When browsers display the ERR_INTERNET_DISCONNECTED message, they’re telling us that our device has lost its connection to the internet.
You can think of it as a delivery truck attempting to transport packages, only to find that all the roads out are blocked.
The truck (your browser) wants to move data, but the roads (internet connection) are inaccessible. Different browsers handle the internet disconnected error differently, too.
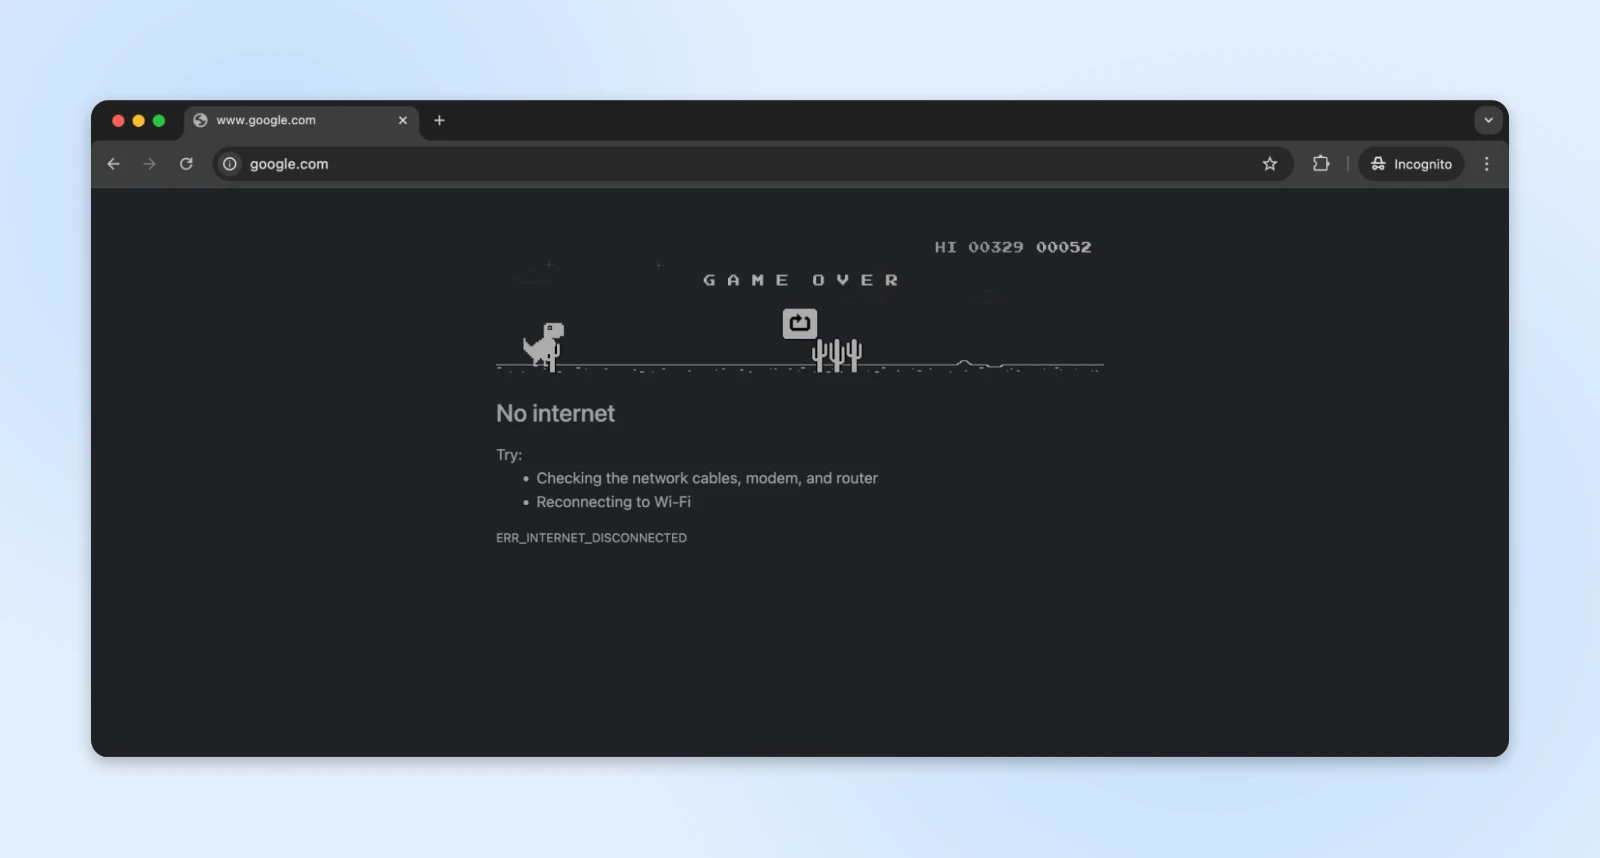
Chrome introduces its famous dinosaur game, a playful nod to times before internet connectivity.
Microsoft Edge has a fun surfing game.

Firefox too has a cute little ping pong-styled game that can be run when the browser has no internet connection.

Safari maintains its minimalist aesthetic with a simple alert.
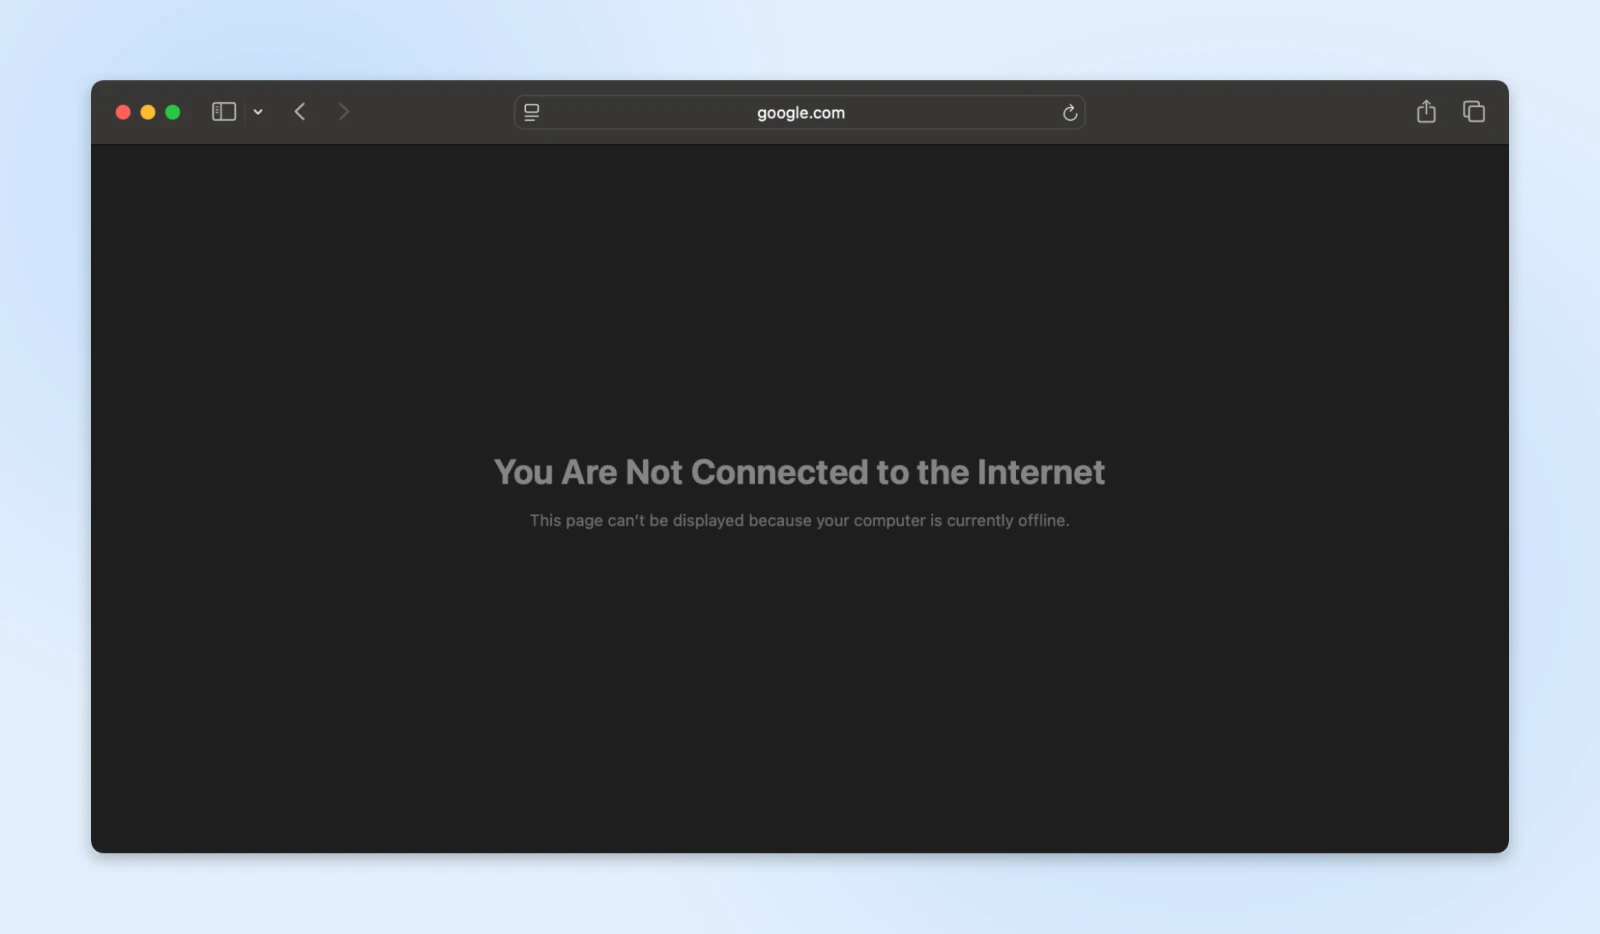
Despite their different presentations, each browser communicates the same fundamental problem — your device can no longer reach the internet.
Why Did You Get Disconnected?
Network connections operate through a complex chain of components working together.
If these get disrupted, the ERR_INTERNET_DISCONNECTED error shows up on your browser window.
Here’s a typical home network setup.
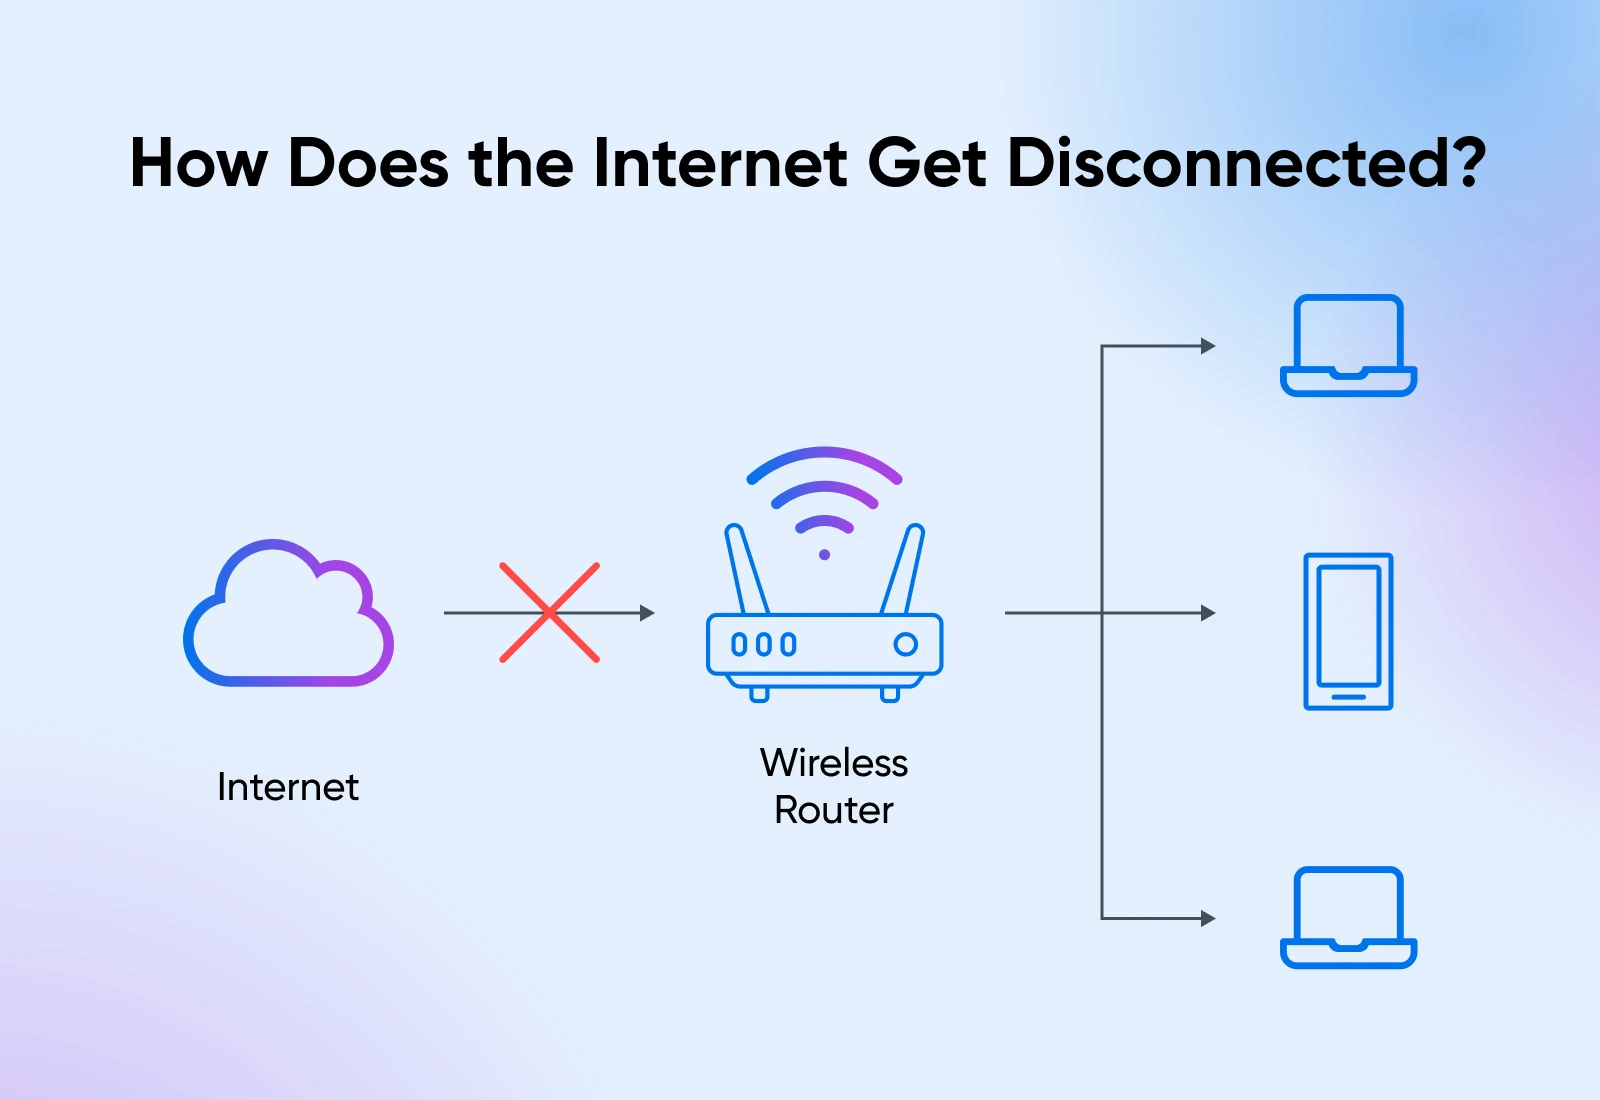
You have the WiFi router connected to the internet, and every device in your house connects to the WiFi router.
BTW, your office network is quite similar. There just are more devices and more routers working together to connect to the internet in an office setup.
There are generally two reasons why you’d get disconnected from the internet:
- Your connection to the router is broken; WiFi disconnects or the wire comes loose.
- The router’s connection to the internet (the cloud) is broken. This is generally out of your control.
Physical connection issues are often the first things you want to check. A cable might have worked itself loose during office cleaning, or for WFH folks, perhaps a pet pulled it loose.
Here’s what you need to do to get back online.
How Do You Get Back Online?
When your internet connection fails, your first instinct might be to try everything at once — unplugging cables, restarting devices, checking settings — all in rapid succession.
While this panic-driven approach is completely understandable, especially with a deadline looming, it rarely solves the problem. In fact, making random changes often creates new issues that mask the original problem.
Instead, we’ll think of it as a detective story.
Every lost connection has clues pointing to its cause, and like any good detective, we’ll examine each piece of evidence systematically.
Let’s walk through the investigation process step by step, checking each potential trouble spot until we uncover the culprit behind your disconnection.
Step 1: Assessing the Physical Infrastructure
You know that moment when your phone isn’t charging and someone asks, “Is it plugged in?”
It might seem obvious, but even the professionals sometimes overlook the simple stuff.
Walk over to your setup and follow the cables from your computer to your router. Give each cable a gentle wiggle. Sometimes they look connected but aren’t clicked in all the way.
Keep an eye on your network indicator while you do this because it might spring back to life right as you adjust the right cable!
Check the power cables next.
They tend to loosen over time, especially if your desk gets bumped occasionally. Take a quick look at each power cable for any loose connections or wear and tear (especially if you have cats– check for bite marks. I speak from experience.)
Watch for any power cables showing wear marks or unusual bending — these indicate potential points of failure requiring replacement.
Quick Fix:
Found something loose or worn?
- Push loose cables back in firmly; they should click securely.
- Test your connection after fixing each cable.
- Consider labeling the troublesome cables for future reference.
- Get IT help (or grab a new cable at home) if you spot damage.
Still offline? Let’s move to Step 2.
Step 2: Equipment Status Evaluation
Your router uses lights to tell you what’s wrong, kind of like a car’s dashboard.
The power light is your first clue: green means good, blinking suggests power problems, and no light means it’s not getting power at all.
The internet light (or WAN–Wide Area Network) is your connection indicator.

- Rapid blinking = active internet.
- Slow blinking = trying to connect.
- Solid light = might be frozen.
- No light or red light = lost connection.
Some routers have different blinking styles and light colors, which will be specified in the manual.
Quick Fixes:
- Try a different power outlet.
- Use a spare power adapter if you have one.
- Take a photo of the lights – This is really helpful for IT support.
Step 3: The Strategic Reset Process
Instead of just flipping the switch, we’ll use a much more effective method to restart your network.
This is pretty much a reboot but gives the router time to completely power down, delete all cached data from memory, and start fresh.
Here’s how:
- Document your current setup. Photograph or note your router’s position and cable connections. There’s nothing worse than unplugging everything, just to realize you have no idea where to plug it back in.
- Disconnect power from both modem and router, starting with the router.
- Wait a full 30 seconds. This critical pause allows internal components to fully discharge.
- Unplug all ethernet cables and reconnect them firmly, ensuring proper clip engagement.
- Reconnect your modem’s power supply.
- Allow exactly two minutes for modem initialization and connection establishment.
- Power up your router.
- Wait three full minutes for complete system initialization.
- Verify indicator lights show proper operation patterns.
If you’re still stuck with no internet connectivity, move on to step 4.
Step 4: Verify Connection
After completing the power cycle, systematically verify each connection layer.
Open your device’s network panel and look for your network name. If it’s missing or showing weak signal bars, try getting closer to your router.
Quick Tests:
- Try connecting with a cable if possible.
- Test with your phone to rule out computer issues.
- Check if others around you have the internet.
Here’s how you can check if your computer has connected to the network or not:
Open your device’s network settings panel. Your network should appear in the available connections list. Here’s what it looks like when my laptop is connected to WiFi, but everything else is disconnected.
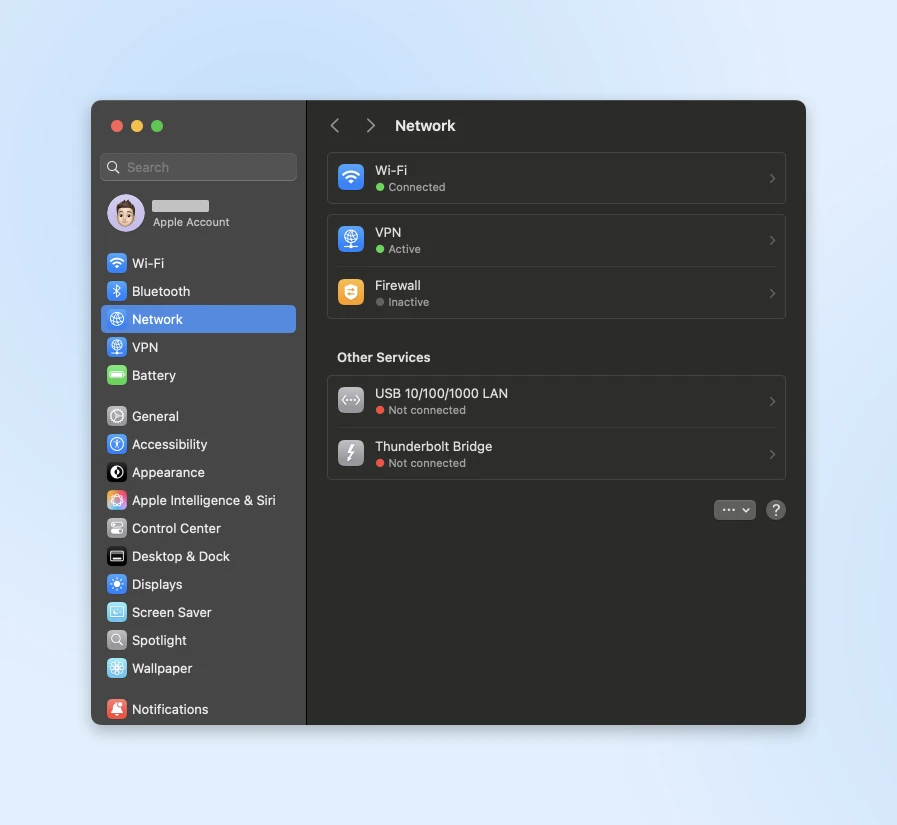
If your device isn’t picking up any networks, your router might not be broadcasting properly.
If your laptop supports it, try connecting to the internet with a wired ethernet connection. This helps rule out any wireless issues.
Also, check the WiFi signal strength with the WiFi Analyzer app; if it’s weak, you might need to reposition your router or check for interference.
You can also perform the WiFi signal strength check on your laptop with:
- Windows – WiFi analyzer
- Mac – Ultra analyzer
If you can connect with ethernet but not wireless, then you know the problem is with your wireless setup. Try connecting wirelessly from different spots and see if the signal strength changes.
Still no luck? Let’s move on to Step 5.
Step 5: Advanced Diagnostics
If nothing has worked so far, we need to dig a bit deeper. We’ll use some built-in tools to see exactly where the connection’s breaking down.
Quick Fixes:
Open Command Prompt (Windows) or Terminal (Mac) and type ping 8.8.8.8 to test the internet connection:

If that fails, contact your internet provider.
If it works but websites don’t, try changing your DNS to 8.8.8.8 (Google) or 1.1.1.1 (Cloudflare).
Remember: Every internet problem has a solution. If you’ve tried all the steps and still need help, don’t hesitate to call your IT support or internet provider.
They’ll appreciate knowing you’ve already tried these steps, and it will help them solve your problem faster!
Preventing Internet Disconnected Error
You need to do a few things to make sure you don’t lose your connection. Let’s look at each of these steps in more detail.
Smart Router Placement
Router placement often becomes an afterthought in busy offices.
The device gets hidden behind plants or stuffed under desks for aesthetic reasons. However, router location directly impacts video call quality, cloud file access speeds, and overall team productivity.
Remember the WiFi analyzers we talked about before? Any of those can reveal where you’re receiving the maximum network and where the WiFi strength gets weak enough to be disconnected.
You can also create a heat map of your WiFi signal.
For office setups (and even large homes), heatmaps tell you where your signal strength starts dropping so you can add WiFi repeaters, extenders, or signal boosters until you see full coverage across the area of your office.

Often, moving a router just 15 feet above the ground can dramatically improve coverage. The most effective position tends to be mounted 6 feet up on a central wall, as WiFi signals travel downward in a dome shape.
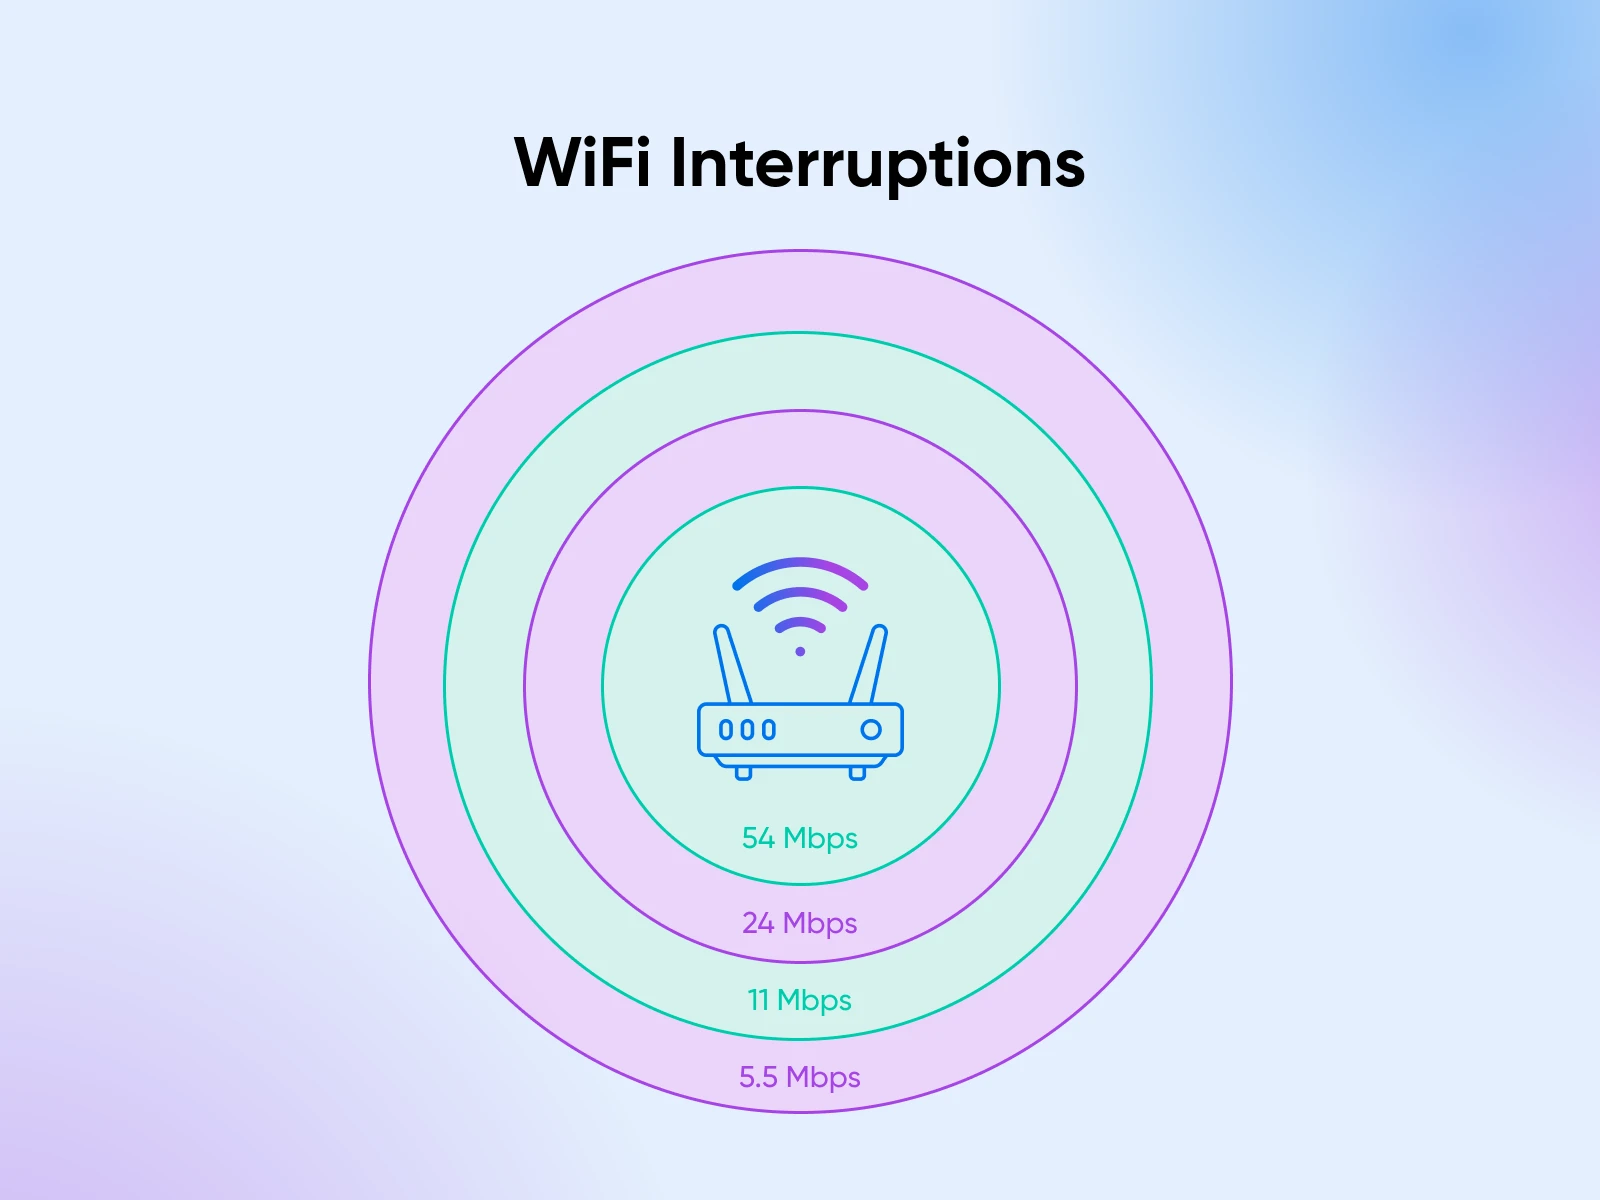
But it’s less common for the router to have a consistent signal throughout its range. Common office items can disrupt WiFi signals in surprising ways:
- Microwave ovens can disrupt 2.4GHz signals.
- Cordless phones may share frequency bands.
- Metal filing cabinets create signal shadows.
- Neighboring networks compete for bandwidth.
Find ways to isolate this interference or strengthen your WiFi signal by placing more devices on the floor.
Create a Maintenance Schedule
Just as vehicles need regular maintenance, network infrastructure requires consistent attention. Your IT department probably has this on lockdown, but here’s an example of what a maintenance schedule would look like, so you can appreciate all their hard work:
- Monthly checks should occur during off-peak hours, typically early in the morning before regular business operations begin.
- Run speed tests from every department.
- Clear dust from equipment (compressed air works wonders).
- Check cable connections (they loosen over time).
- Update network documentation.
- Quarterly assessments provide opportunities for deeper system evaluation.
- Comprehensive speed testing with detailed mapping.
- Equipment inspection (looking for wear signs).
- Review and update emergency contact lists.
- Team training refreshes on basic troubleshooting.
- Firmware management deserves special attention. Outdated firmware can lead to major outages, while proper tracking and testing of updates helps maintain stable performance.
- Track firmware versions in a shared spreadsheet.
- Review update notes before installing.
- Test updates on backup equipment first.
- Keep detailed logs of performance changes.
Backup Connections Planning
A robust backup strategy protects businesses from costly interruptions. Here’s how you can think about planning your backup connections:
- Primary connection: Maintain a business-class internet service with guaranteed service levels and priority support. Also, create direct contact with service provider technical support to avoid customer service channels during outages.
- Backup systems: Along with this, we’d recommend having a secondary cable connection from a different provider for redundancy.
- Mobile hotspots: If keeping a secondary connection active costs too much at your business stage, mobile hotspots can do the job just fine considering how fast mobile internet is these days. But keep running trials every few weeks with all your internet out and just the mobile hotspots to ensure people on the team can handle an outage.
- Emergency response: Create detailed procedures for connection failures:
- Diagnostic steps for common problems.
- Contact information for support services.
- Alternative workspace arrangements.
- Customer communication templates.
A final resort would be to stay connected with local co-working spaces as emergency workspaces when needed for business continuity.
Documentation and Training
Technical documentation should be clear and actionable.
A centralized guide containing network diagrams, equipment information, and troubleshooting steps helps staff resolve common issues independently.
Maintain comprehensive network documentation such as:
- Network topology diagrams.
- Equipment specifications and warranties.
- Configuration backups.
- Maintenance logs.
- Update histories.
Train team members on basic troubleshooting procedures. Create quick-reference guides for common issues. Clear escalation procedures help staff identify when to handle issues themselves and when to seek additional support.
More Than Just Connection Problems
While we’ve focused on internet disconnection errors, you might run into several other errors that prevent access to websites.
Sometimes your browser and server just aren’t speaking the same language.
Each of these guides walks you through fixing the problem step by step. Bookmark them for those moments when things aren’t working quite right — they’ll help you get back on track quickly!
- The 400 Bad Request Error pops up when something’s wrong with how your browser asks for information — maybe a mistyped URL or some cookie problems.
- You might also see ERR_CONNECTION_RESET when your connection drops mid-conversation with the server. These connection hiccups can be particularly frustrating when you’re in the middle of important work.
- Form submissions can be especially tricky. Ever filled out a long form only to lose everything when you hit submit? That’s often related to ERR_CACHE_MISS Errors. They’re particularly annoying when trying to save important information or make a purchase.
- WordPress users face their own set of challenges. The “Maximum Execution Time Exceeded” message might appear when trying to install a new plugin, or you could run into WordPress image upload issues while updating your site’s media library.
- Sometimes the problem lies within the server itself. A 504 Gateway Timeout means the server’s taking too long to respond, while a 503 Service Unavailable error suggests it’s too busy or down for maintenance. These server issues usually resolve themselves, but our guides can help you understand what’s happening and what you can do about it.
Ready for Any Internet Adventure
Network problems never arrive at convenient times. That dinosaur game might be fun, but not when you’re facing a critical deadline or in the middle of an important task.
The key isn’t avoiding every possible problem but knowing what to do when they occur.
Keep this guide handy, save your ISP’s number somewhere offline, and know that every connection issue has a solution.
And when in doubt, explore our guides on common website errors and management tips.
Sign up for our newsletter to be notified about new tutorials when they’re published. We may not be able to every internet hiccup, but we can sure help you handle them like a pro.
The post Disconnected Again? How To Fix the ERR_INTERNET_DISCONNECTED Error and Get Back Online appeared first on DreamHost Blog.
]]>The post We Tested 5 of the Hottest AI Video Generators, These Were Our Result appeared first on DreamHost Blog.
]]>Forget Hollywood budgets and film crews; anyone can make good video content using generative AI. Yes, that includes small business owners like you!
Of course, there’s still a learning curve. Writing good text prompts is a skill, and AI video makers vary widely in features, style, usability, and price.
Navigating this world can seem daunting if you’re not a creative professional. That’s why we decided to compile an accessible guide.
Stick with us for the next few minutes to learn about the benefits of AI-generated video, and find out how we rank the best AI video generators in 2024.
You ready, Spielberg? Let’s dive in!
How Small Businesses Can Benefit From AI Video Generation
One of the biggest challenges for small businesses is being seen. While multinationals can throw millions at content and ads, smaller brands have to find cost-efficient ways to stand out.
In some ways, AI video tools are helping to close the gap.
With relatively little investment, business owners and marketers can now —
- Turn text prompts into short video clips: Text-to-video AI models can magic up content based on your written requests, meaning you don’t need the help of creative professionals to produce simple videos.
- Convert images into videos: Adding motion to an existing photo is a great way to catch the eye of potential customers.
- Extend and edit existing videos: Many AI tools can extend an existing clip or assist you with intelligent video editing. In both cases, you’re likely to save time.
- Build AI avatars: Don’t have time to record an endless list of videos in front of a camera? With some AI video creation tools, you can build a controllable avatar by uploading one short clip. It’s kinda like turning yourself into a game character!
Put together, these AI features open up a wide range of use cases. Here are some examples of video content you can create using AI:
- Product demos: Showcase your products in action, with engaging visuals and snappy descriptions.
- Explainer videos: Simplify complex concepts or services with easy-to-understand animations and voiceovers.
- Video tutorials: Guide your audience through a process, like using your product or troubleshooting a common issue.
- Promotional videos: Highlight special offers, discounts, or new product launches to drive sales.
- Social media content: Create short, eye-catching videos optimized for different platforms like TikTok or Instagram.
- Training videos: Onboard new employees or educate customers with concise and informative video guides.
- Video content for ads: Create compelling video ads for various platforms, capturing attention and driving conversions.
The benefits of using AI to generate videos like these are pretty obvious. Hiring an experienced employee or an agency to produce video can be costly for most small business owners. And spending hours learning video editing yourself requires time — let’s be honest — you don’t have. With AI, you can simply type in a few words and watch the magic happen.

And because you can produce more content in less time, you’re likely to see a positive effect on your marketing efforts. In one recent survey, 87% of marketers said video has directly contributed to increased sales and leads. That’s a big number you can’t ignore!
Choosing the Right AI Video Creator
The hardest part of the video creation process with AI is knowing which tool to use.
Right now, we’re seeing an explosion of video models entering the market. Each offers something a little different, so it’s essential to find a platform that matches your specific needs.
Here are the key ingredients to look for as a small business owner:
- Usability: While most AI video makers are designed to be user-friendly, some hit this mark better than others.
- Style: Every AI model is trained on different data, so you can expect different video outputs. For instance, some models are better at photorealistic videos, while others are better at animation.
- Features: While traditional video editors share the same basic set of tools, AI studios all offer something a little different. For this reason, you might need to switch between apps for different video projects.
- Speed: Creating AI videos from scratch can last seconds, minutes, or hours, depending on the model you’re using, and the length of the clip you’re trying to create.
- Price: Generating video with AI takes plenty of computing power, so it does come at a cost. It’s worth taking a closer look at how much usage you get with each tool.
Test Driving the Best AI Video Generators
To help narrow down the field, we decided to take the top five AI video generators for a test drive.
Our testing method was to identify key use cases for small businesses, and try them out on each platform. You can see some of the best outputs under each app.
Let’s see what these hotrods can do!
1. Klingai
Billed as a general-purpose video generation model, Klingai is a creative tool that focuses on text-to-video.
The app is relatively simple, with a dark interface that’s easy to navigate.
You can choose between two models: Kling 1.5 is the newer version, aimed at delivering cinematic results; and while the older Kling 1.0 might be rougher around the edges, it has a Motion Brush feature that allows you to draw a path for characters and objects to follow across the frame.
In both cases, you can enter text, set your preference between creativity and relevance, and create prompts to exclude elements. You can also choose between three aspect ratios, and even take manual control of camera movement.
In terms of real-world use cases, Klingai is better suited to creating eye-catching clips rather than detailed tutorials and explainer videos. From our testing, it produces better results with detailed, prescriptive prompts.
Highlights:
- Simple interface.
- Motion Brush tool for creative control.
- Free to try and cheap upgrades.
Best for: Eye-catching social media and promo videos.
Pricing: Free to try. Paid plans start at $120 a year, which covers 66 standard videos per month.
2. Runway
Runway is considered one of the leading lights in AI video. This platform offers a suite of tools that have caught the attention of content creators and businesses alike.
The latest addition to the Runway toolbox is Act-One, a model that can convert a simple video from a camera into an animated short. It’s essentially like creating a Pixar version of yourself, although it doesn’t necessarily have to be cartoon-like — Runway has some very realistic avatars to choose from. The results are impressive.
You can also generate videos from text, although Runway encourages you to upload some reference imagery as a starting point. In addition, the platform provides a library of example prompts to give you a sense of what’s possible.
The AI video generation interface is slick and clean, with a limited array of controls to keep things simple. Once you’ve created your first cut, you can open your videos in Runway’s full video editing suite.
This area offers an impressive selection of tools. 3D Object Capture allows you to create dynamic scenes based on the real world; Super-Slow Motion can turn any video into a smooth action replay; and Motion Tracking allows you to add graphics that stick to any element within an existing video.
Because Runway is a complete video production studio rather than a standalone AI tool, the platform is well suited to creating polished video content for professional use cases. It can handle AI image generation, as well.
Highlights:
- High-quality output.
- Extensive suite of creative tools.
- Strong community and learning resources.
Best for: Using AI content as part of professional video production.
Pricing: Free tier available. Pro plans start at $15/month for individuals, with team and enterprise options available for larger operations.
3. Luma Labs Dream Machine
Some of the most viral AI-made clips on social media were created with Luma Labs Dream Machine. This platform definitely leans into the creative side of video production, with a model that morphs characters and creates dreamy transitions.
Creating a video using the Dream Machine is very simple because there’s only one control: a text box. Here is where you type in your prompts and use commands to take control of camera motion.
Compared with some other AI tools, the Dream Machine can produce good results with very little input. Just a one-line prompt is enough to deliver something you would consider sharing on social media. If you like what you see, you can also extend videos with a tap.
As an overall theme, Luma Labs has opted for simplicity and ease of use over manual control. For busy marketers and business owners, that might make it an attractive option.
Highlights:
- Very easy to use.
- Delivers good videos from short prompts.
- Camera motion commands.
Best for: Creating social media content, product launch previews, and fun introductions.
Pricing: Free to try, although your tasks may end up on a waitlist. Paid plans are based on credits, starting at $7.99 per month for up to 70 videos.
4. Pika
Looking for something whimsical and creative? Time to check out Pika.
This platform is based around fun visual effects, like eyes popping out and objects being crushed under a vice. You can apply these templates to your own creations using text prompts.
After a brief wait, Pika spits out short, colorful clips with audio to match.
With an emphasis on fun and creativity, Pika isn’t loaded with controls. The idea is to create videos from text, without spending too much time tweaking settings.
That said, you have six different aspect ratios to choose from. You can also keep unwanted ideas at bay using negative prompts.
While the outputs are not always faithful to the original prompt, Pika produces really good-looking videos. We didn’t come across any weird morphing or glitches in our testing.
Highlights:
- Built-in templates with fun visual effects.
- Six different aspect ratios.
- Quick to generate AI videos.
Best for: Quirky, attention-grabbing social media posts and video ads.
Pricing: Generous free AI video generator plan with 10 videos per month. Paid plans start at $8 per month for 150 videos.
5. Synthesia
And now for something completely different.
Synthesia is an AI video generator that was specifically built for business. Instead of asking you to dream up ideas to fill an empty canvas, this platform has pre-built workflows for creating business-related videos. These videos are based around AI avatars, speaking to the camera.
You start by picking which type of content you want to make — a product launch video, sales training, a case study, and so on. Synthesia then asks you to explain what the video is about; you can paste in any URL or file as a reference here. The platform also asks you to name the areas of focus for your video.
Next, you get a preview, which includes an AI-generated script. This is usually pretty good off the bat, but you can wade in to make adjustments if you want. Equally, Synthesia’s editor allows you to tweak any part of the video — from the on-screen text to the placement of the avatar.
The output videos are polished, and Synthesia supports much longer runtimes than most other AI models. For easy sharing, the platform also provides video hosting and embedding.
Highlights:
- Over 230 AI avatars.
- Guided workflow for creating videos.
- Large range of editable video templates.
Best for: Sales, training, customer support, and marketing videos.
Pricing: Free AI video plans with limited avatars and video generation. Paid plans start from $18 per month, providing up to 10 minutes of video.
The Verdict: Which AI Video Generator Is Right for You?
Choosing the right AI video generator depends on your specific needs and priorities. Here’s a quick rundown to help you decide:
- If you need short, engaging videos with minimal effort: Luma Labs Dream Machine is your best bet. The simple interface and quick generation times make it ideal for busy marketers. Klingai is also a strong contender in this category, especially if you want control over character and object movement. If quirky and fun is your style, Pika is another low-effort option.
- For polished, cinematic video production: Runway stands out with its editing tools and high-quality output. While more focused on business applications, Synthesia also delivers polished results thanks to the AI avatar generator.
- If you’re primarily creating business-related videos like training, sales presentations, or customer support content: Synthesia is the one. The guided workflows really help to streamline the process of creating professional videos.
- For experimenting with ideas and getting creative: Runway and Luma Labs Dream Machine offer the most creative flexibility. Runway’s advanced features allow you to go wild with pro-level motion graphics, while Luma Labs Dream Machine excels at generating dreamy, visually captivating content.
- On a budget? All five platforms offer free trials or free tiers. Klingai and Pika offer particularly generous free plans, making them great options for budget-conscious users.
| Use Case/Feature | Best AI Video Generator(s) |
| Quick & Easy Content | Luma Labs Dream Machine, Klingai, Pika |
| Cinematic Quality | Runway, Synthesia |
| Business/Professional | Synthesia |
| Creative Flexibility | Runway, Luma Labs Dream Machine |
| Budget-Friendly | Klingai, Pika |
| Free Trial/Tier | All five offer free options, with Klingai and Pika having the most generous free plans |
| Character Control | Klingai |
| Professional Editing Tools | Runway |
| AI Avatar Generation | Synthesia |
| Motion Graphics | Runway |
| Quick Generation Time | Luma Labs Dream Machine |
Start Harnessing AI Today
The latest wave of AI video generators can produce some pretty impressive content. You probably won’t get it right at the first attempt — prompting is a skill that takes time to master. But with a little time (and effort) investment, you should soon be knocking out new videos like Scorsese on steroids.
Just remember, video isn’t the only arena where AI can help your business. For instance, DreamHost Liftoff is a new AI tool that can build a design for your WordPress website in just 60 seconds! Our customers also get free access to the AI Business Advisor, which can help you plan ahead and perform everyday marketing tasks.
Sign up with one of our hosting plans today to try these tools for yourself!
The post We Tested 5 of the Hottest AI Video Generators, These Were Our Result appeared first on DreamHost Blog.
]]>The post 6 Ways To Fix the 400 Bad Request Error appeared first on DreamHost Blog.
]]>Panic sets in. What does this mean? How many customers are seeing this error instead of your products? How is this affecting your business?
If you’ve ever felt the frustration of getting an error instead of the webpage you expected, or woken up in a cold sweat imagining it happening on your site at a critical moment — you’re not alone. The 400 Bad Request error can be a thorn in the side of entrepreneurs and small business owners who rely on their websites for success.
But don’t worry.
This guide is here to help you understand and fix this issue so you can return to providing a seamless experience for your customers.
Why Understanding HTTP Errors Matters for Your Business
Your website is often the first point of contact between you and potential customers. HTTP errors like the 400 Bad Request can disrupt this connection, leading to a poor user experience, lost sales, and even a dent in your search engine rankings.
For small businesses and entrepreneurs, every visitor counts, and making sure your website runs smoothly is how you keep growing, maintain your reputation, and run a successful online business.
Understanding and promptly resolving errors isn’t just about fixing a technical glitch — it’s also about maintaining professionalism, building trust with your audience, and protecting the online presence you’ve worked so hard to establish.
What Is the 400 Bad Request Error?
When you or any site’s visitors try to access a page, your browser sends a request to the website’s server. The server then processes the request and returns the desired information — unless something goes wrong. The 400 Bad Request error is an HTTP status code that indicates the server couldn’t understand the request because of invalid syntax.
In simpler terms, the server thinks there’s something wrong with the client’s request. Instead of loading the page, it displays an error message, leaving both you and your visitors in the dark.
Variations of the Error Message
While this error typically shows up as “400 Bad Request,” it can manifest in several ways, so you may see some variations:
- “Bad Request – Invalid URL”
- “HTTP Error 400”
- “Bad Request. Your browser sent a request that this server could not understand.”
- “HTTP Status 400 – Bad Request”
- “HTTP Error 400 – Bad Request”
- “400 – Bad Request. The request could not be understood by the server due to malformed syntax. The client should not repeat the request without modifications.”
- “400 Bad Request. Request Header Or Cookie Too Large”
- “Bad Request – Error 400”
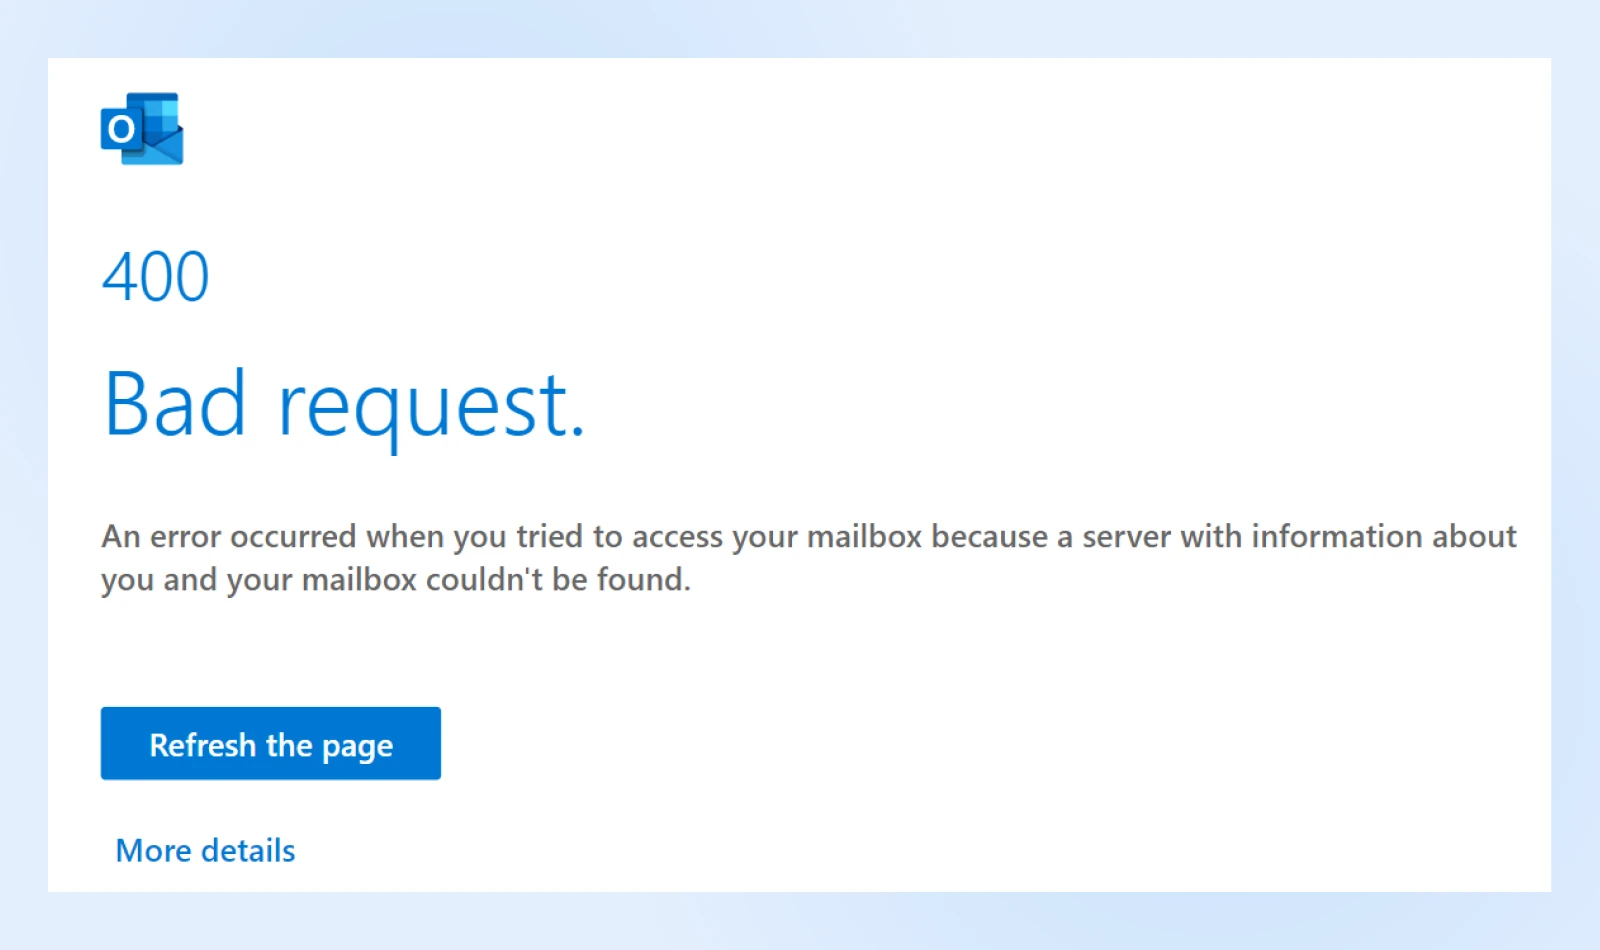
Regardless of how it’s phrased, the message indicates the same issue: the server can’t process the request because of a client-side error. The 400 Bad Request error can be very frustrating, as it blocks access to the site without giving you any helpful information.
Let’s discuss some of the most common causes.
Common Causes of the 400 Bad Request Error
When a server returns a 400 Bad Request, it means that it can’t understand and process your request. Usually, this is because of a client-side error, which means there’s a problem at your end.
Understanding what triggers this error is the first step toward fixing it. Here are some common issues that may cause a 400 Bad Request error:
- Invalid URL syntax: You may have mistyped the URL or used invalid characters. This can include typos, misplaced characters, or unsupported symbols in the URL.
- Corrupted browser cache or cookies: Outdated or corrupt files stored by your browser can interfere with requests. If your browser cookies have expired or your cache is corrupted, the server may not be able to process your request properly.
- Conflicting browser extensions: In some cases, your browser extensions can interfere with the request and cause a 400 Bad Request. Add-ons or extensions might block or alter requests unintentionally.
- Bad DNS cache: Outdated DNS information can lead to miscommunication with the server. Your locally cached DNS data could be out of sync with the current DNS registration for the domain.
- Large uploaded file size: Attempting to upload files that exceed the server’s size limits can cause an error. If you’re uploading a large file to a site, it could exceed the maximum upload limit and therefore, cause the error.
- Server-side issues: Misconfigured server settings or temporary glitches could also cause a 400 Bad Request error. For example, the website may have a misconfigured server or a temporary glitch. While less usual, don’t write it off.
How To Fix the 400 Bad Request Error (6 Methods)
Now that we’ve pinpointed potential causes, let’s dive into actionable solutions to get your website back on track.
When you first see a 400 Bad Request error, try refreshing the page. Sometimes, this will resolve any temporary glitches. If it doesn’t work, you can try the following steps.
1. Check for Errors in the Address
Check your URL for any errors. This is one of the most common causes of a 400 Bad Request. There could be typos, malformed syntax, or extra characters in the address.
Why this helps: A simple typo or misplaced character in the URL can prevent the server from understanding your request.
What to do:
- Double-check the URL: Go back to the domain name, directory path, and query string to make sure the address is correct. Look for misspellings, extra slashes, or unsupported symbols. During this process, check for special symbols. Random characters like hyphens (-) or percentages (%) could cause the Bad Request. For example, if you intended to visit www.yourbusiness.com/products but typed “www.yourbusiness.com/prod%ucts,” the “%” symbol could cause an error.
- Use a URL decoder tool: Some URLs have special characters, but you’ll need to make sure they’re coded correctly. You can check the address using a URL Decoder/Encoder. This tool will identify any invalid characters in the URL.
- Navigate manually: You can also try searching for the web page differently. For example, you can run a search for the site’s domain name and a relevant keyword. If you were looking for a DreamHost post on featured image sizes, type “site:dreamhost.com featured image sizes” into a search engine. This will allow you to access the page without having to type in the URL manually.
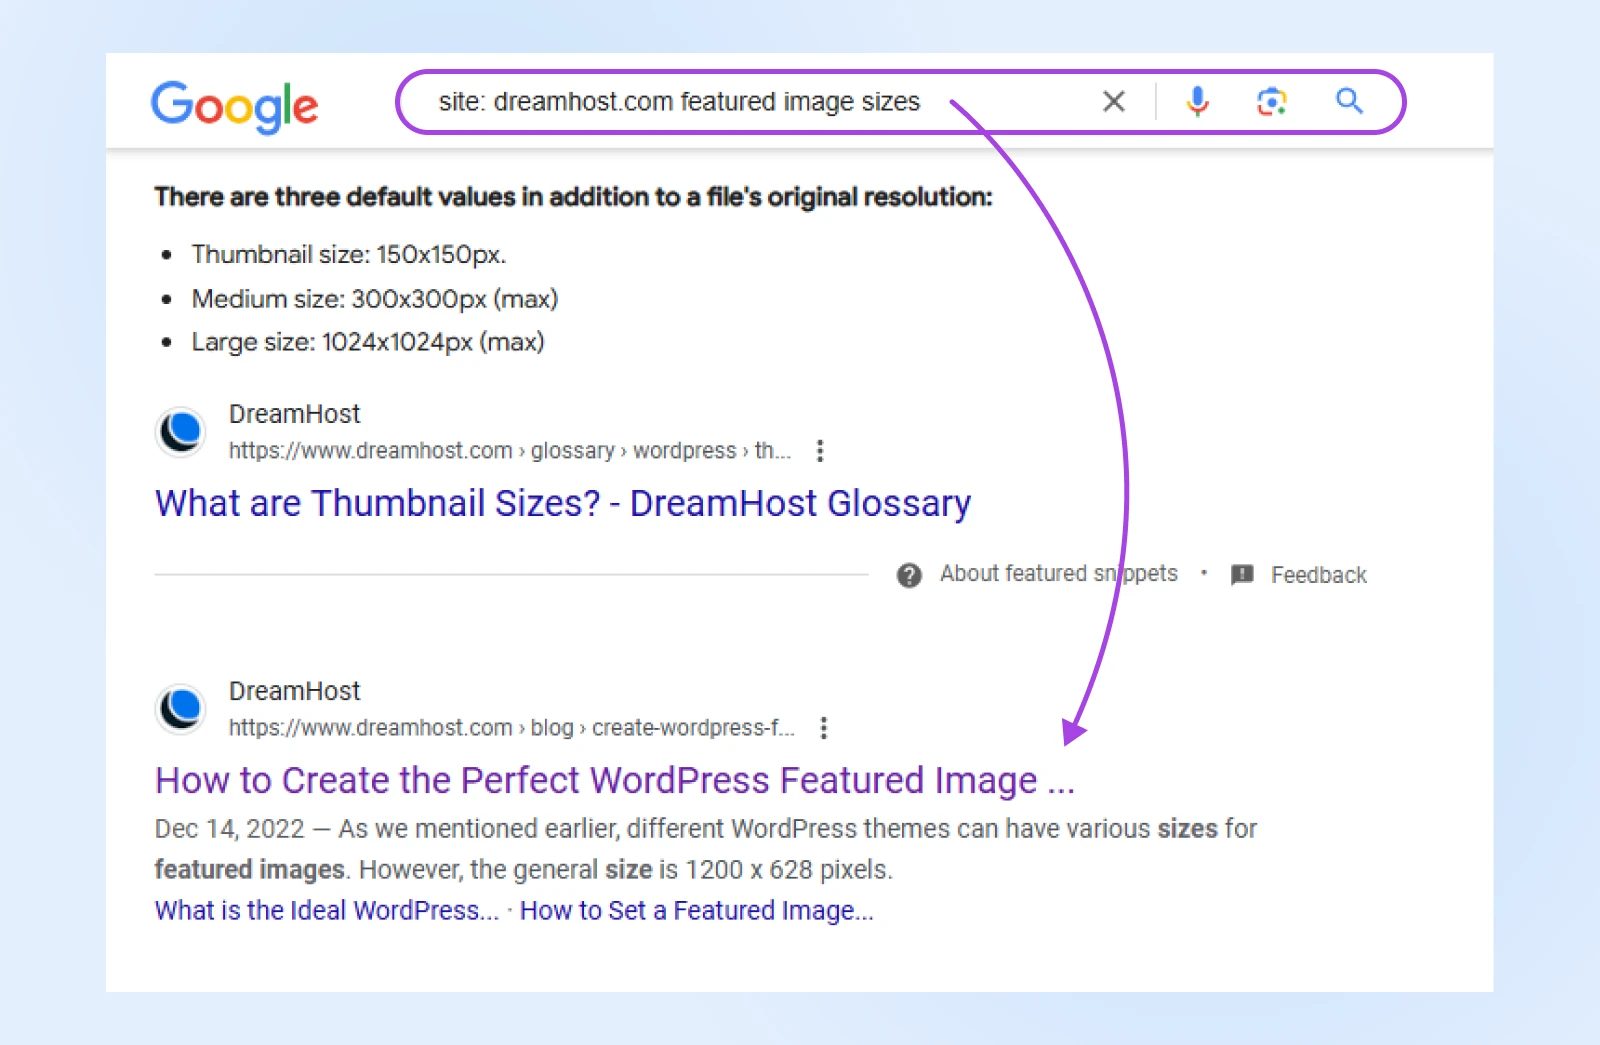
Pro-tip: Keep your website’s URLs simple and user-friendly to minimize the risk of typos.
If you still get a 400 Bad Request error after trying all these tips, continue to the following method.
2. Clear Your Browser’s Cache and Cookies
Your browser saves site data in a cache, so when you revisit the site in the future, the browser can serve the cached content to make the page load faster.
Cache
A cache is a temporary data storage layer that is designed to improve data access speeds by reducing the time needed to read and write data from a permanent data storage location.
Read MoreAs you’re browsing the Internet, cookies will also be stored in your browser. These are small files that contain data such as the length of your browsing session. Cookies can also remember personalized information like your login details or site preferences.
Although your browser’s cache and cookies can be helpful tools, they can also become corrupted, and cookies can eventually expire. When this happens, it can trigger a 400 Bad Request. To solve this problem, consider clearing the cache and cookies in your browser.
Why this helps: Over time, cache and cookies can become outdated or corrupted, leading to communication issues with the server.
What to do:
- Access browser settings:
- In Google Chrome, click on the three-dot menu in the upper-right corner, select More Tools > Clear Browsing Data.
- In Mozilla Firefox, click on the three-line menu, go to Settings > Privacy & Security > Cookies and Site Data > Clear Data.
- Select data to clear:
- In Google Chrome, check Cookies and other site data.
- In Mozilla Firefox, check Cached images and files.
- Choose a time range: For a thorough clean, select All time.
- Clear data: Click Clear data and wait for the process to complete.
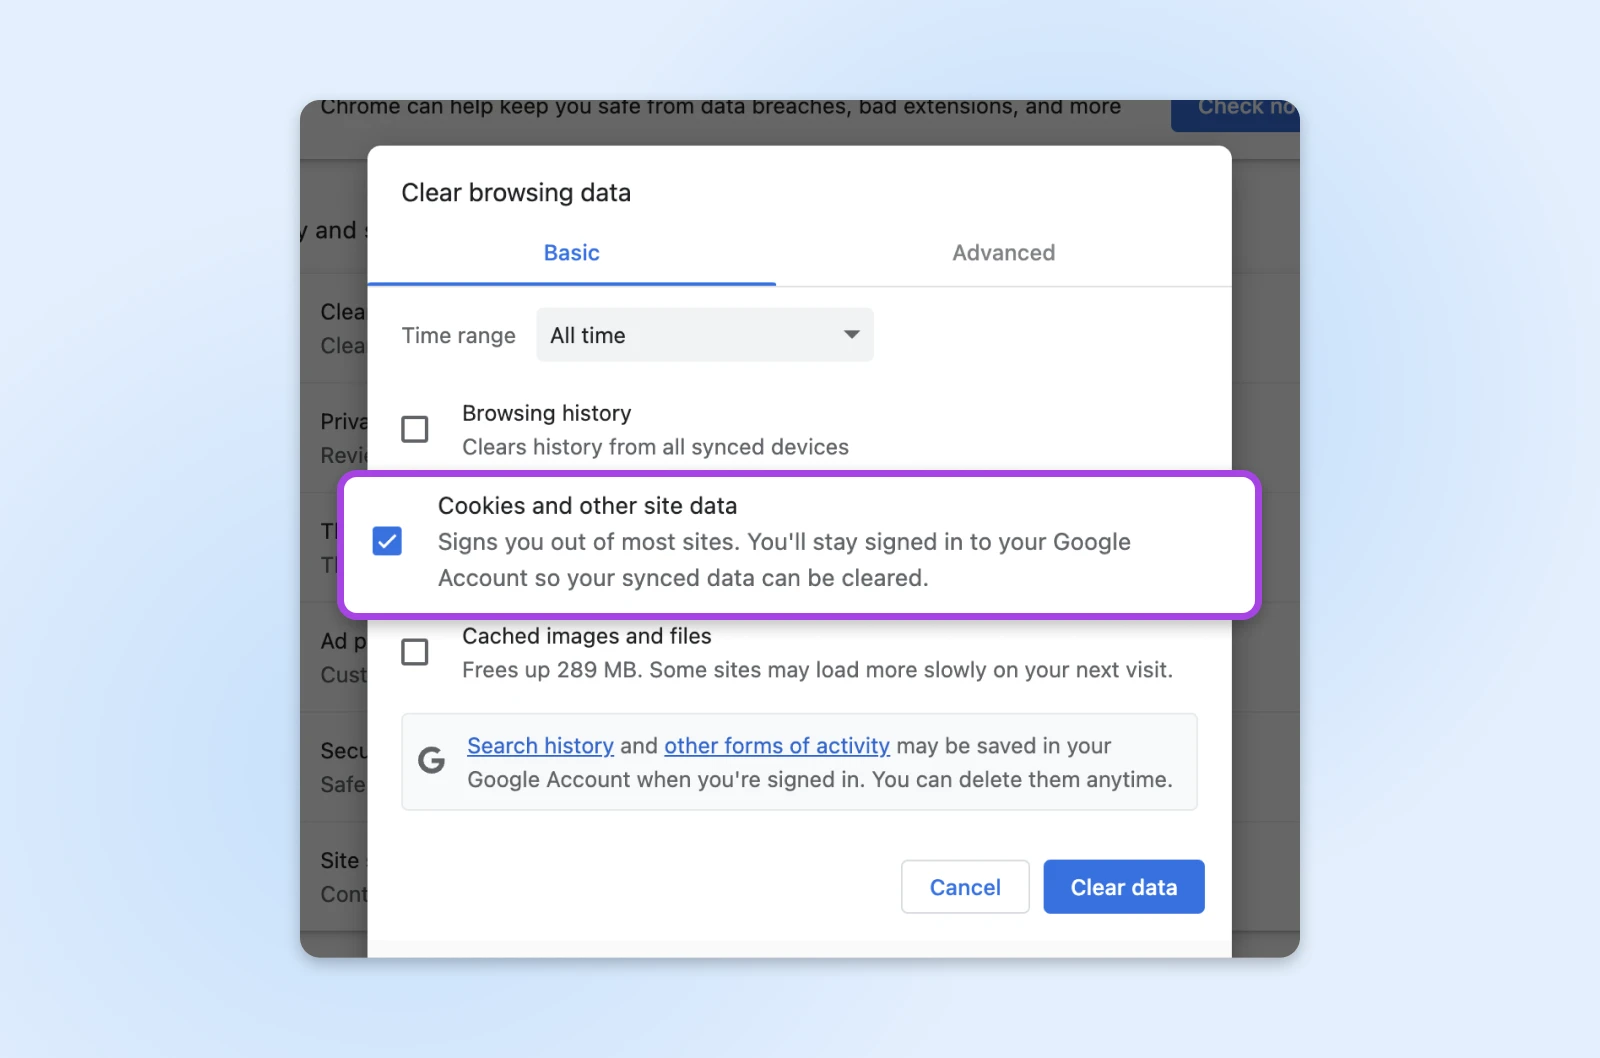
Keep in mind that this will sign you out of many websites. You may also experience slower loading times when you visit these sites again. However, it could remove corrupted or expired data that may cause a 400 Bad Request.
3. Disable Browser Extensions
If you’re a website owner, you likely know that third-party plugins can cause many WordPress errors. Similarly, the software in your browser extensions could interfere with your request, so try disabling extensions temporarily if you’re seeing 400 Bad Request errors.
Why this helps: Some extensions may interfere with website requests, especially those related to security or content filtering.
What to do:
- Access your extensions:
- In Chrome, go to the three-dot menu > Extensions > Manage Extensions.
- In Firefox, click on the three-line menu > Add-ons and themes.
- Disable your extensions: Toggle off all extensions to disable them temporarily.
- Test the site again: Reload the page that showed the error.
- Identify the extension that was causing the error: If the error resolves, re-enable extensions one at a time, checking the website after each to pinpoint the problematic extension.

Some extensions are more likely to be common offenders than others when it comes to 400 Bad Request errors. These include: ad blockers, privacy extensions, or VPN-related add-ons.
4. Flush the DNS Cache
The first time you visit a website, some of its data is stored locally in a cache. To load pages faster, your computer will save DNS information about websites. This will eliminate the need to search for the site’s nameserver and IP address every time you come back.
Just like your browser cache, the DNS cache can also become corrupt or outdated. Sometimes, a website will update its DNS information. If this conflicts with your cached data, it can lead to a 400 Bad Request error. To fix this error, you’ll need to flush your DNS cache.
Why this helps: Clearing the DNS cache ensures your computer communicates with the most recent DNS information.
What to do:
On Windows:
- Press Win + R.
- Type
cmdand press Enter. - In the Command Prompt, type
ipconfig /flushdnsand press Enter.
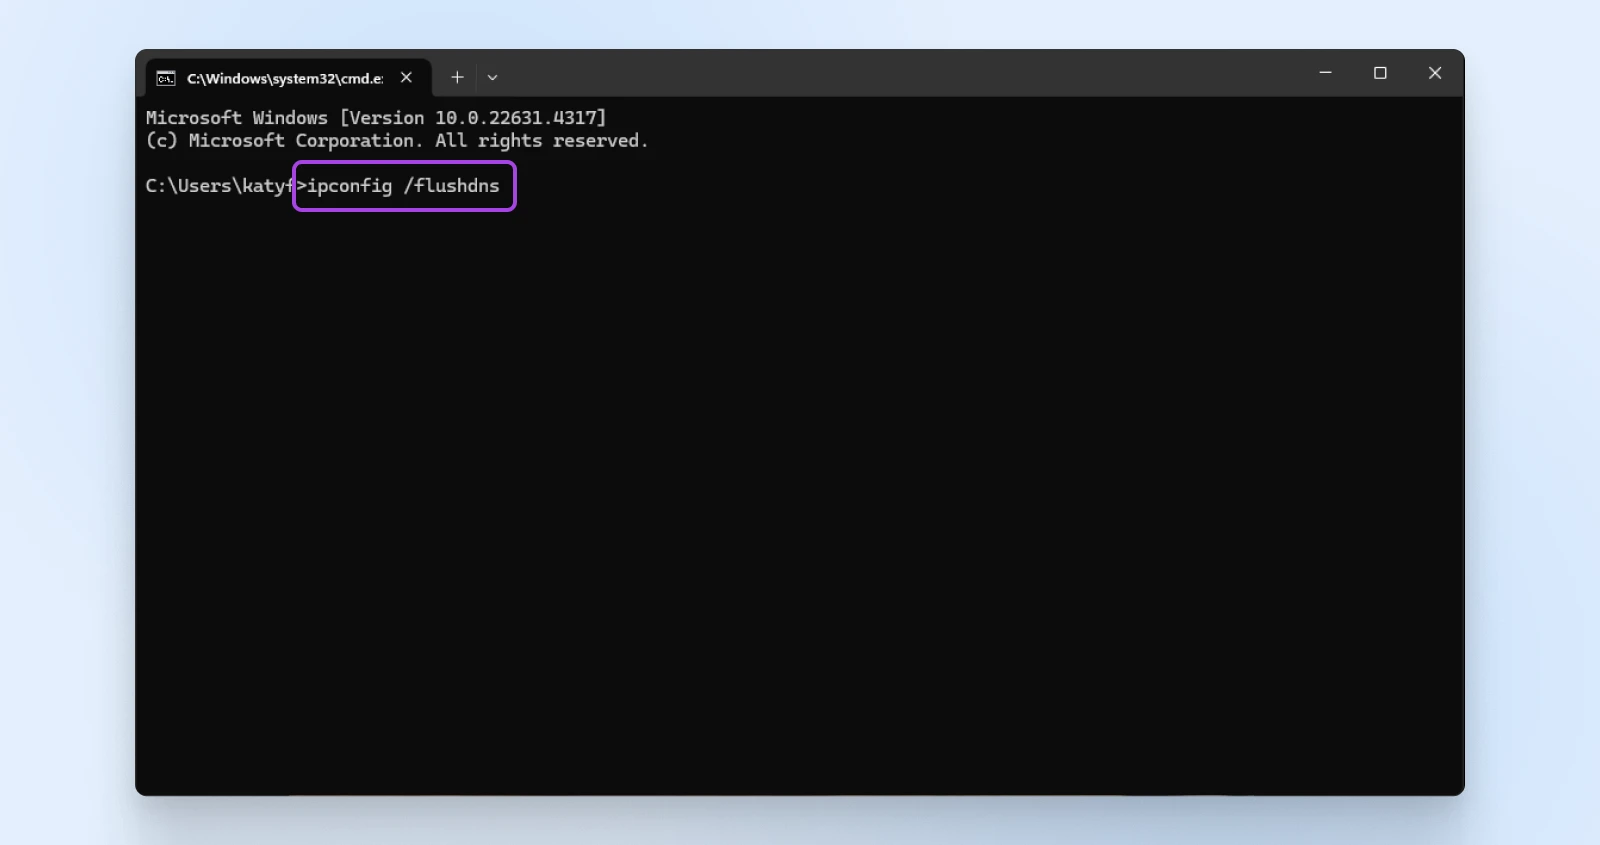
On Mac:
- Open Terminal.
- Enter the command
sudo dscacheutil -flushcache; sudo killall -HUP mDNSResponderand press Enter. - You might need to enter your system password.
On Linux:
- Open Terminal.
- Enter
sudo systemd-resolve --flush-cachesand press Enter.
For browser DNS cache (Chrome):
- Type
chrome://net-internals/#dnsin the address bar. - Click on Clear host cache. This will flush your browser’s DNS cache.

After you successfully flush your DNS, check to see if this resolves the error. If not, you’ll need to try another method…
5. Check the Uploaded File Size
Sometimes, you’ll see the 400 Bad Request error right after uploading a file to a website. In this case, your file may be too big to upload to the site’s server.
To see if this is the case, start by uploading a smaller file. If this is successful, you’ll need to resize or compress the original file.
Why this helps: Uploading files larger than the server’s limit can trigger a 400 error. Every site has a maximum file upload size. Although this is set by the hosting provider, it usually falls between 2 MB and 500 MB. If you upload a larger file, you’ll likely receive a Bad Request.
What to do:
- Confirm your file size limit: Check the website’s or server’s maximum upload size. For WordPress sites, you can find this in Media > Add New.
- Reduce file sizes:
- For images: Use tools like TinyPNG to compress images and reduce file sizes without losing quality.
- For documents: Compress files into a ZIP folder.
- Upload smaller files: Try uploading a smaller file to see if the error persists.
- Increase your maximum file size: If you own the website that’s throwing the 400 Bad Request error, you can increase your site’s maximum upload size by adjusting your server settings or contacting your hosting provider.
6. Troubleshoot Your Device and Internet Connection
Now, if every single page you visit returns a 400 Bad Request, you might just have a poor internet connection. To see if this is the case, try switching to a different network. For example, you can turn off Wi-Fi for your mobile device and use cellular data.
Why this works: Network issues can prevent requests from reaching the server correctly.
If this resolves the error, you can troubleshoot your Internet connection.
What to do:
- Restart your device: Since this can clear Random Access Memory (RAM), flush temporary caches, and close running programs, it may help solve a Bad Request.
- Restart your Wi-Fi router. A simple reboot can clear temporary glitches.
- Check your connection: Switch between Wi-Fi and a wired connection, or try accessing the website on a different network.
- Disable VPNs or proxies: If you’re using a VPN or proxy service, disable it temporarily to see if it’s causing the issue.
- Run a network troubleshooter:
- On MacOS, use the Wireless Diagnostics tool.
- On Windows 11, go to Settings > System > Troubleshoot > Other troubleshooters > Network and Internet. Click Run.

If none of these options clear the error and you’re still getting a 400 Bad Request error on multiple or all websites, consider contacting your service provider to help fix the issue.
Monitoring and Preventing 400 Bad Request Errors
Being proactive can save you from future headaches. Here’s how to keep an eye on your website’s health:
Use Website Auditing Tools
Tools like Google Search Console can scan your website for errors, including 400 Bad Request issues. Here’s what to do:
- Set up the tool: Follow the tool’s instructions to connect it to your website.
- Run a scan: Initiate a crawl of your website to detect errors.
- Analyze the results: Look for any pages returning a 400 status code.
- Fix issues: Use the insights provided to correct URLs, fix broken links, or adjust server settings.
Regularly Update Your Website
Keeping your website updated prevents critical security issues and other problems that can cause errors, including 400 errors. Keep all components, especially things like plugins and themes, up to date to ensure compatibility. And make sure your content management system (CMS) is always updated to the latest version.
Educate Your Team
Make sure anyone who adds content or manages your site is aware of best practices to avoid introducing errors —including everything we’ve covered so far in this article.
When To Seek Professional Assistance
Sometimes, despite your best efforts, the 400 Bad Request error persists. Then, it might be time to call in the experts.
Indicators that you might need help resolving a 400 Bad Request error:
- Server-side issues: If the error is due to server misconfigurations or database problems, it might be outside of your control.
- Widespread impact: If multiple users report the same error across different devices and networks, you might need professional assistance getting it solved quickly before the effects snowball.
- Lack of time and/or expertise: Business owners are busy, and your time is valuable. If you have too much on your plate and can’t focus on a website error right now, it’s better to ask a professional for help.
How DreamHost can help: At DreamHost, we’re committed to supporting you in maintaining a flawless online presence. Our award-winning, in-house support staff and service team are on hand 24/7 to help with whatever you need, including 400 Bad Request errors. Our experts can:
- Diagnose and fix server-side issues.
- Provide guidance on optimizing your website.
- Offer hosting solutions tailored to small businesses.
Get Ready for Error-Free Browsing
The 400 Bad Request error can be a stumbling block, but with the right knowledge and tools, it’s one you can overcome. By understanding the causes and implementing these fixes, you’re taking proactive steps to ensure a seamless experience for your visitors — a critical factor in the success of your business.
Fortunately, there are many ways to resolve the issue. One simple solution is to reload the browser and check for temporary glitches. However, you may need to flush your DNS cache, restart your device, or reduce uploaded file sizes.
Remember, you don’t have to navigate these challenges alone. Stay ahead of potential issues by subscribing to the DreamHost Blog for more tips, or explore our range of services designed to empower small business owners like you.
Educate your team on other common website errors with these helpful guides:
- 9 Tactics For Fixing The 504 Gateway Timeout Error
- How to Fix the 503 Error in WordPress
- 10 Ways To Fix The ERR_CONNECTION_RESET Error
- Fixing The HTTP 500 Internal Server Error On Your Website
- Fixing The ERR_CACHE_MISS (Confirm Form Resubmission) Error In Google Chrome
- How to Fix Fatal Error: Maximum Execution Time Exceeded (In 6 Steps)
The post 6 Ways To Fix the 400 Bad Request Error appeared first on DreamHost Blog.
]]>The post How To Get the Most out of Claude AI appeared first on DreamHost Blog.
]]>Perhaps your mind goes straight to a famous example: Lévi-Strauss, Monet, Debussy, Van Damme, and so on.
Well, now you need to make room in your mental roster for another Claude: an intelligent virtual assistant.
Claude AI is one of the most powerful artificial intelligence platforms around right now. It’s as smart as ChatGPT, and capable of handling a wide variety of tasks — from data analysis to content creation.
This tool is basically rocket fuel for your business.
Want to harness that power? Stick with us for the next few minutes, and we’ll show you how to unlock the full potential of Claude.
Nice To Meet You, Claude AI

Let’s start with a proper introduction.
Claude by Anthropic is a generative AI platform that uses LLMs (large language models) to make sense of text prompts and provide intelligent replies.
You communicate with this AI assistant through a chat interface. You can also upload images and documents to provide context.
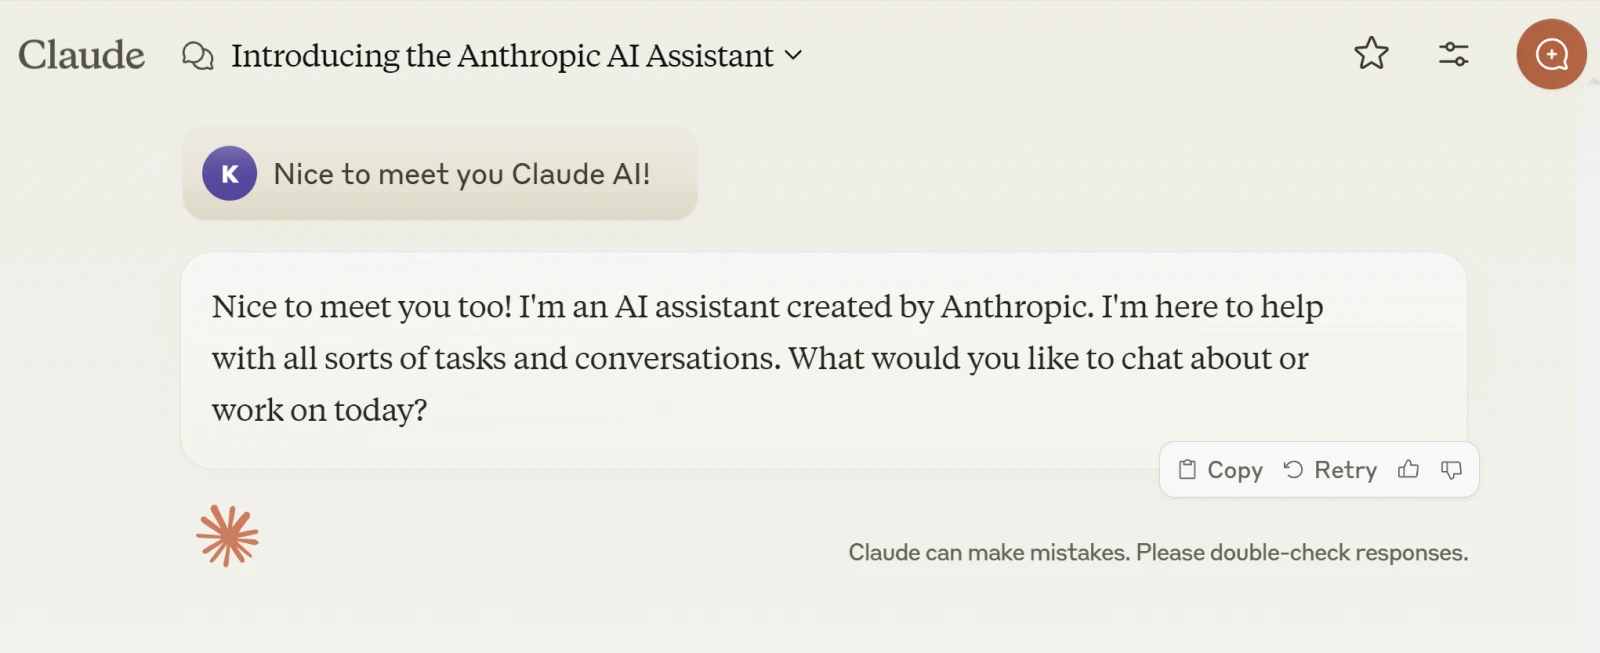
This means you can use Claude to:
- Brainstorm new ideas
- Collaborate on content creation
- Research new topics
- Automate boring admin tasks
- Analyze existing data
- Get assistance with coding
And that’s just a glimpse of what Claude is capable of. We’ll take a closer look at the real-world use cases very shortly.
At the time of writing (Q4 2024), Claude has several cutting-edge models:
- Claude 3.5 Sonnet: The brightest of the bunch. Sonnet stands up to any current model in terms of intelligence. It’s a great sales assistant and a very capable coder.
- Claude 3 Opus: The previous high water mark. Opus has now been overtaken by the latest version of Sonnet in terms of speed and intelligence, but it’s still a capable model.
- Claude 3.5 Haiku: The baby of the family is not quite as clever as the others, but it’s still a speed merchant. For basic tasks and live customer interactions, this one is probably the best fit.
Claude AI vs. ChatGPT
While the AI ecosystem is always shifting, Claude has been neck and neck with ChatGPT for some time. This shouldn’t come as a surprise, because Claude was developed by former employees of OpenAI — the company behind ChatGPT.
Both platforms are very capable, but they have slightly different strengths and weaknesses. For instance, some people believe Claude tends to be more concise with answers, while ChatGPT is more thorough.
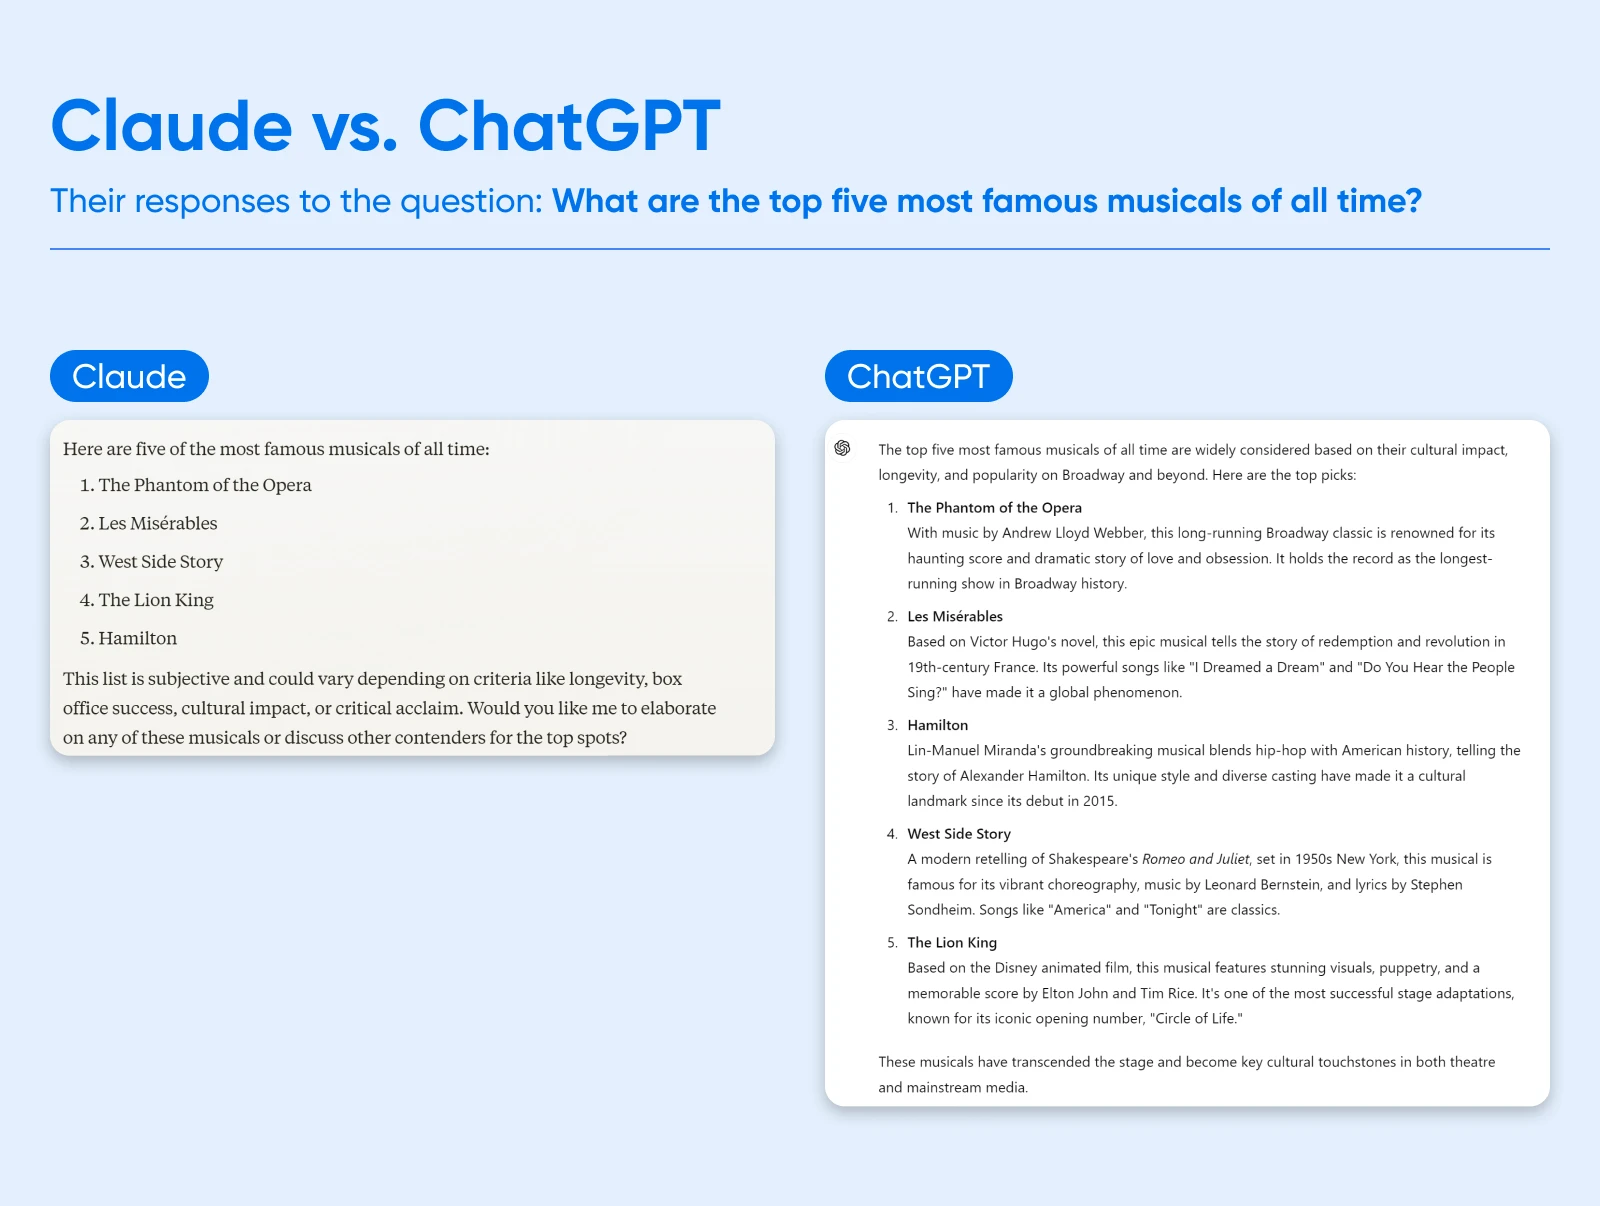
One area of strength for Claude is safety. Anthropic is a public-benefit corporation that tries to develop AI responsibly.
With this approach, known as “Constitutional AI,” the company aims to align Claude with human values, like not doing harm to others, and treating people with respect.
How Much Does Claude AI Cost?
Anyone can sign up and use Claude AI for free, including the latest models.
The downside of the free tier is that you’re restricted to around 40 short messages per day. And Claude will freeze you out completely during times of peak demand.
A Claude Pro premium subscription costs $20 per month. This extends your limits five-fold, and allows you to access the platform during peak times.
For larger businesses, the Team plan ($25 per user/month) extends usage limits further and provides early access to collaboration features. There’s also an Enterprise plan (custom pricing) for large organizations.
The other way you can access Claude is through the Anthropic API. This option lets you pay as you go, with variable pricing depending on which model you use.
The Key Benefits of Claude AI
Of course, Claude isn’t the only show in town. So, what makes this AI system better for your business than other AI or automation tools?
Here’s a quick run-through of the primary benefits:
- It’s easy to use: Unlike with many automation tools, you can tell Claude what you want to achieve in plain English (or any other language, as it stands).
- It’s pretty cost-effective: You can complete a lot of work on a fixed monthly subscription, and the pay-as-you-go prices are affordable as well.
- It’s completely scalable: If you use the API, you can buy as much usage as you need.
- It’s built for safety: One of the main motivations for founding Anthropic was to build an AI that’s safe and reliable.
- It’s improving rapidly: Claude is on the cutting edge of AI research, and new versions are released every few months, delivering significant improvements without a step up in cost.
How To Use Claude AI (Step-by-Step Walkthrough)
All of this sounds great on paper. But how do you actually start putting the AI to work?
Getting started with Claude is surprisingly easy. Ready to dive in? Just follow these steps:
Step 1: Sign Up at Claude.ai
First, you’re going to need an account.Head over to the Claude AI website and sign up using your email or via Google sign-in. If you choose the former option, Claude will ask you to verify your email address.

To complete the sign-up process, you’ll be asked to enter your phone number and date of birth.
Once you’ve verified your phone number via SMS, Claude will ask for your name and what you prefer to be called. You’ll also be asked to confirm a few details about the terms of service.
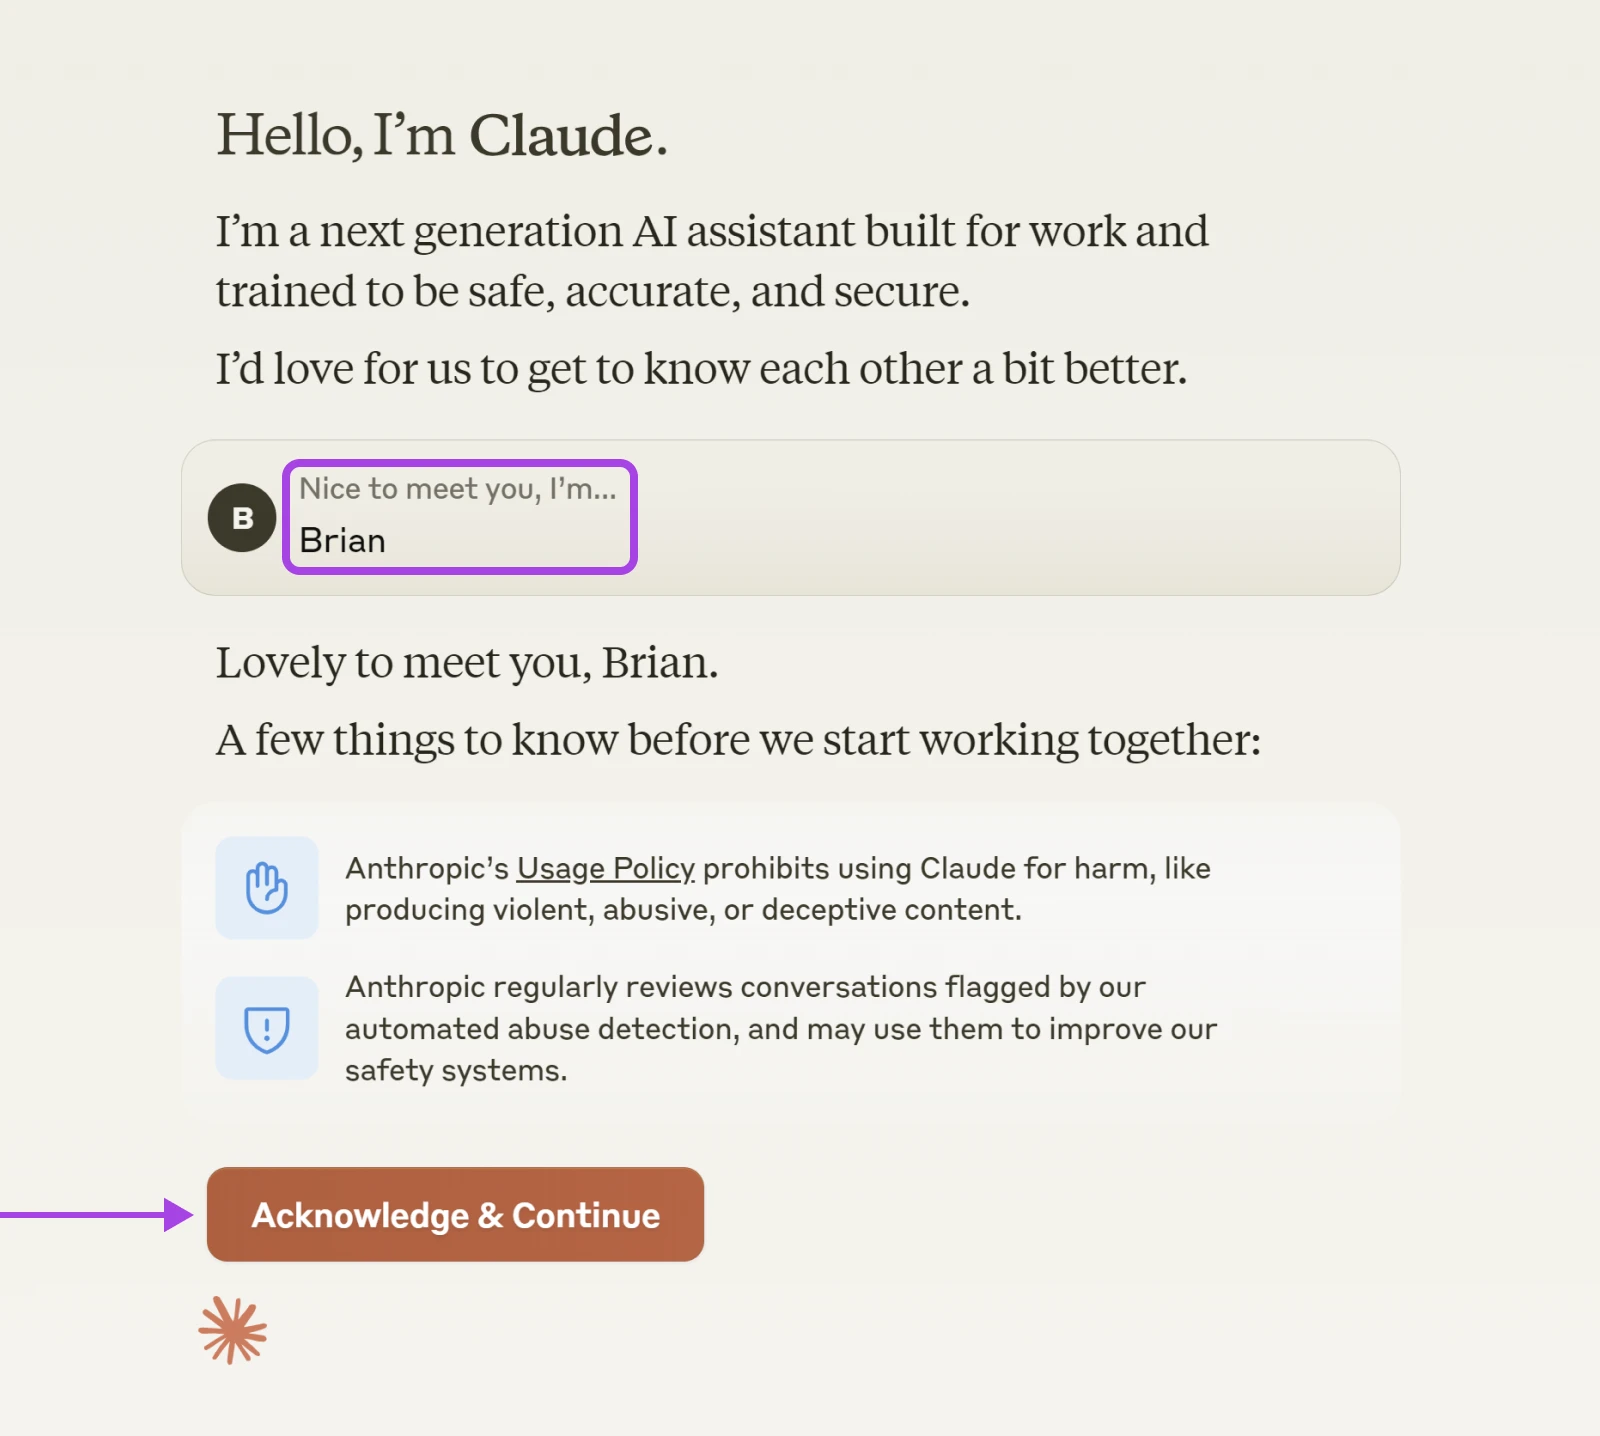
Note: You can follow a similar setup process via the Claude iOS app.
Step 2: Choose Your Settings
Claude is pretty low-maintenance when it comes to preferences. Even so, it’s worth setting up your account.
Having jumped through all the hoops, you should reach a screen like this:
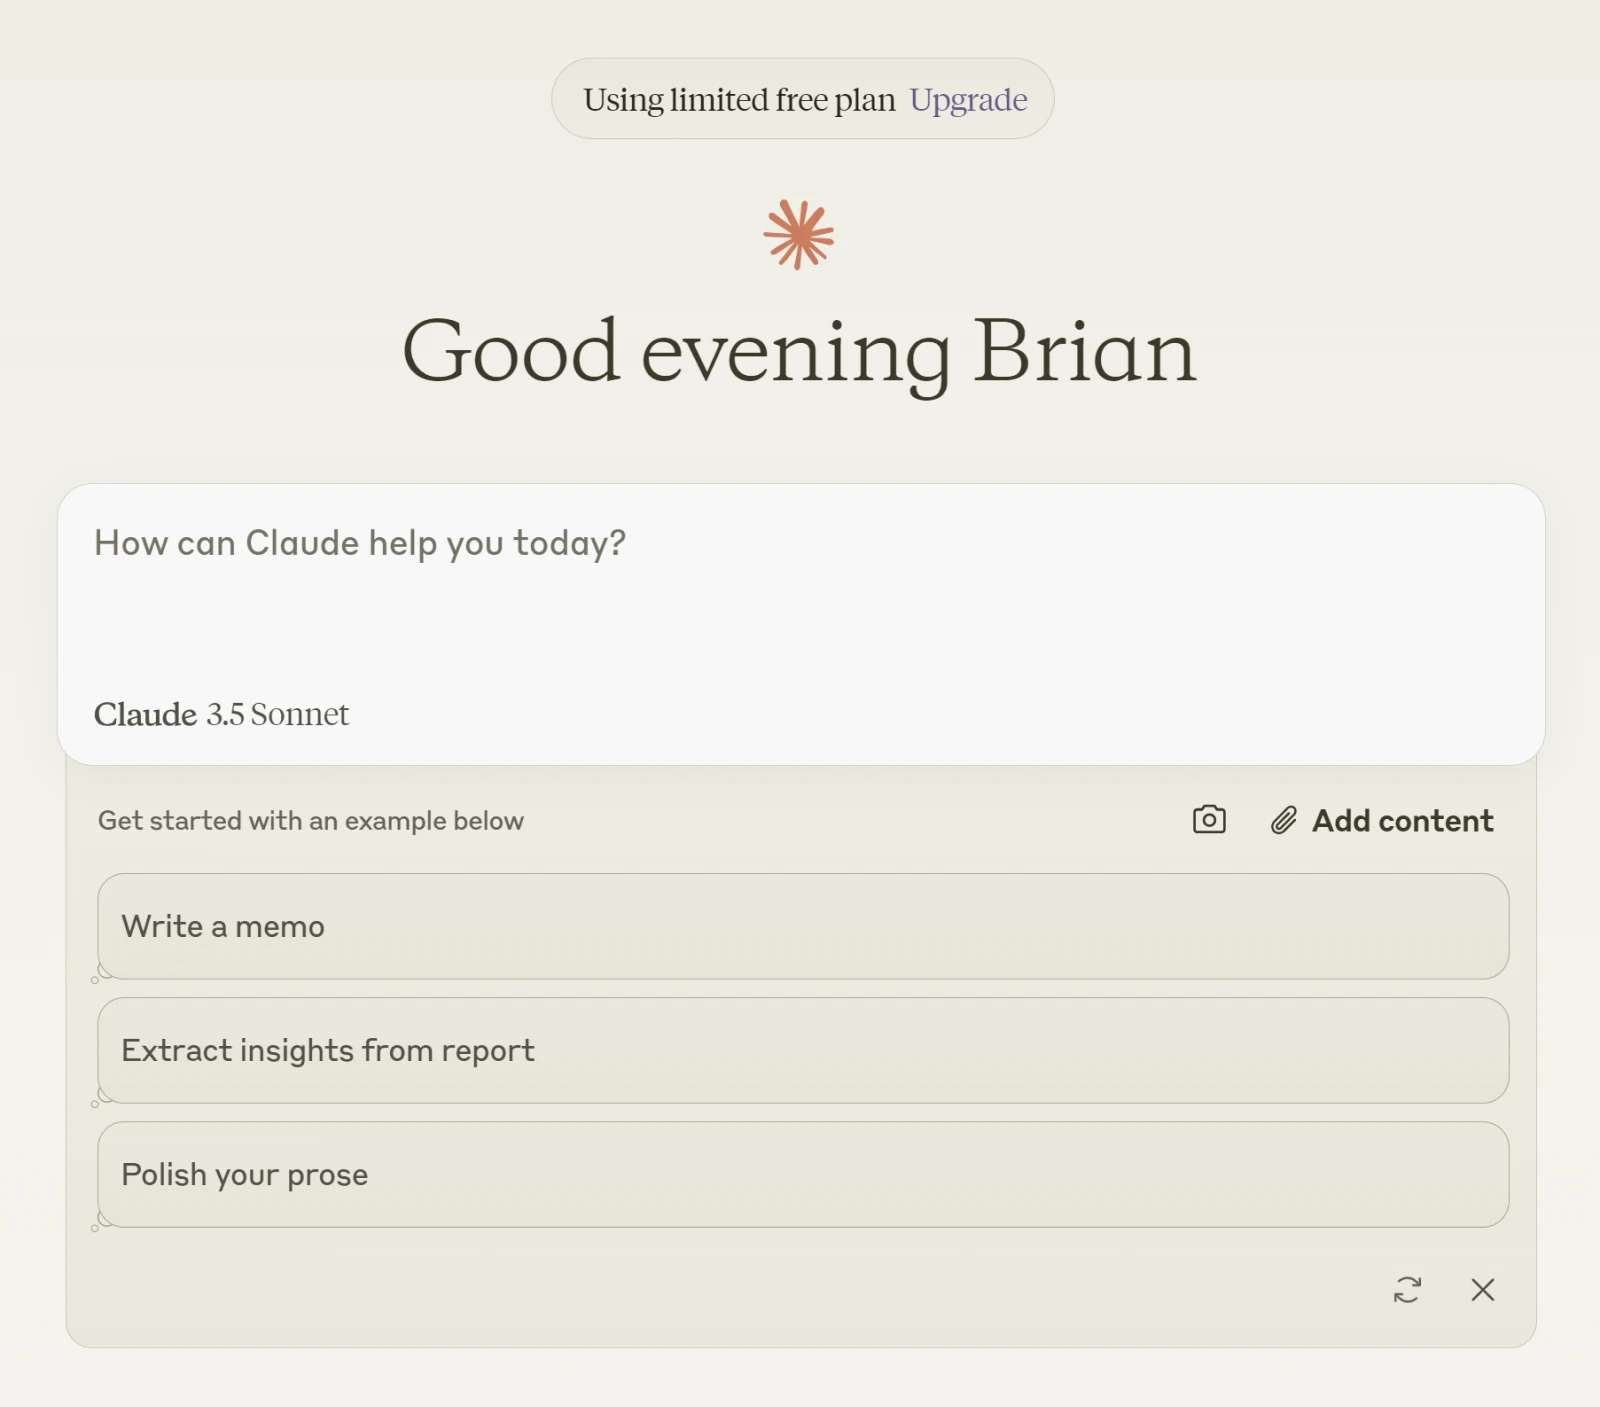
Move your cursor over to the bottom left, and tap on your email.
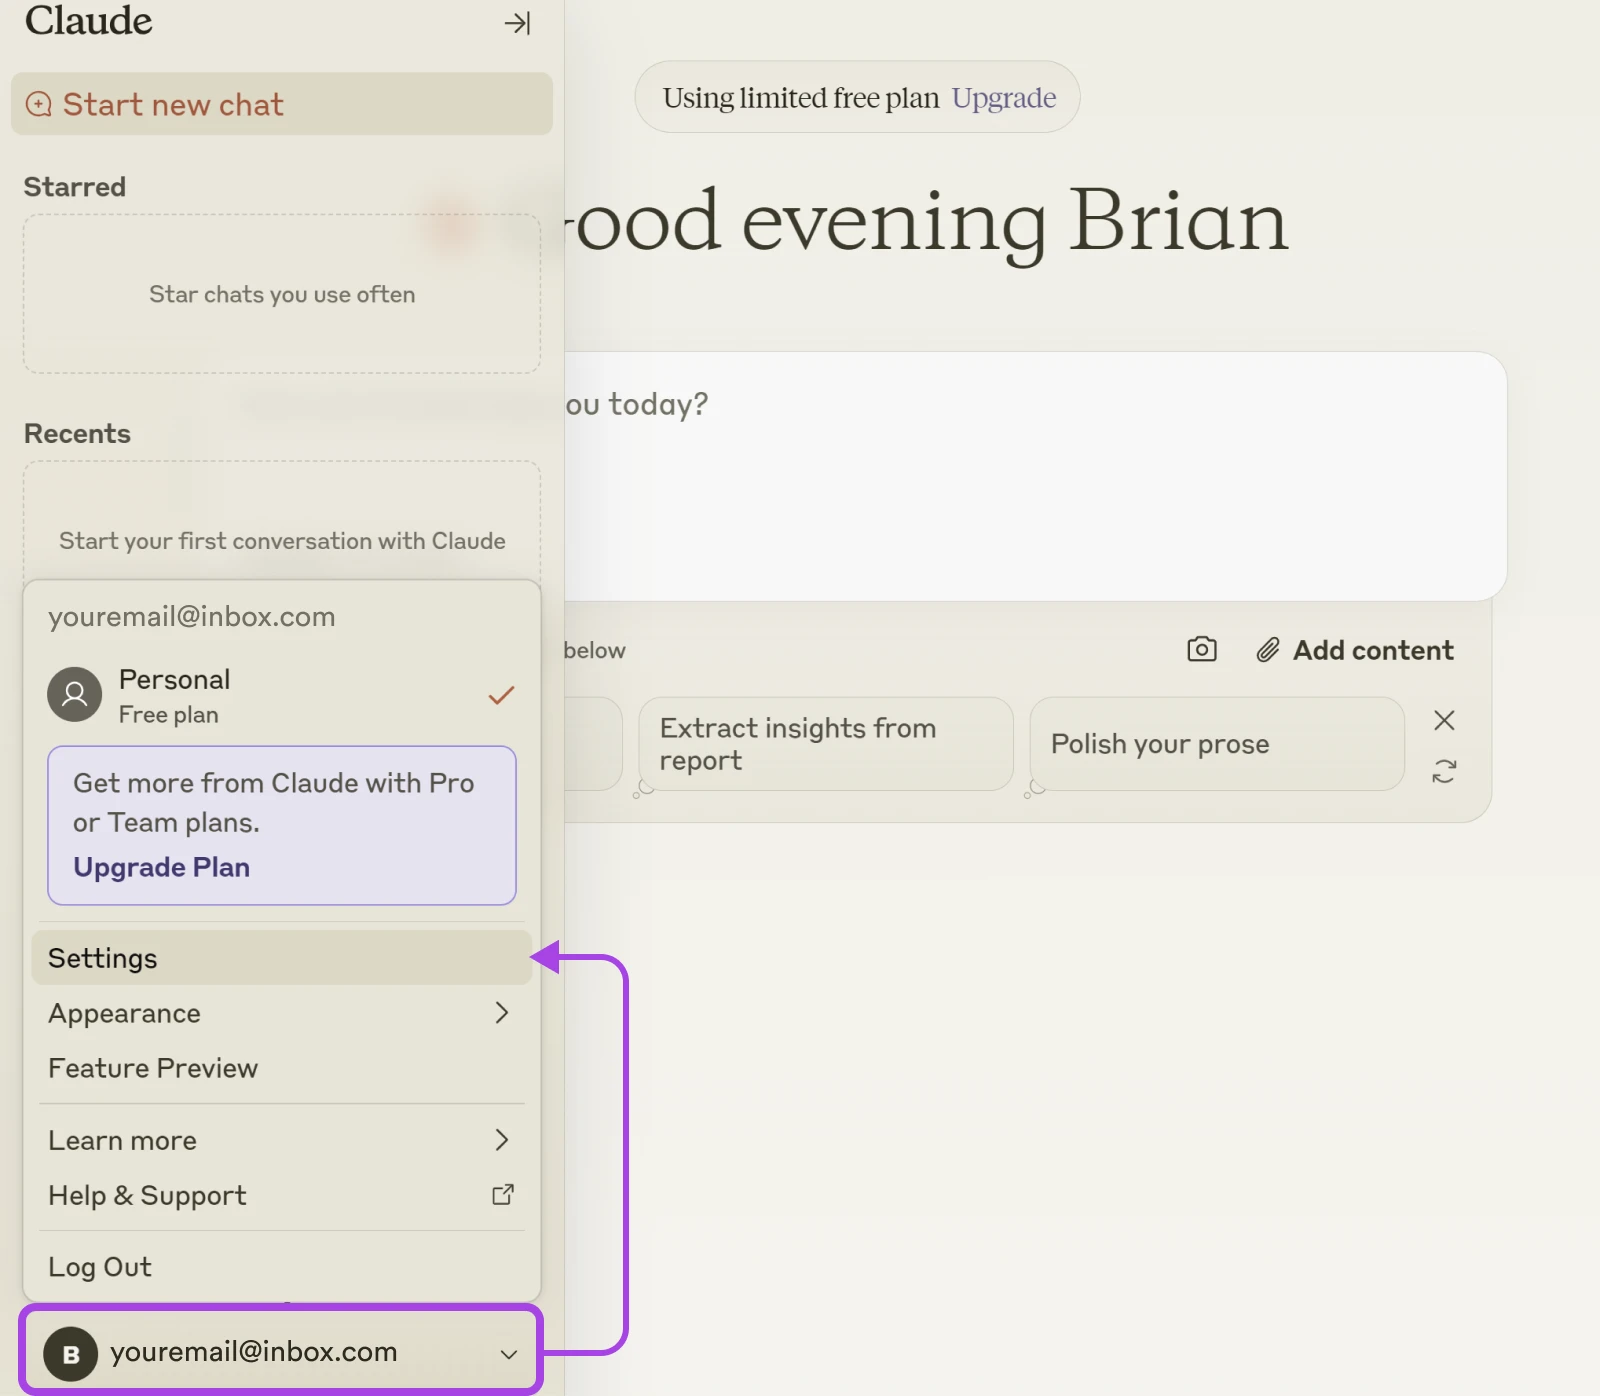
From the drop-down menu, you can upgrade to a paid tier, change the appearance of Claude, and access your account settings.
Open Settings. Under Profile, you will find a few useful options:
- What best describes your work? Tell Claude what sector your business is in, and the app will adjust to match your needs.
- Show prompt suggestions: Claude can provide one-tap prompts related to your business. Here, you can choose whether to have them switched on or off.
- Enable artifacts: In some cases, Claude generates a Wiki-style page that contains the results from a conversation. You can share these pages publicly. If you don’t fancy doing that, you can switch it off here.
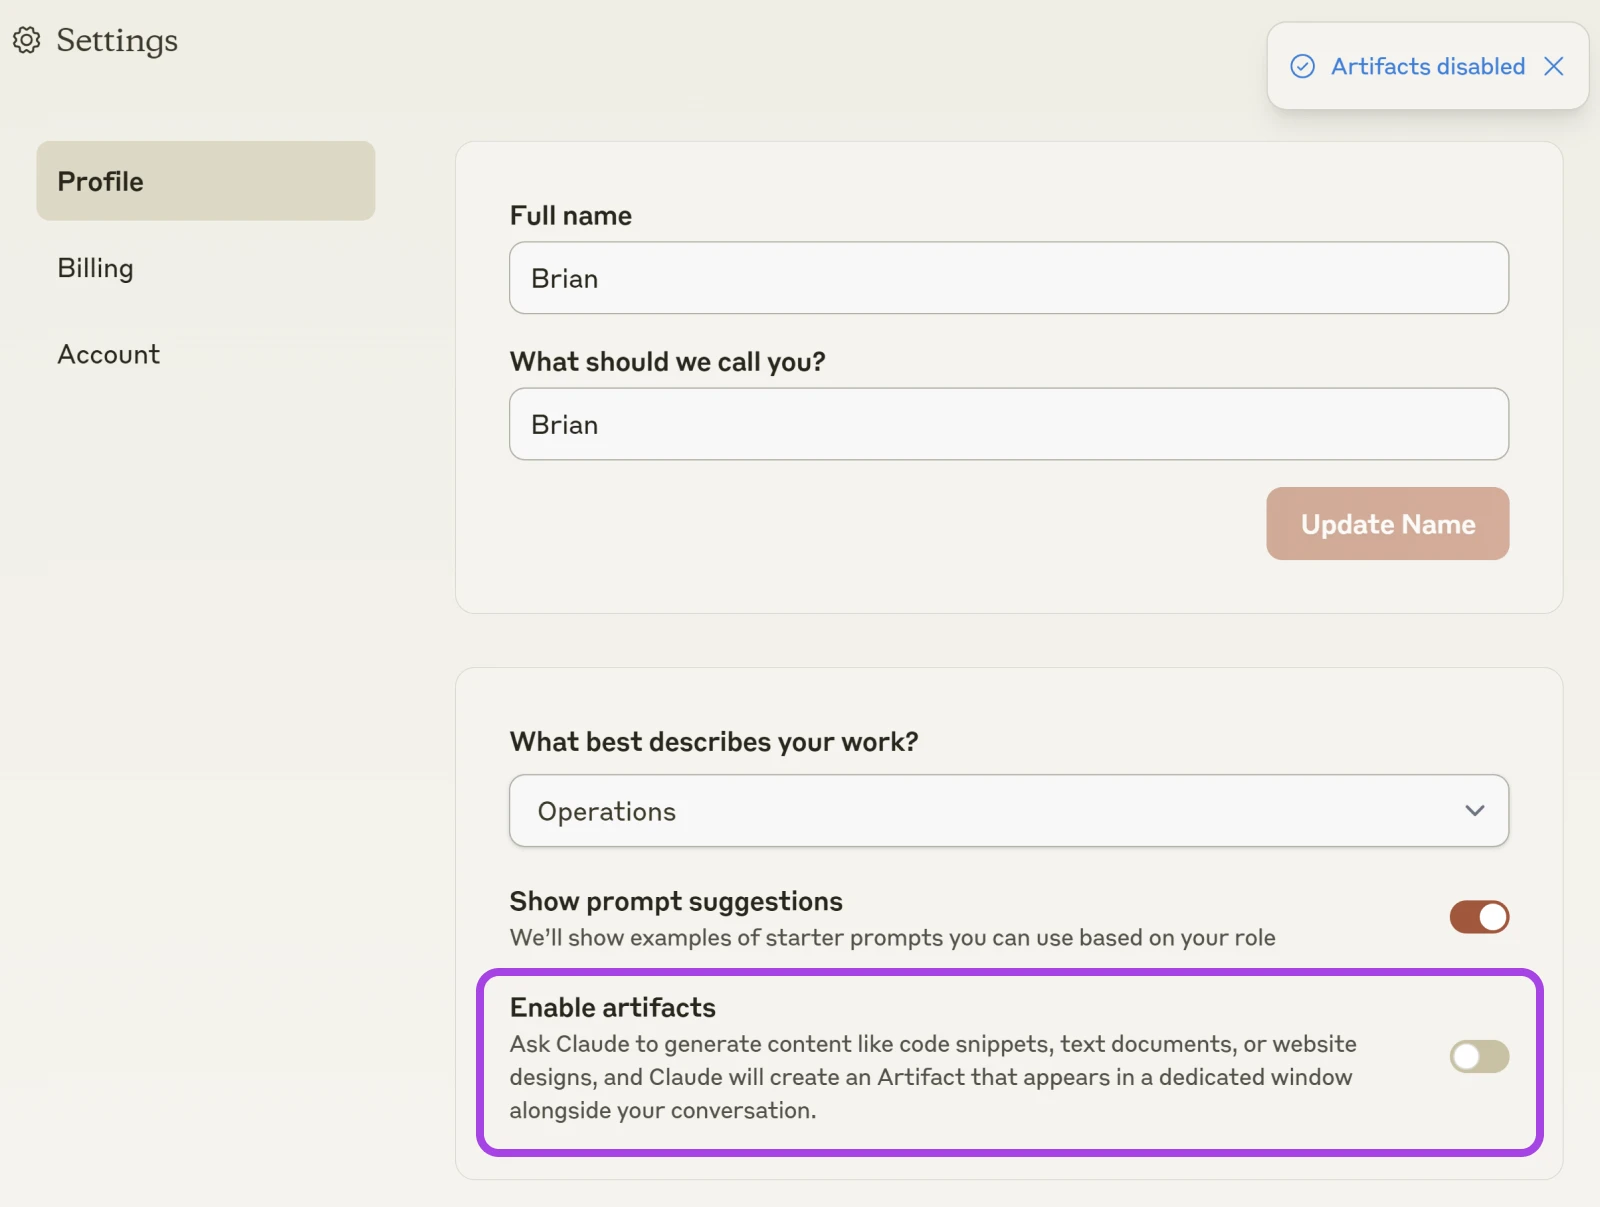
Step 3: Start Chatting
To return to the start screen, tap the big Claude logo in the top-left corner.
The big white box is where you can type instructions for Claude. You’ll also notice that there are a few suggestions below, along with buttons for attaching files and photos.
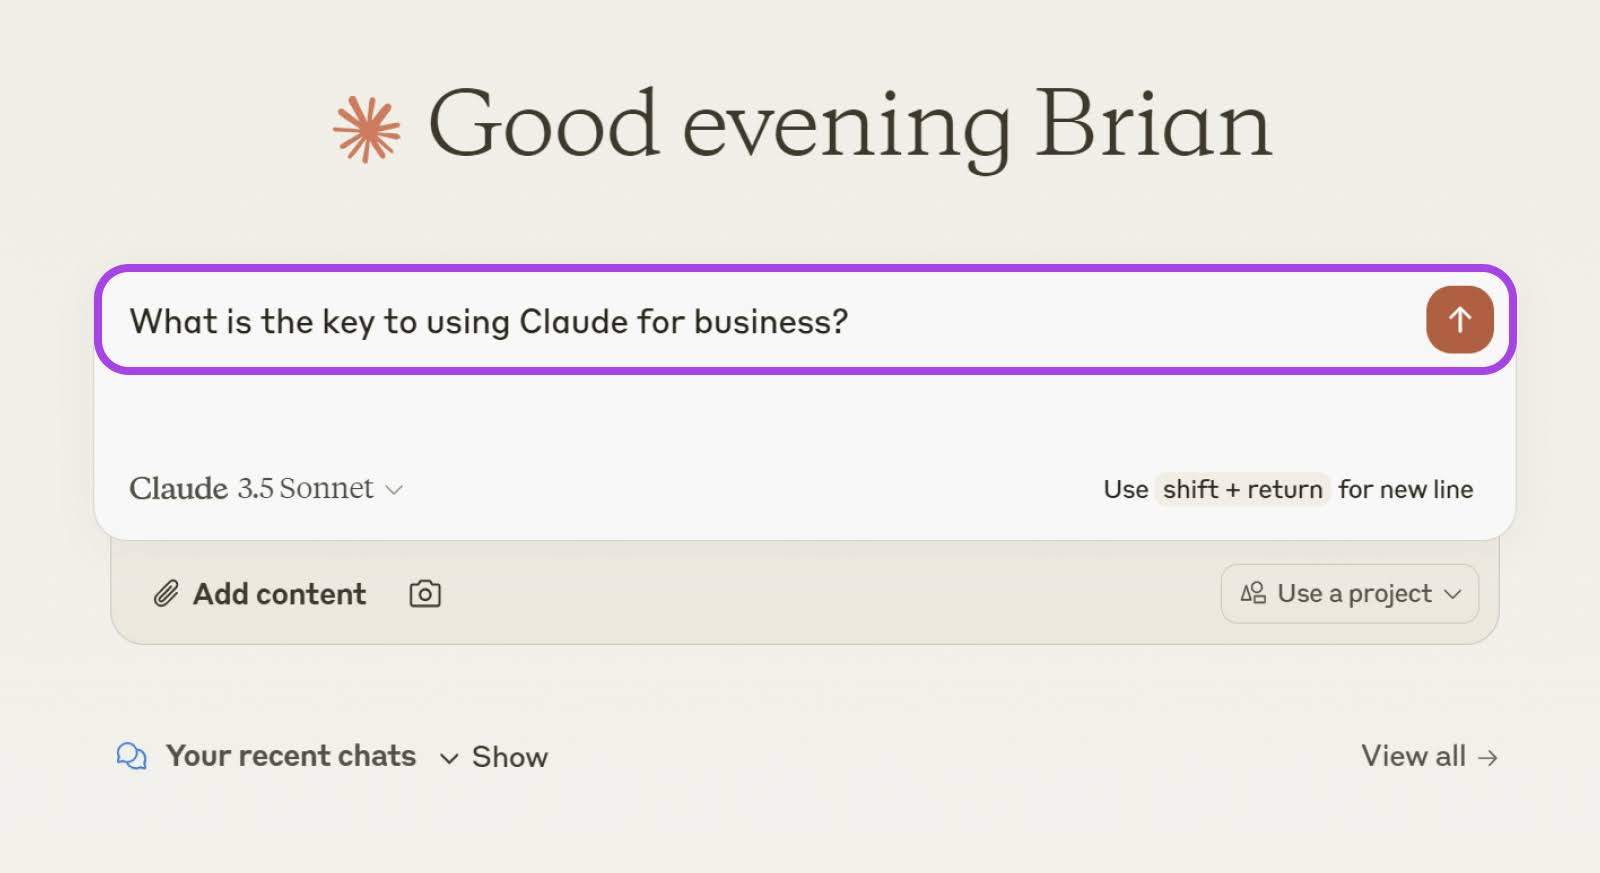
Once you’ve composed your first prompt, simply hit Enter and Claude will start cooking up a reply.
You then arrive at a chat-like interface, where you can carry on the conversation.
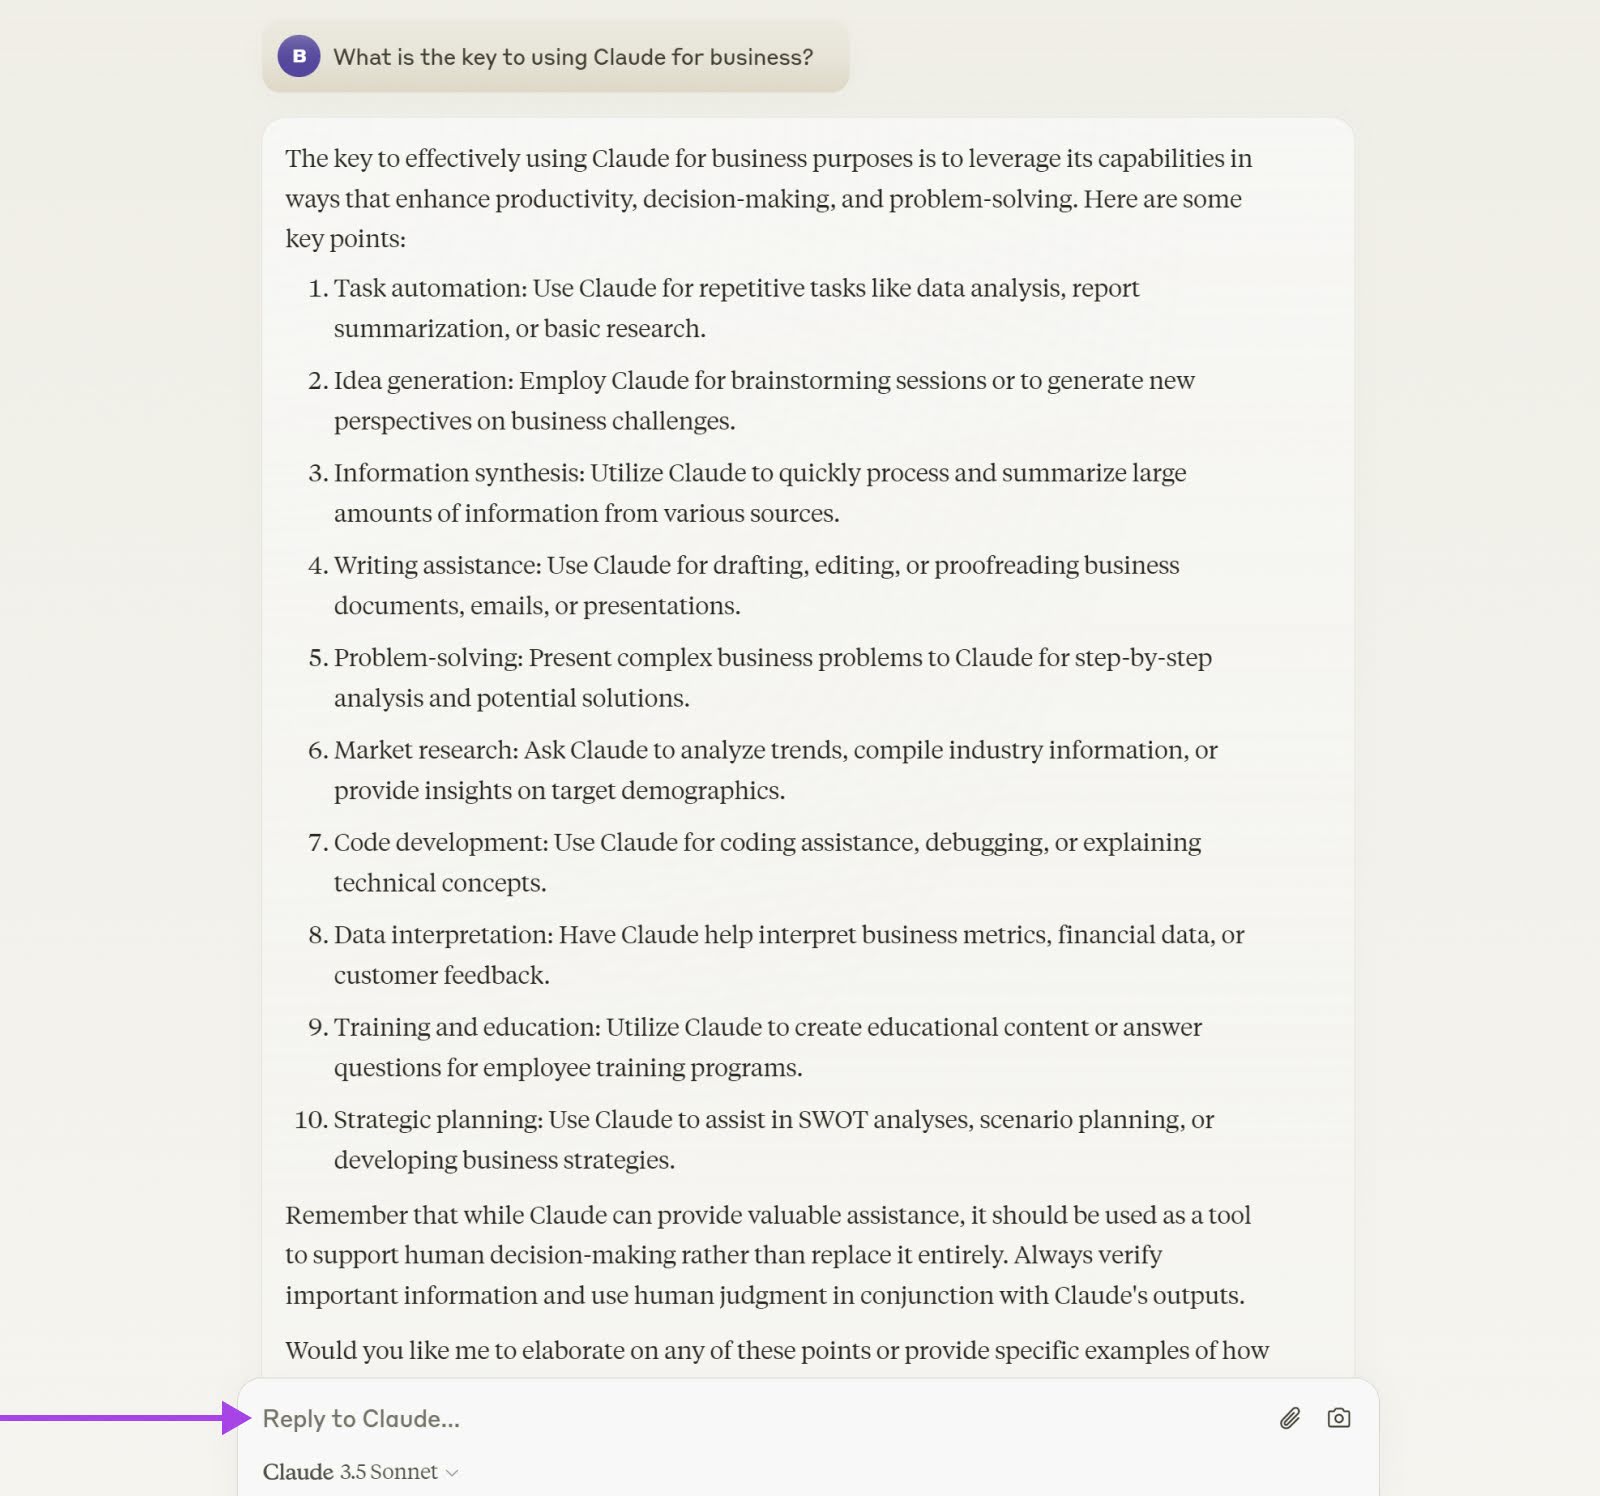
On the free tier, you’ll have access to Claude 3.5 Sonnet. However, if you’d like to access the other AI models, you can upgrade to a paid plan via the link at the top of the screen.
10 Ways To Power Your Business With Claude
You don’t have to use Claude for long to realize the potential of this platform. However, there’s a chance you won’t see how it fits into your workflow right away.
To speed things up, here are some tried-and-tested business use cases:
1. Write Email Drafts in Seconds
The average professional spends 42 minutes a week writing emails. And for business owners, this figure is way higher.
Rather than composing every reply from scratch, you can use Claude to whip up a first draft.
For instance, you could ask the AI to generate a response to common customer inquiries:
Generate a customer service response to the following inquiry:
Generate a customer service response to the following inquiry:
Customer Inquiry: [INSERT CUSTOMER INQUIRY HERE]
Use the following guidelines:
1. Start with a friendly greeting.
2. Express empathy or understanding of the customer’s situation.
3. Provide a clear and concise answer to their question or a solution to their problem.
4. Offer additional assistance if needed.
5. End with a polite closing.
Tone: Professional yet friendly
Maximum length: 150 words
Alternatively, paste in an email you’ve received, and ask Claude to write a professional reply, using a similar prompt format.
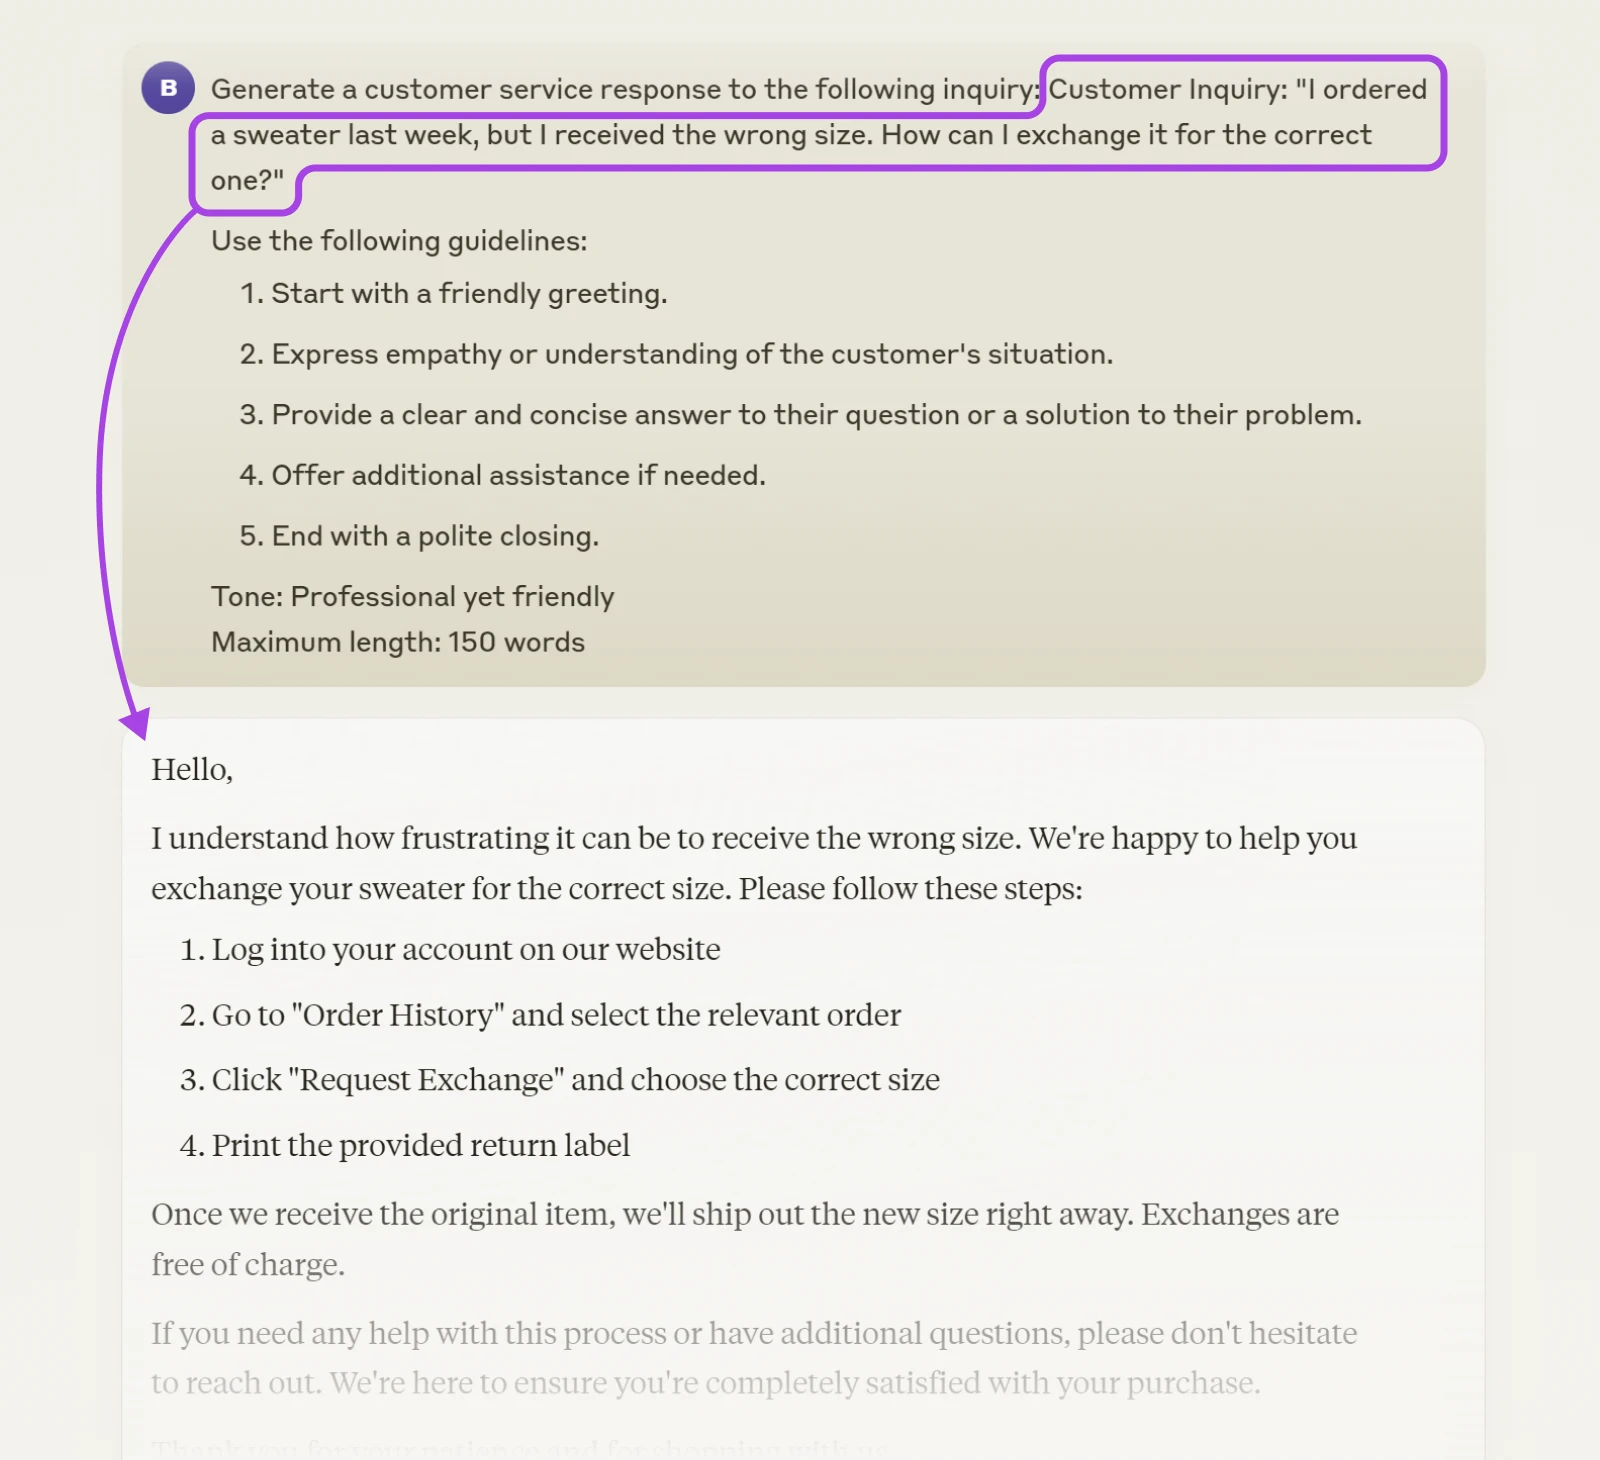
2. Get Help With Social Media Marketing
Maintaining a strong social media presence can be great for business. The tricky part is keeping your followers engaged — and being consistent week after week.
Plus, creating posts can be a time-consuming process.
Claude can help here. We can ask our trusted AI assistant to generate text posts and captions, based on a specific style, like this:
Generate a social media post for [PLATFORM] about [TOPIC].
Style Guide:
-Tone: [DESCRIBE TONE, e.g., casual, professional, humorous]
-Voice: [DESCRIBE VOICE, e.g., friendly, authoritative, quirky]
-Key elements to include: [LIST ELEMENTS, e.g., hashtags, emojis, call to action]
Brand guidelines:
-Always mention: [BRAND NAME] in the post
-Use our slogan: “[INSERT SLOGAN]”
-Avoid mentioning: [LIST ANY TOPICS TO AVOID]
Target audience: [DESCRIBE TARGET AUDIENCE]
Post purpose: [SPECIFY PURPOSE, e.g., increase engagement, promote product, share information]
3. Write Perfect Product Descriptions
In e-commerce, every product description should be a sales pitch. But for store owners with hundreds of items to list, descriptions don’t always get the TLC they deserve.
Luckily, Claude is pretty good at writing about products. All you need is the basic specifications of the product, and a prompt like this:
Product Name: [INSERT PRODUCT NAME]
Category: [INSERT PRODUCT CATEGORY]
Key Features:
1. [FEATURE 1]
2. [FEATURE 2]
[ADD MORE AS NEEDED]
Target Audience: [DESCRIBE TARGET CUSTOMER]
Unique Selling Points:
1. [USP 1]
2. [USP 2]
[ADD MORE AS NEEDED]
Tone: [SPECIFY DESIRED TONE, e.g., professional, friendly, luxurious]
Et voilà! You now have an awesome introduction to your product, ready to copy and paste.
4. Dive Deeper With Your Market Research
Ugh, market research. It’s really important, but let’s face it — the process can be a grind. Digging through long documents and endless figures takes time and energy you probably don’t have.
So, why not speed things up with Claude? The platform is great at sifting through information for the key takeaways and summaries,
Simply paste in the content you’re trying to analyze (PDFs and spreadsheets work just fine), and use a prompt like this:
Please pick out the key takeaways and trends from this document. Please focus on the [AREAS OF INTEREST].
5. Get a Summary of Every Meeting
Blah blah blah…no idea what your client said the last time you spoke? Fear not. As long as you have an audio recording or transcript, Claude will be able to create a quick refresher for you.
Start by uploading the audio or text file, and use a prompt like this:
Please summarize the conversation in this meeting in bullet-point form.
6. Work With Claude To Brainstorm Ideas
From creating a brand to naming your first product, running a business always involves a certain amount of creativity. If you find yourself getting stuck, let Claude take some of the strain.
Say you’re trying to dream up a new marketing campaign. Start by giving Claude some key details about your ICPs:
- Age
- Location
- Annual income
- Interests
Then, describe your offer and ask Claude to come up with some marketing ideas:

Based on this information, provide five ideas for marketing campaigns we could run. Include a tagline and short description of each one.
7. Identify What Your Customers Are Thinking
Online reviews are a treasure trove of information for small businesses. Combing through them one by one, though? That’s hard work. Let’s shortcut the process with Claude.
The easiest way to do this is by exporting reviews and then uploading this data to Claude. You can use a prompt like this to find the recurring themes:
What are the most common positive and negative comments made by customers in these product reviews?
If you’re more technically inclined, it’s also possible to automate this process by building a Claude-based app on Amazon Bedrock.
8. Create Perfect Job Listings
Seeing growth? You might need more staff. To make sure you get the perfect person for each role, you can use AI to generate the ideal job description.
Imagine you’re hiring a new baker. First, ask Claude to help you build the job description:
I need to build a job description. Can you help me?
Then, provide some information about your bakery and the role:
My bakery is called ‘Sweet Delights’ and we specialize in artisanal pastries and cakes. We’re looking for an experienced pastry chef to join our team of five. The ideal candidate should be creative, detail-oriented, and able to work in a fast-paced environment.
Claude might then ask about specific responsibilities or requirements. You can provide these details:
The Pastry Chef will be responsible for creating new recipes, preparing a variety of pastries and desserts, managing inventory, and training junior bakers. They should have at least three years of experience, and knowledge of both traditional and modern baking techniques.
In return, you should get a full job ad — ready to go!
9. Make Your Writing Error-Free
Did you know that Claude is a great proofreader? Check your writing for errors by pasting in the text.
Say you’ve written a blog post and want to make sure you haven’t made any major slip-ups. Enter this prompt:
Please check the following text for any factual, logical, or grammatical errors.
Enter your post, and set Claude on the job!
10. Craft the Perfect Presentation Script
Writing an outline for any presentation or webinar is usually a time-consuming process. But there’s a smart way to go about this. You guessed it! We can use Claude to automate most of the process.
Begin by asking for assistance:
I need help creating an outline for a 15-minute presentation on ‘The Future of Remote Work’ for a small business networking event. Can you help me?
Claude will likely ask for more details. Feed in more information about your goals and audience:
The audience will be small business owners from various industries. I want to cover current trends; benefits and challenges of remote work; and how businesses can adapt. My goal is to provide practical insights that they can apply to their own companies.
You should get a detailed outline. If you need revisions, just ask Claude!
Expert Tips for Squeezing More out of Claude AI
You’re starting to see how Claude does things now. It’s pretty good at interpreting what you need, right?
That said, there are a few techniques you can apply to make the outputs even better.
Customize Claude To Match Your Needs
Claude has a great memory. Use this to your advantage whenever you start a new chat.
Before you get to work, specify some ground rules. For example, you could tell Claude:
- You’re knowledgeable in your industry, so any advice should be at an expert level.
- You want every answer delivered in bullet points.
- The AI should avoid using jargon.
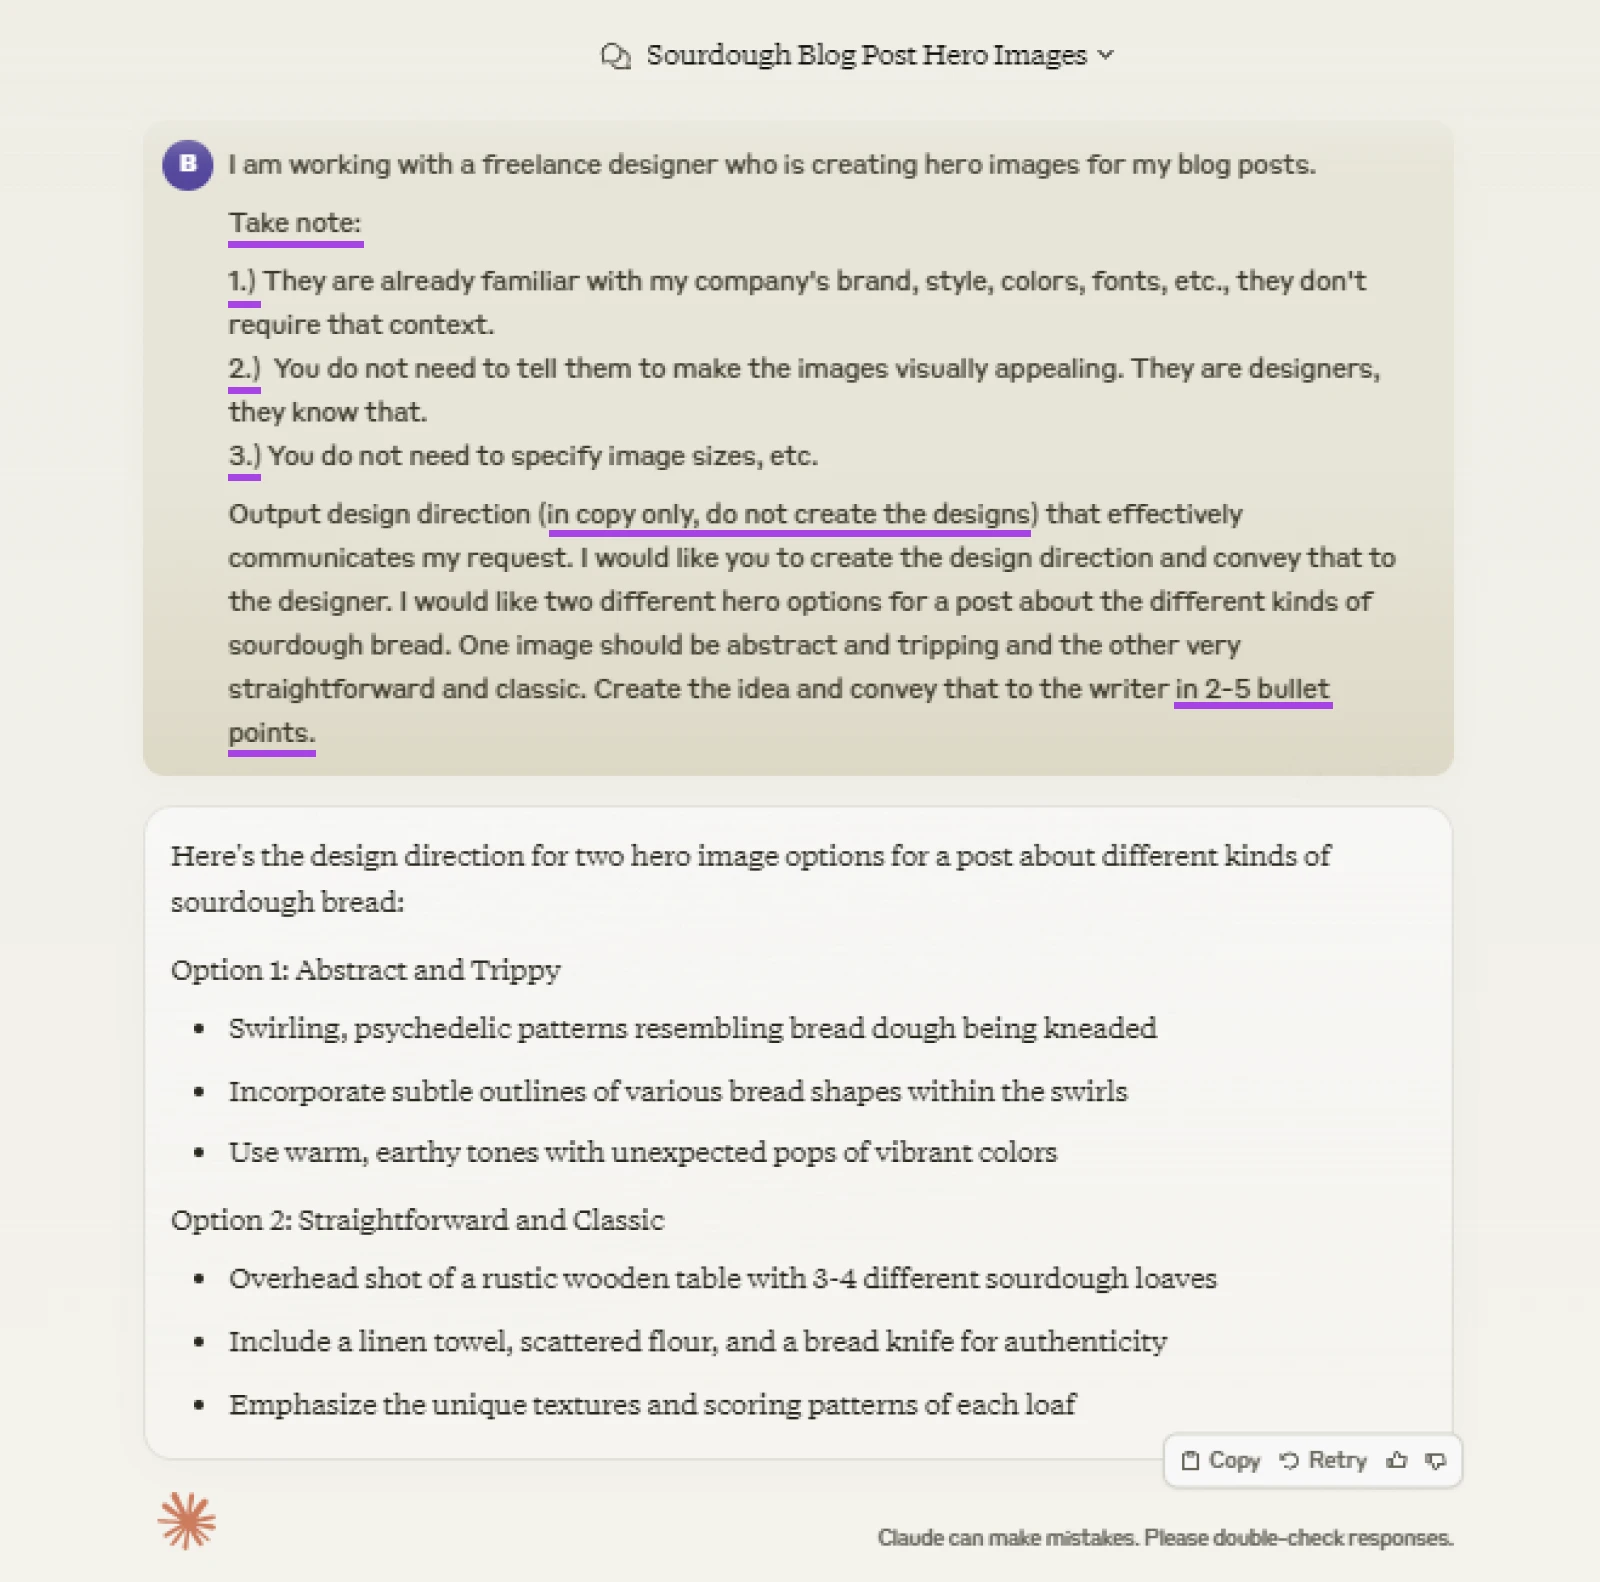
For the rest of the conversation, Claude should remember this. If you want to be doubly sure, you can make similar requests for each prompt.
Use Highly-Specific Prompts
The key to better responses? Precision in prompting.
The more details you provide, the better Claude can tailor its responses. So, instead of asking, “How do I write a blog post?” — try “How do I write a 1,000-word blog post about sustainable gardening for beginners?”
You’d never believe the difference in quality. Like night and day!
Ask for Revisions
The current AI models rarely achieve perfection on the first try. Not to worry. Feel free to ask for a revision.
You might say, “Expand on the third point.”
Or: “Can you make this explanation simpler?”
Claude is always ready to refine its work based on your feedback. It’s like having an apprentice who is eager to impress.
Integrate Claude With Your Favorite Apps
Want to take your productivity to the next level? Try integrating Claude with your go-to apps.
You can do this using Zapier or Make. Both platforms allow you to send data to Claude, and retrieve the responses.
What does this mean? For example, you could analyze responses to Google Forms submissions and send a summary to Google Sheets. Or use Claude to run a SWOT analysis and save the results to Notion.
Use Template Prompts
If you want to maximize your time savings, make templates for your regular tasks.
For example, if you often need to write product descriptions, you could save a prompt like this:
Write a 50-word product description for [PRODUCT NAME]. Include key features, benefits, and a call to action.
Just fill in the blanks and you’re good to go. Get ready for instant, consistent results!
Always Check the Outputs
Like all AI tools, Claude makes mistakes too.
When using this platform for something really important, like a data-driven case study, for example, make sure you review the outputs thoroughly before publishing. Similarly, don’t rely on Claude as your only source of information. Like all AI tools so far, it’s been known to make things up.
In other words, treat it like a really smart human rather than an all-knowing robot genius.
Learn More About AI
Want to learn more about artificial intelligence? Here are some of our best guides:
- How To Use AI as a Small Business Owner (12 Pro Tips)
- Get the Most out of AI With These 12 Prompting Tips
- 39 AI Tools That Will Transform Your Workflow
- What Is DALL-E? How To Use This AI Image Generation Tool
- How To Use Midjourney: Creating AI Images For Your Website
Power Your Business With AI
There’s no doubt that artificial intelligence is going to change how we do business. In fact, it already is! So, instead of wasting valuable time on simple tasks, you can whizz through your busywork at warp speed and get on with the more important stuff — like strategy.
Claude is one such great tool for small businesses. Another is our AI Business Advisor.
Available to all DreamHost customers, this versatile app can help you navigate search engine optimization (SEO), create content, and even upgrade your website.
Speaking of upgrades — our hosting plans offer a 100% uptime guarantee, unlimited traffic, and access to our AI Website Builder tool.
Sign up today to get your small business dominating online!
Ready to Supercharge Your Business with AI?
Unlock the power of AI for your business with DreamHost’s AI Business Advisor. Included free with your hosting plan, this advanced tool provides personalized guidance on SEO, content creation, and website optimization. Start leveraging AI to drive growth and stay ahead of the competition today!
Get Started with AI Business AdvisorThe post How To Get the Most out of Claude AI appeared first on DreamHost Blog.
]]>